I’d like to start doing some dashcam reviews now. I’ve previously reviewed the Itronics ITB-100HD, the dashcam I’ve been using the past few years. The next one I’m taking a look at is the KDLINKS X1, a newer 1080p dashcam that offers some upgrades beyond what I’ve had up to this point including better video quality, as well as some new features I’m not totally sold on for a dashcam like an external GPS antenna and an LCD screen. I chose this one because it has a crazy ton of good reviews on Amazon. Let’s take a look at what the camera is like. You’ll can watch my complete video review above.
Permanent link to this article: https://www.vortexradar.com/2016/02/kdlinks-x1-dashcam-review/
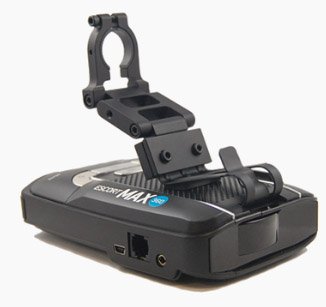
Radar Detector Hardwire Cable Options
If you’d like to hardwire your radar detector for a professional and clean looking install, you’ve got a number of radar detector hardwire cable options. These are special cables that replace your cig. lighter cable and instead use your fuse box or some other hidden power source for power, leading to a much better looking setup.
When it comes to selecting a hardwire cable, you’ve got everything from your standard basic cable that just provides power, cables that add remote mute buttons, or even cables that plug into unique locations like your rearview mirror. Let’s take a look at what your different options are.
Note: I have tutorials available to help you install these power cables. If you go for a traditional hardwire cable, read my Radar Detector Hardwire Tutorial. If you go for a rear view mirror based hardwire cable, watch my MirrorTap Tutorial.
Radar Detector Hardwire Cable Options
Standard Cable: Power Only, $10

This is the most simple radar detector hardwire cable you can get. One end wires into your car for power, the other end plugs into your radar detector. That’s it.
This type of cable is your traditional and most popular option. It’s inexpensive, simple, and does the job with no fuss.
Compatible with: Escort, Valentine, Uniden, Radenso
Purchase the Standard Directwire Cable for $10.
Escort Directwire Smartcord: Add a Mute Button & LED’s, $35
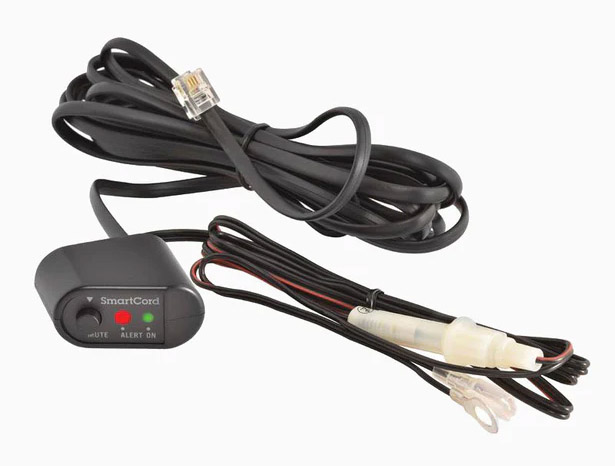
This is the same idea as before except now also get an additional remote mute button plus alert LED’s. If you like the idea of the standard radar detector hardwire cable, but you’d like to have a convenient mute button so you don’t have to reach up and hit the mute button on your detector every time, this is a helpful option. Just install the control module somewhere within arm’s reach.
The Smartcord also has a pair of LED’s, one for power and a second that blinks when you’re getting an alert. That way even if you can’t hear your detector, you can still see the LED and get notified when you’re getting an alert.
There’s two versions of this cable with different colored LEDs. The first has a red alert light and green power light. The second has a yellow alert light and a blue power light. Otherwise they’re the same. Choose the color combo that matches your car or what you feel looks better.
Note: Though the power connector may fit other brand detectors like Uniden, the mute button and alert functionality won’t work properly. There are similar options for other brands of detectors.
Compatible with: Escort, Beltronics
Purchase the Directwire Smartcord for $35
Uniden Smart Hardwire Cord: Add Mute button and LED, $30
If you run a Uniden brand radar detector and you’d like a hardwire cord with a remote mute button and external alert LED, there is now a Uniden-specific smart hardwire cord.
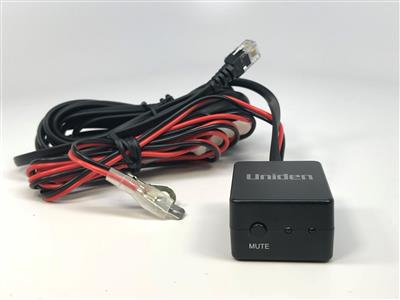
The mute button lets you remotely mute your detector or manually lock out false alerts. You can also use it to change the display brightness when no alert is present.
When you get an alert, the alert LED will light up and blink. The stronger the alert, the more rapid the LED will blink, just like the cig. lighter cord that the detector comes with.
Purchase the Uniden Smart Hardwire Cord for $30
Radenso Direct Wire Power Cord
Radenso’s detectors use a variety of different power cable connectors so depending on the model you run, you’ll need a different hardwire cable.
Radenso XP, power only cable ($20)
Radenso Pro M, power only cable ($20)
Radenso DS1, power & remote mute button ($35)
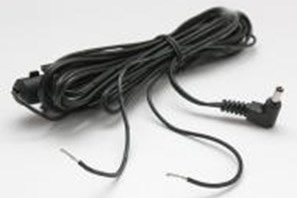
Valentine 1 Direct Wire Adapter, $19
If you use a Valentine 1, it actually comes with a directwire adapter as part of the package.
This adapter has two ports, one for the V1 and another for an accessory like a concealed display.
The power cable is actually compatible with other brands of detectors too from Escort, Uniden, and Radenso and so this is what I use in my personal vehicle.
If you don’t have your direct wire adapter already or you lost your original one, you can buy a new one here for $19.
Savvy: Power for Valentine 1 from OBD-II Port, $69
Another option you have to power your V1 is Savvy. Rather than wiring into your fuse box somewhere, you can plug your V1 into your vehicle’s OBD-II port. It makes for an even easier installation, plus Savvy will be able to read your vehicle’s speed and mute your V1 when you’re traveling below a pre-set speed, effectively giving you low speed muting without requiring GPS.
You can now get this similar functionality using your phone’s GPS and running and app, but this is an alternative that doesn’t require a phone or an app.
One advantage it has is it doesn’t rely on GPS so it works even in parking decks and in tunnels, plus it works even if you don’t want to fire up your cell phone app.
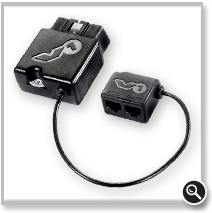
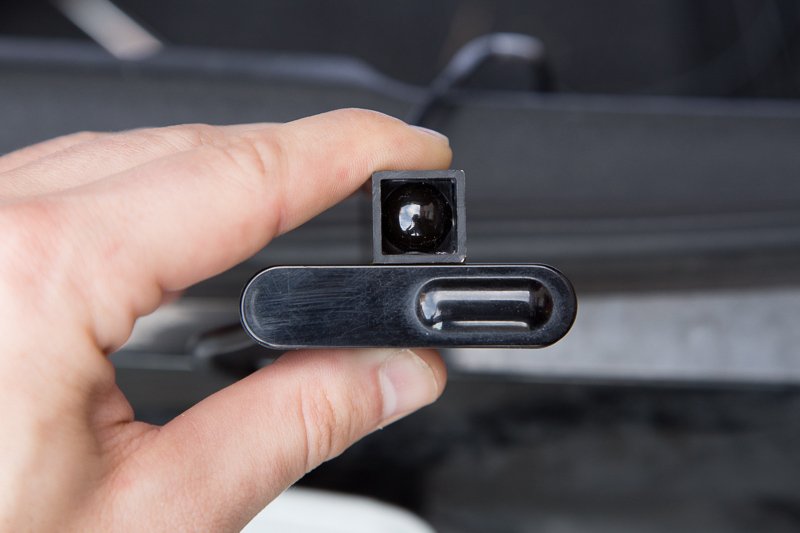
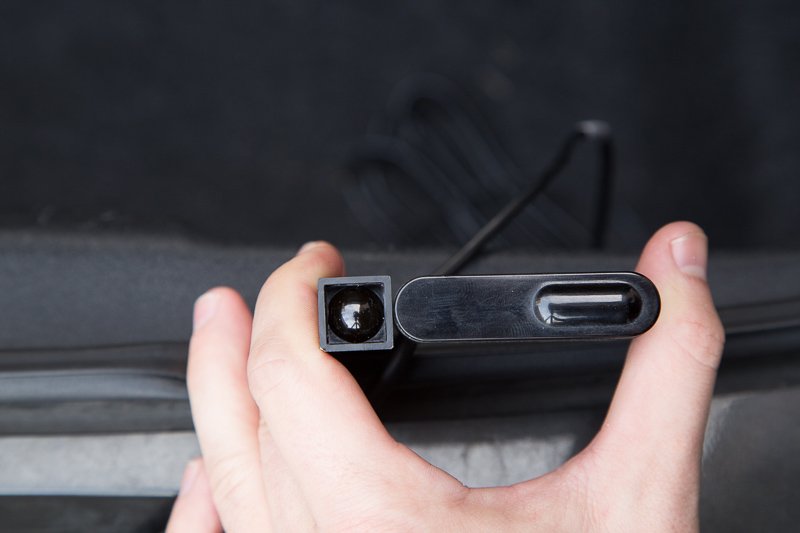
MirrorTap: Power from Rear View Mirror, $30
If you’re hanging your radar detector next to your rearview mirror or underneath it with something like a Blendmount and you have a powered rearview mirror (autodimming, compass, garage door opener, etc.), one really convenient idea is to get a MirrorTap. It’s a short power cable designed to plug directly into your powered rearview mirror and then power your radar detector that way. No running cables through your car or messing around with the fuse box required.
Compatible with: Escort, Valentine, Uniden, Radenso
Click here to buy a MirrorTap for $30.
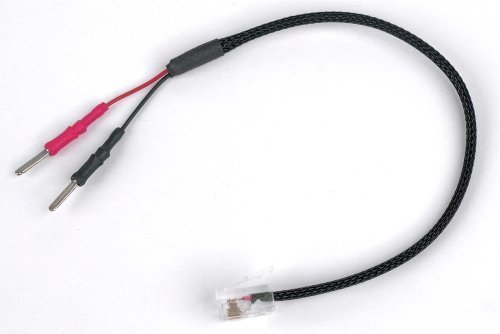
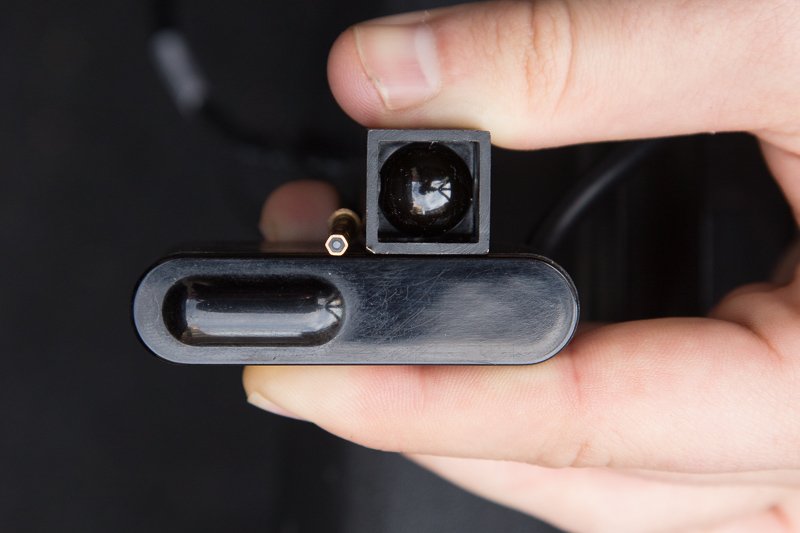
MirrorTap MTX: Upgraded Power Cable Tapping into RVM, $47
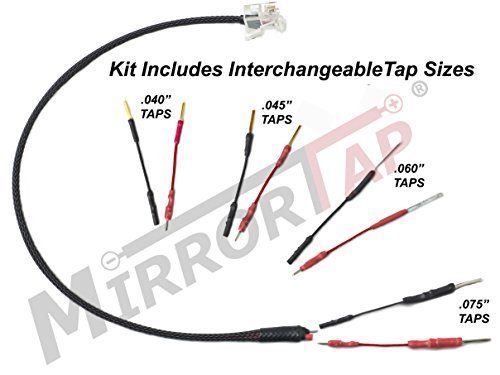
There’s an upgraded version of the MirrorTap that I really like called the MirrorTap MTX. It’s essentially a traditional MirrorTap with different sized swappable tips so that you can more easily find the one that best fits your RVM. It’s hard to know which size connector you need when initially buying and if you purchase the wrong size, it either won’t fit (too big) or will fall out (too small) and so you’ll have to exchange the cable altogether and try again. Having a few different sized tips available makes it so you know you’ll have the right size you need.
I’ve also found it beneficial because it’s easy to bend or break the connectors during installation, especially the smaller and thinner ones, and in case it happens (it happened to me! whoops..), you can fall back to using a different sized connector as a backup.
Additionally, when you’re probing around behind your rear view mirror with your multimeter to find where to plug in your MirrorTap, chances are your multimeter’s probes will be too big and fat to fit into the teeny connectors behind your RVM. You can use the removable tips from the MirrorTap to probe into the RVM’s power connector and then connect your multimeter to the other side of these tips (though you could do the same thing with some extra wire lying around the house) and so for the installation process, I find this power cable to be very helpful. It’s more expensive for the upgraded MTX version of the MirrorTap, but I think it provides an excellent upgrade in convenience.
Compatible with: Escort, Valentine, Uniden, Radenso
Permanent link to this article: https://www.vortexradar.com/2016/02/radar-detector-hardwire-cable-options/
Top 10 Questions about Radar Detectors
Radar detectors are very useful tools to help drivers avoid speeding tickets. To help explain how they work and clear up some of the most common sources of confusion, let’s go over the top 10 most frequently asked questions people have about radar detectors.
Top 10 Questions about Radar Detectors
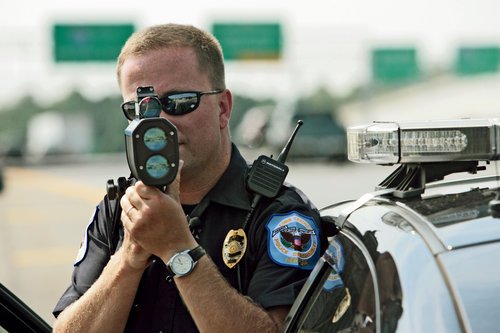
1) Do radar detectors really work?
Yes. They’re designed to detect a police officer using a radar gun at a distance to clock cars way up ahead of you, before he is clocking your speed. Your objective is to slow down to the speed limit before he can clock you. The more sensitive detector and the more effective it is at filtering out false alerts, the better.
2) I passed a cop but my radar detector didn’t go off. What happened?
Radar detectors are not police car detectors. They’re radar detectors. If a police officer doesn’t have a radar gun in his car or if he has his radar gun turned off, your detector will not alert.
Sometimes they even do this on purpose where they keep their radar guns turned off, waiting for a speeder. Only when they see someone they want to clock do they turn on their radar gun. This is called “Instant on” (I/O) as opposed to “Constant on” (C/O). It’s one reason that you want a sensitive detector. This way you can pick up officers as he’s clocking cars way up ahead of you. Sometimes the only advanced warning you get may be a shot of instant on a mile or two up the road.
(It’s actually very common for your radar detector to not alert when a cop is present. This is one of the most common misunderstandings and it leads many people to think their radar detector is broken, incorrectly programmed, or needs to be returned.)
3) Why is my radar detector alerting even when there’s no cops around?
There are many sources of radar that can trigger your radar detector. Police radar guns are just one of the sources. Some other examples of “false alerts” would include automatic door openers in front of grocery stores and drug stores that use radar to sense when someone is approaching, speed signs on the side of the road, and even newer vehicles that use radar-based blind spot monitoring systems and collision avoidance systems.
Newer and better designed radar detectors offer a variety of different filters to help you filter out many of these sources of false alerts while still alerting you to police radar so that you actually pay attention when it goes alerts. The older and lower end detectors are a lot like the boy who cried wolf.
4) Will a radar detector help against police using laser?
No. Unlike with radar, you won’t get any advanced warning against police using laser guns. If your radar detector does go off when you are targeted (and many times it won’t because the laser beam is so small), your radar detector is little more than a ticket notifier. By the time it goes off, the officer already has your speed.
Against laser you need a laser jammer. Laser is in use all over the country now so a good laser jammer will pair nicely with a radar detector. I recommend the AntiLaser Priority.
5) Will a radar detector always help me avoid speeding tickets?
Definitely not. Countermeasures are designed to help lean the odds in your favor, not make you invincible. Even with the best equipment on the market, you can still get tickets. For example, an officer driving behind you can drive the same speed as you and then look at his speedometer to measure your speed and give you a ticket from that, so you’ll want to stay alert to your surroundings either way. Radar and laser are the two most common ways that police try to catch speeders so those are two of the most useful tools you can have. There are also helpful cell phone apps you can use to add another layer of protection. One app I recommend, Waze, allows you to where other drivers have marked where they’ve recently spotted police. A good countermeasure kit includes a quality radar detector, laser jammer, and waze. It’s all about layers of protection and helping to swing the odds in your favor.
6) Are radar detectors legal?
It depends on where you drive and what you drive. In the U.S., they’re legal everywhere except Virginia and Washington D.C., or on military bases. This applies only to passenger vehicles. They are also illegal all over the country in commercial vehicles over 10,000 lbs and all vehicles over 18,000 lbs. Otherwise yes, radar detectors are legal.
Some radar detectors like the Redline EX, Uniden R3, and Stinger VIP are especially popular in those areas because they are immune from detection by radar detector detectors.
Laser jammers are illegal in the US in 10 states including California, Colorado, Illinois, Minnesota, Oklahoma, South Carolina, Tennessee, Texas, Utah, and Virginia, as well as Washington D.C. The penalty for having jammers is very minor (basically a fix-it ticket) and when jammers are used properly, the officer won’t even realize you have them in the first place.
Radar jammers, however, are highly highly illegal, as in huge financial penalties and prison time so no one bothers to make or sell them here.
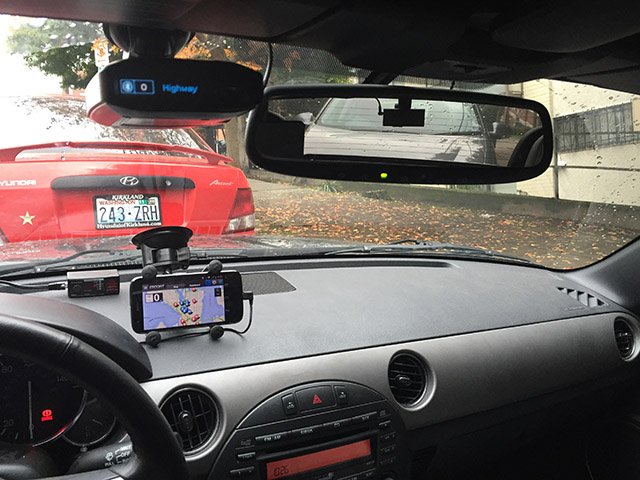
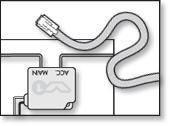
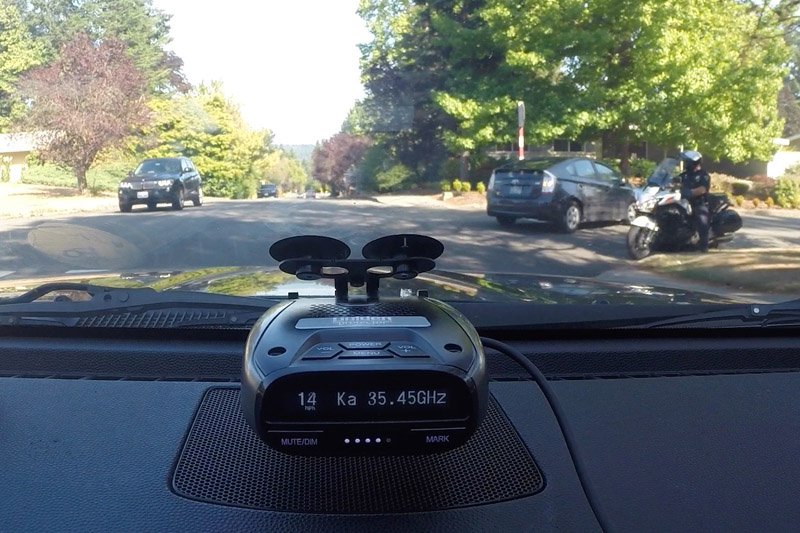
7) Where’s the best place to mount my radar detector?
Generally the best spot is up high on your windshield, just to the left of your rearview mirror, hidden behind a tint strip as you can see in the photo above. It’s out of sight of other drivers and thieves, you can free up your cig. lighter and have a cleaner install by hardwiring your detector, and you’ll get maximum radar detection performance mounting it up high. You’ll give up some laser sensitivity since you’re moving your detector farther away from the primary laser targets (headlights, front plate area, and grill), but laser detection doesn’t matter too much so it’s a worthy tradeoff.
The most convenient place to mount is down low on the windshield, but you’re giving up the benefits I just mentioned.
Some people like to hang their radar detector underneath their rearview mirror using a custom mount. I find this location means it gets in the way of my view a bit in smaller cars and the detector is still pretty visible to others outside the car, but it can be a good alternative if you’re finding the suction cups aren’t holding well or you live in an area where mounting things to your windshield is illegal (more than half the states!). The Blendmount is a popular option for people looking to go this route.
8) How do I configure my radar detector?
There’s two things you need to know about. First you need to know how to configure the settings of radar detector you purchased. I have free tutorials available for many different popular radar detectors. Click here to see my radar detector setup tutorials.
Some of the settings you need may vary depend on where you live, where you drive, and what you see around you. Check out this tutorial to learn how to program your detector for your area.
9) What’s the difference between cheap detectors and high end detectors?
While some detectors offer additional bells and whistles like arrows, redlight camera alerts, or bluetooth integration with your phone, if you want to know what the difference is between cheap detectors and high end detectors, ultimately it boils down to two main things: Range and filtering.
Range is one of the most important aspects of a radar detector. It’s what lets you pick up the police using radar guns way up in the distance. The more sensitive your detector, the better your odds at picking up radar in the distance before it’s too late. In the wide open desert you can easily get miles of range. In curvy mountainous terrain with radar absorbing trees you may be lucky to get a few thousand feet. In either situation, picking up radar at a distance can mean the difference between a ticket or not and the higher end detectors generally do a much better job than the lower end detectors, particularly in the tougher scenarios.
The other thing is filtering. There are many sources of false alerts as was mentioned earlier and if the radar detector is constantly bombarding you with false alerts, you’ll learn to ignore it and so you won’t pay attention when the threat is actually real. Higher end radar detectors offer more effective false alert filters to help you minimize the false alerts.
So while any radar detector can go beep when the police are using radar nearby, the higher end detectors can go beep in a way that best helps you avoid speeding tickets.
10) What’s the best radar detector?
Just like with cars, it’s not always which one is best for all people, but which one best suits your preferences and needs. To see my recommendations among the very best detectors and which one would best suit you, check out my radar detector buyer’s guide.
Permanent link to this article: https://www.vortexradar.com/2016/02/top-10-questions-about-radar-detectors/
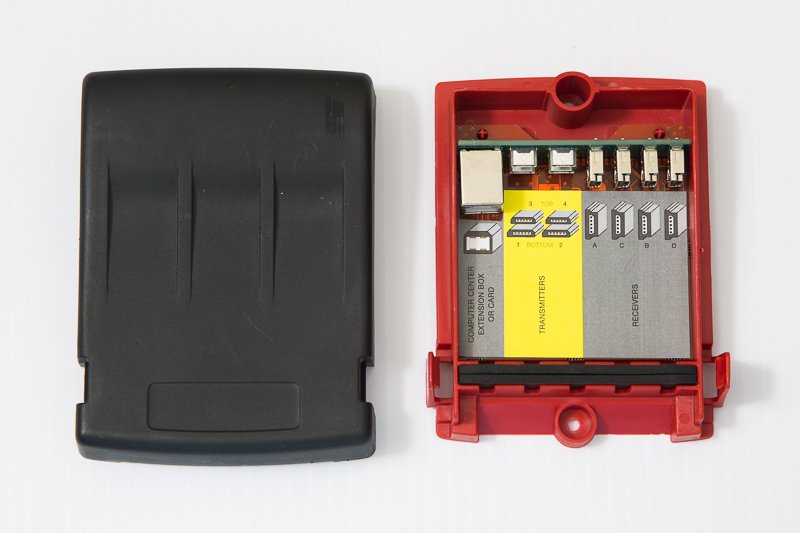
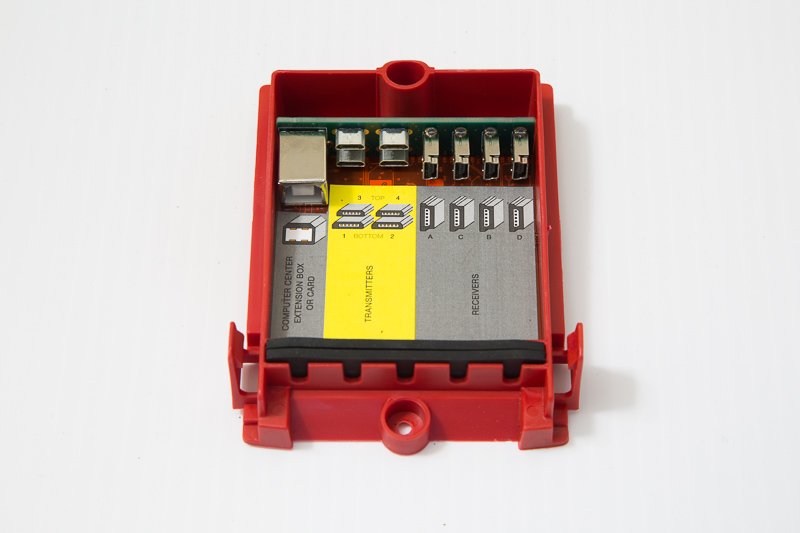
How the Stinger VIP Components All Wire Together
Here’s a look at how all the components of the Stinger VIP radar detector and laser jammer system wire together.
You can see the schematic for how everything is laid out here:

For more detailed information, I recommend checking out the Stinger VIP Installation Manual. You can also check out the full user manual as well.
To purchase your Stinger VIP, click here to learn how to save 10% on your purchase.
Permanent link to this article: https://www.vortexradar.com/2016/02/how-the-stinger-vip-components-all-wire-together/
The Ultimate Speeding Ticket Countermeasure System: The Best Radar Detector and Laser Jammer
Are you looking for the very best speeding ticket protection available today?
Update July 2018: This article is now out of date and the Stinger is no longer the best choice. See my updated guide to the Best Radar Detectors.
There’s a lot of great choices out there for radar detectors and laser jammers, each with their own pros and cons, but let’s cut to the chase. If you’re looking for the very best setup available, here’s what you’ll need for the ultimate speeding ticket countermeasure system.
The Best Radar Detector
Stinger VIP, 2 antennas
This is the ultimate radar detector. It gives you the longest range out of any radar detector, providing you maximum warning time in even the toughest scenarios (it blew away every other detector in my testing) while also providing the most advanced filtering capabilities to help minimize those annoying false alerts, including cars which have those blind spot monitoring systems which are one of the hardest sources of false alerts for detectors to filter out. The Stinger VIP has the most sophisticated hardware and signal analysis capabilities that allows it to recognize and filter out false alert signals that other detectors simply can’t.
The standard setup comes with a single front facing antenna like most detectors. You can add the optional rear antenna to get directional information to help locate the threat which is very useful in practice.
You can purchase the Stinger VIP from StingerRadarUSA.com.
Use the coupon “VortexRadar” to save 10% on your purchase.
Update: I no longer consider the Stinger VIP to be the best radar detector due to lack of updates and new radar detectors that have since come out. For more information, see my updated radar detector buyer’s guide.
The Best Laser Jammer
AntiLaser Priority, 5 heads

This is the very best performing laser jamming system on the market, able to jam even the newest anti-jamming laser guns that are now on the market.
This is the laser jammer that nearly everyone who knows about laser jammers buys. It’s far superior to most everything else out there. Go for the 5-head setup for maximum protection against all guns for both the front and rear of your vehicle.
I’ll give an honorable mention to the Stinger VIP’s laser jammers because the heads are even tinier which means installation is easier and your install is more stealthy and less visible, plus it integrates perfectly with your Stinger VIP radar detector, but the ALP is currently more effective at jamming lidar.
You can purchase the AntiLaser Priority from ALPriorityUSA.com.
Then to get your jammers properly set up and configured, see my comprehensive ALP setup guide.
The Best Phone App
Waze, iOS, Android, & Windows Phone

Waze is a turn-by-turn navigation app for your phone like Google Maps, except that it relies on the community to provide its information. It has millions of active users, normal drivers just like you and me who report things like traffic, accidents, and even where police have been spotted, all in realtime. You’ll also get alerts for redlight camera and speed cameras as well so it can help you with more than just speeding tickets.
Because it has so many users, it’s very active and up to date and pairs perfectly with your radar detector and laser jammer system.
You can download it for free for iOS, and Android.
The Ultimate Setup
This is the ultimate setup in terms of performance and speeding ticket protection, the very best that money can buy.
With the Stinger VIP, AntiLaser Priority, & Waze working for you, you’ll have the top of the line and most advanced speeding ticket protection available on the market today.
Get it and enjoy.
Permanent link to this article: https://www.vortexradar.com/2016/02/the-ultimate-speeding-ticket-countermeasure-system-the-best-radar-detector-and-laser-jammer/
10 Ways to Avoid a Speeding Ticket
If you’re the type of driver who finds yourself worried about getting a speeding ticket, there’s a number of things you can do to help improve your odds to avoid a speeding ticket. Obviously you could aim to not speed, but there’s always the risk of inadvertently missing a speed limit drop zone, you can get popped even following the flow of traffic, or you may get zapped at the bottom of a downhill when your car sped up naturally, so it’s helpful to be aware of your surroundings so you can respond intelligently. Here’s a couple things you can do to help avoid speeding tickets.

10 Tips to Avoid a Speeding Ticket
1. Stay alert for cops up ahead.
Use your eyes and look for the telltale clues of a police car up ahead. A car on the shoulder may be a cop, often shooting radar, and if they’re parked sideways on the road, they’re usually shooting laser out their side window. Being parked sideways is a very telltale giveaway.
2. Stick close to the flow of traffic.
If you drive within 5-10 miles of the flow of traffic, you won’t stick out as an obvious target for police to go for.
3. Get a good radar detector.
 One of the most common ways that police give speeding tickets is with a radar gun. A radar detector will give you advanced warning so you can slow down before he clocks you. They will pay for themselves many times over. Avoid cheapy detectors though. They give very limited range and tons of false alerts so they’ll generally be more annoying than helpful. For my recommendation on good radar detectors, see my best radar detector buyer’s guide.
4. Install a good laser jammer.
Police also use laser guns all over the country to give speeding tickets. A radar detector doesn’t help against laser so you’ll want to get a laser jammer like the AntiLaser Priority that can stop the laser gun from getting a reading off your car, giving you enough time to slow down, turn off your jammers, and let them clock you doing the speed limit. Learn everything you need to know about getting set up with laser jammers here.
5. Use a rabbit.
A “rabbit” is a car up ahead driving quickly that you follow from a distance. The idea is you give them some room up ahead of you and if a police officer hits them with radar or laser, they’ll draw fire and get the ticket instead of you.
6. Watch for brake lights up ahead.
If drivers up ahead of you are suddenly braking, that can be a clue that they may have just spotted a cop.
7. Be extra careful when you’re alone on the road.
If you don’t have a rabbit up ahead, it’s really best to stick to the speed limit. Without that added layer of protection, you’re easy pickings without a pack to hide inside of.
8. Check your rearview mirror.
Police can follow behind you, do the same speed as you, and look at their speedometer to see how fast you’re going. This is called pacing and neither a radar detector nor a laser jammer will help with this. Keep an eye out for light bars on top of the vehicle and the headlights of the style of police cars used in your area.
9. Know the common hiding spots.
Keep an eye out for common police hiding spots like underneath or on top of overpasses, highway onramps to clock cars from behind, or right after you crest the top of a hill. Slow down as you crest the top of a hill and check your side mirrors on on-ramps behind you.
10. Use apps that let you know where police officers are sitting up ahead.
 There’s free apps like Waze that are navigation apps that also have real time alert sharing capabilities meaning people can report where there’s things like traffic, accidents, or even police cars on the side of the road, potentially looking to give people tickets. You can run the app and see where other people have marked where cops are and contribute by marking any police officers you see as well.
With these 10 tricks, you will significantly help lean the odds in your favor. While you can’t totally prevent yourself from getting speed tickets altogether, you can definitely help improve your odds as much as you can.
Stay safe and happy driving!
Permanent link to this article: https://www.vortexradar.com/2016/02/10-ways-to-avoid-getting-a-speeding-ticket/
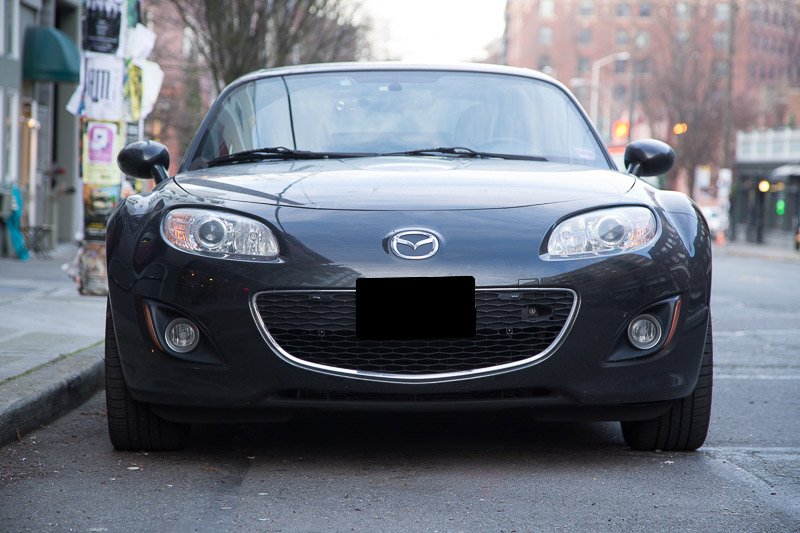
Stinger VIP vs AntiLaser Priority: Laser Jammer Head Size Comparison
So I received a Stinger VIP again today for testing purposes. I’ve been curious just how small the heads are compared to the AntiLaser Priority’s heads and since I’ve played around with the radar bit before, I spent the past few hours comparing the head sizes with my ALP and shooting some photos and I wanted to share the photos here with you guys. Let’s take a look…
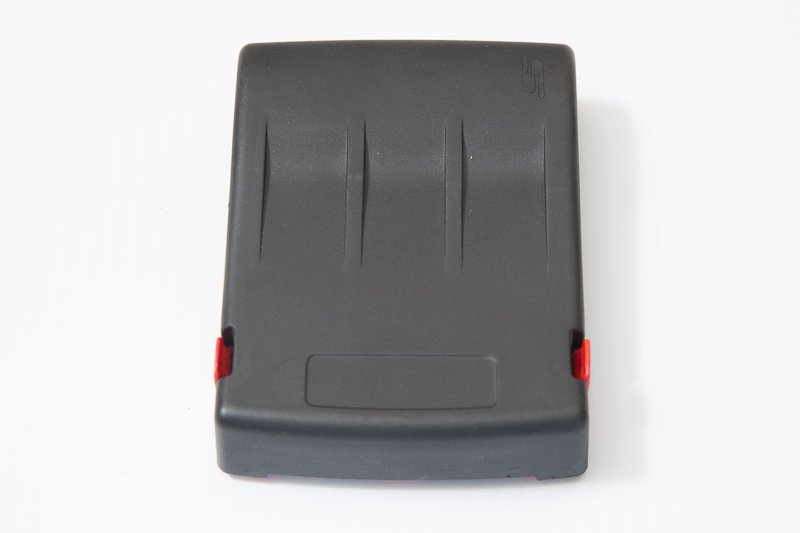
Here’s how the laser jammers look. First up is the normal receiver.
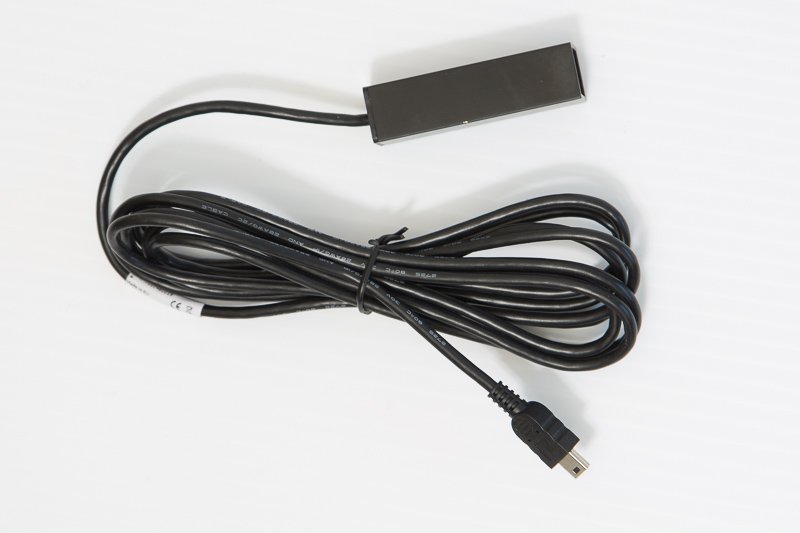
Long box on one end and a Mini USB port on the other.
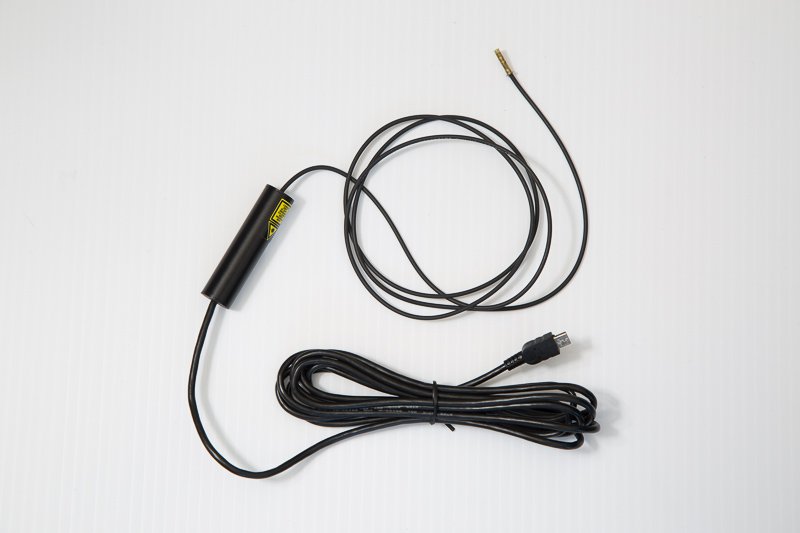
Here’s a look at the fiber head. I always figured it was basically just a long skinny wire, but you can see the tube where the laser jammer is, like the normal head, and then an extension out to the fiber head.
Now I gotta admit that I wasn’t too impressed initially.. at least not until I went out to my car, started playing around, compared it to my ALP’s, and started realizing what the smaller heads meant. Looking at them in the box, it’s just some wiring and boxes.. and I guess they’re small. Cool.
Let’s take a look at the head sizes next to the ALP.
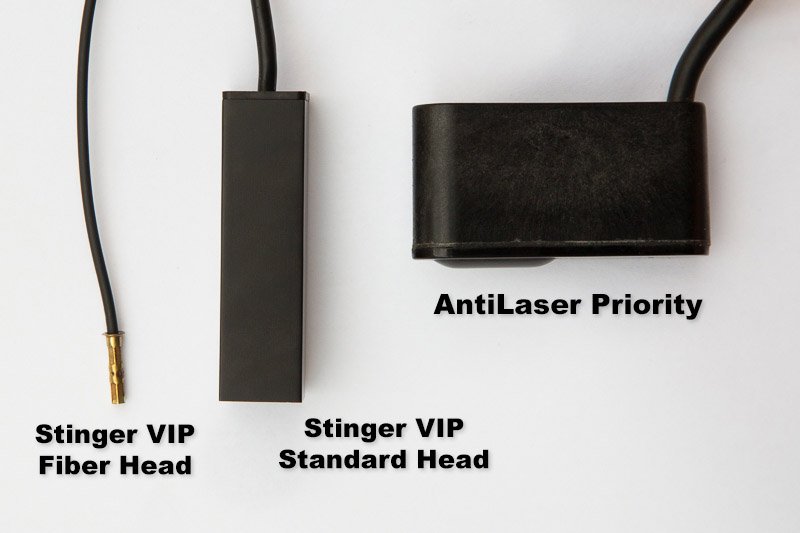
The ALP head is much wider. The Stinger heads are clearly smaller. The wires are thinner too. The ALP is shorter front-to-back which is preferable for rear installs when you’re installing under your trunk lid. If that area is short, the Stinger heads may stick out further beyond your trunk. Otherwise the Stinger heads are definitely not nearly as wide. It’s like a similar idea, just reoriented. ALP is wide, Stinger is long. Let’s take a look at the face of the heads.
The square heads are very tiny. The ALP heads are definitely much wider. Now to be fair, one ALP head covers both the transmitter and the receiver. The Stinger heads are transmitter or receiver only.. so the heads are smaller but you’ll need twice as many of them.. so it’s a trade-off.
The square shaped head is the receiver. The standard transmitter has the same shape but the face is a little different. Below you’ll see the standard transmitter (left) and receiver (right).
You also have the ability to upgrade your transmitter head to a super tiny fiber head. Here’s a look at all the different head sizes, including the fiber head.
That fiber head is really tiny. It’s only 2.6mm across which makes it super easy to hide on your vehicle. I was expecting that, but I wasn’t expecting how small the standard heads would be. They’re basically the same height as the ALP head, just barely a smidge taller. (16mm vs. 14mm)
Here’s a similar shot, adding in the fiber head for comparison.

Now I shot those photos with my rear ALP heads since they’re sitting in a bracket on either side of my rear plate and they’re easy to pop out for pics. When I went around to the front of my car, I found out some more really cool things.
For my front ALP heads, I had a professional cut into my car. He had to pull off the bumper and dremel the holes in the grill. It turns out that with the Stinger heads, I could actually install them in my grill without drilling! Holy cow… Granted I had to mount them down lower, but it’s still feasible. That’s way cool… I was very happy to see they slid right into place nicely.

I think these smaller heads will open up a lot of possibilities for installation with being able to install in grills that the ALP’s are too big for. (That’s why I went for HP-905’s over LI’s in my last car.)
For people who don’t want to cut their grills, the Stingers are a better option. That’ll make for a potentially cheaper install and a quicker install too so even though the Stinger heads may be more expensive (or less, depending on the configuration), you can put that money into the heads rather than the install which I’d prefer. Now you will have twice as many heads which may negate the time and money saved in not cutting, but you still have a much better shot at avoiding having to cut your grill which is awesome.
That also helps when it comes time to sell your car and so you don’t have to buy a new grill. You could sell your car as is with holes in it. Hopefully the salesperson/buyer wouldn’t notice, but either way, it’d be nice to just avoid that altogether. (I’m a fan of not cutting the grill if possible.)
I also really like that the Stinger heads look much more like parking sensors compared to my ALP heads.
Here’s another shot where I installed the laser fiber as well. See if you can find it. 🙂 (Hint: It’s down lower than the receiving head.)
If we zoom out further, you can see how the heads look compared to my ALP’s. I’ve got 2 ALP heads and 4 Stinger VIP heads (2 TX fibers, 2 RX square heads).
Now this isn’t necessarily the “best” locations for installing your heads. I actually had no idea where to install these heads since it’s a totally different idea than with your standard integrated heads we’ve had with Blinder/LI/ALP so I asked Cliff and here’s what he suggested.
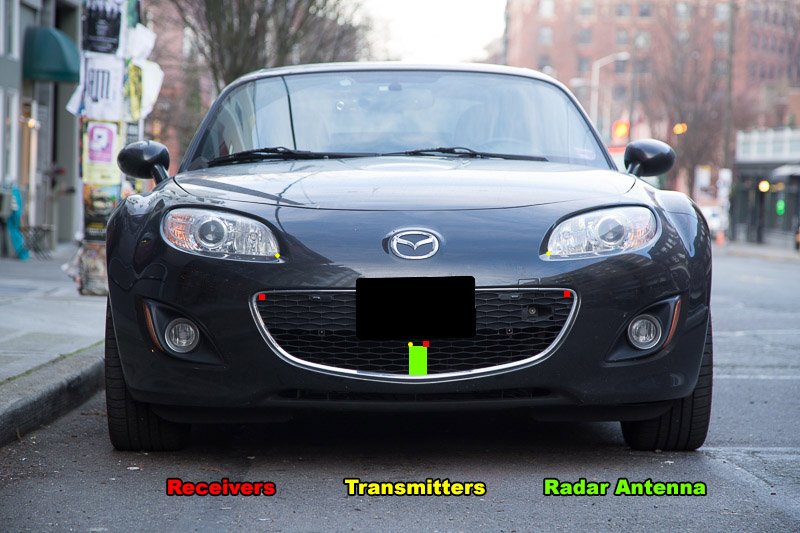
So with the tinier heads, we can get them closer to the targets which is awesome. The upper red receivers would still require cutting in the grill, but at least they’d be much smaller holes. The bottom heads wouldn’t require any cutting. Woohoo! That’s also pretty wild about putting the transmitters down in the corners of the headlights like that. That’s an option we didn’t have before… so we’ve got new possibilities with these smaller heads.
The way you wire the Stinger heads up is pretty cool too. If you wanted to do an ALP triple up front, you’d have to run 3 wires back through your firewall. With the Stinger, all your laser jammers (up to 4 Tx, 4 Rx) plug into this laser analyzer box (LAB) which stays in your engine bay somewhere and then you run just one cable back through your firewall, into your cabin. That makes installation and uninstallation much much easier. Plus you’ll need smaller holes in your firewall which is easier to do.
So yeah, I’m pretty impressed with these tiny heads, more than I thought I would be. I knew they were small, but I figured you’d have to upgrade to the fibers to get the smallest heads. However, even with the normal heads, they’re already pretty small which means you’ve got more options as far as placement, especially if you’re wanting to avoid grill cutting. (I just did the ALP setup guide so placement stuff is fresh on my mind.)
I hope Stinger gets everything fully sorted out on the software side too because the ALP’s definitely are more solid currently in terms of performance, but focusing strictly on the head sizes, these smaller heads are really slick… I’m a fan.
If you want a set of Stinger Laser Jammers, click here.
If you want a set of AntiLaser Priority Laser Jammers, click here.
Permanent link to this article: https://www.vortexradar.com/2016/02/stinger-vip-vs-antilaser-priority-laser-head-size-comparison/
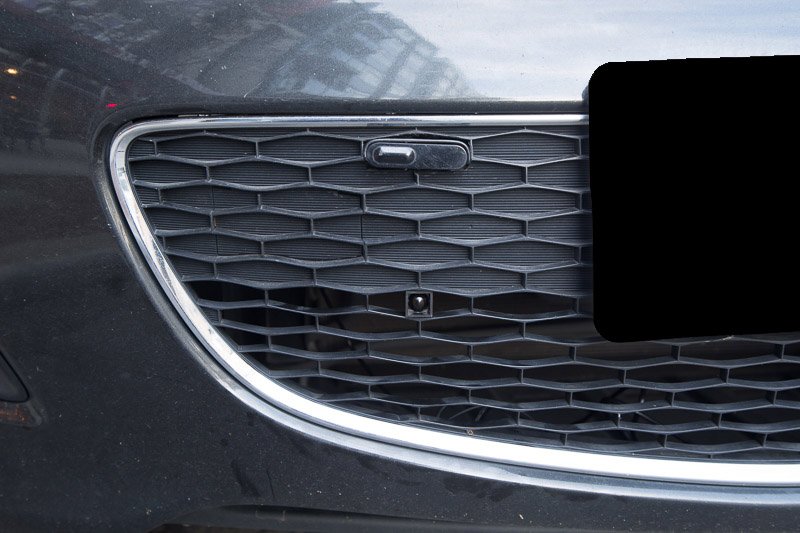
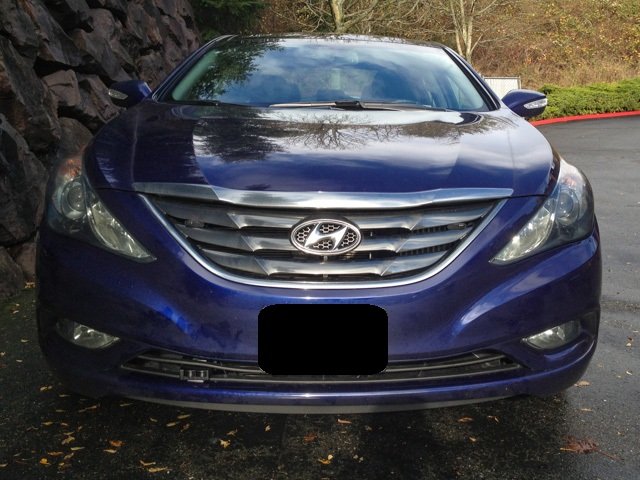
Installing a Beltronics STi-R Plus Radar Detector in my 2012 Hyundai Sonata
I wanna show you guys my Beltronics STi-R Plus install that I did on my 2012 Hyundai Sonata. These pics are all from a post few years back in 2012 when I still had the car (the lease has expired since), but I feel this would be great to share nonetheless. 🙂
Permanent link to this article: https://www.vortexradar.com/2016/02/installing-a-beltronics-sti-r-plus-in-my-2012-hyundai-sonata/
The Best Radar Detector Under $200 for 2016
 If you’re looking for an inexpensive radar detector, most of them basically suck to be honest, but the big standout exception to the rule is the Uniden LRD950. It offers long range and really good false alert filtering on par with (or even better than) many higher end and higher priced detectors, except you can find it online for less than $200 which is kinda crazy. This means it’s the best inexpensive and affordable radar detector on the market.
Permanent link to this article: https://www.vortexradar.com/2016/02/the-best-radar-detector-under-200/
Blendmount Coupon Code
 So I just got off the phone with Blendmount today after having a chance to review their Blendmount. They liked my review and we had a chance to bounce some ideas off one another. One comment that people brought up about the Blendmount was the price so they gave me a Blendmount coupon code to help save you guys some money on the mount.
Blendmount Coupon Code
To save 10% off a Blendmount, use the coupon code Vortex10 at checkout.

Permanent link to this article: https://www.vortexradar.com/2016/02/blendmount-discount-coupon-code/
Best Radar Detectors
![]() Uniden R8w ($749)
Uniden R8w ($749)
Best Performing GPS Radar Detector
![]() Valentine 1 Gen2 ($599)
Valentine 1 Gen2 ($599)
Best for Radar Detector Enthusiasts
![]() Uniden R7 ($499)
Uniden R7 ($499)
Best bang for the buck with arrows
Uniden R4![]() ($379)
($379)
Best non-arrow detector
![]() Uniden R3 ($299)
Uniden R3 ($299)
Best performance under $300
![]() Uniden DFR7 ($199)
Uniden DFR7 ($199)
Best under $200
Best Laser Jammers
![]() AntiLaser Priority ($1069 Dual, $1699 Triple TX BT HiFi)
AntiLaser Priority ($1069 Dual, $1699 Triple TX BT HiFi)
The best performing and top laser jammer on the market
![]() Stinger Fibers ($1825 Dual, $2525 Triple)
Stinger Fibers ($1825 Dual, $2525 Triple)
Tiny heads for stealthy installs, great for exotic cars, expensive, poor track record of updates
![]() Adaptiv TPX ($949 Triple)
Adaptiv TPX ($949 Triple)
Best affordable laser jammer (Save 10% with coupon “Vortex”)
Best Custom Installed Radar Detectors
Uniden R9w![]() ($3,999, radar and laser)
($3,999, radar and laser)
High performance radar detector & laser jammer combo
![]() Net Radar DSP ($619, $1119 w/ arrows)
Net Radar DSP ($619, $1119 w/ arrows)
Affordable custom installed radar detector, integrates with AntiLaser Priority
Facebook Reviews

Ben B.
16:45 15 Jan 25
Very thorough information on his site. I love his YouTube channel as well.Dewayne G.
07:10 04 Aug 24
He gives great advise and helps you understand everythingWes P.
14:48 02 Nov 22
A great source of information! Consistently updates when new information or products come out. Reviews radar detectors,... laser detectors, laser shifters, dash cams, and more!read moreTommy W.
21:12 17 Jul 21
1. He’s honest!!2. He knows what he’s talking about!!
3. He does in depth research!!
4. Only review/testing I... listen to!!read more
Saif K.
01:05 16 Mar 21
This guy will help you save money !!! Excellent accumulated experience, quick and in-depth reviews, and very useful... information overall. Significant personal annual saving on tickets !
I recommend Radar detectors for anyone who got more than two tickets within the last 5 years! and I recommend Vortex Radar as your one stop shop, for all the support you need for Radar Detectors, dashcams, and many other reviews 😀read more
Frank B.
18:45 17 Dec 20
Great reviews, in-depth and very thorough.Would love to see 2 channel dashcam reviews for convertibles with the... rear unit on the front windshield Blackview or Thinkware or any with cloud access.
It would help decide which cam has better coverage through rear window.
Thanks again for your efforts.read more
Jerry G.
01:08 17 Oct 20
unbiased reviews and will give you the best information possible on tbe products he test.Steven H.
16:11 25 Jun 20
This guy yes I watch everything he does is the Master on radar detectors and counter measure equipment . He’s saved me... a lot of money on equipment buying and not waisting my money he’s the Man!read moreTony S.
06:40 19 Jun 20
Exceptional YouTube channel dedicated to radar detectors. Thoughtful discussion - and solid technical conclusions.Robert K.
17:31 16 Jun 20
What I like most about Vortex Radar is the fact that you give an honest review what's good and not good on all products.Kyle S.
18:09 19 May 20
The most knowledgeable data based source for radar / laser detectors in addition to countermeasures. Very informative... in giving both manufacture details and real world test results. Check out the YouTube channel it is enjoyable to watch. I personally do not know of any other easily accessible source of information with such a wealth of content on this topic that is assimilated into an easy to understand format. Thank you for all the great content and advice.read morePete H.
15:20 25 Apr 20
There’s no one else that puts in the time and information about the radar community than him.Joe T.
01:17 22 Apr 20
Notting but the FACTS and the 411 on all that you need to know.Willie B.
01:24 22 Mar 20
Been a fan of radar detectors for over 40 years. Following Vortex radar detailed reviews and side by side comparisons... of the newest detectors allowed me to make a very informed decision on the best value for a windshield detector. Great page to follow.read moreChris M.
18:59 07 Mar 20
If you're shopping for a Dashcam or Radar Detector, Vortex Radar is the one and only place to do your research! Vortex... does all the testing for you and lays out all the facts!read moreShawn S.
00:41 03 Mar 20
Knowledgeable about Radar DetectorsHal Y.
13:18 02 Mar 20
What you always wanted to know about radar detectors but were afraid to askCarter J.
17:07 22 Feb 20
Great Information and easy to understand! I wish all tutorials were like these. Great Job!!!!Eric W.
01:42 28 Jan 20
I've been watching his Radar Detector for years. He really knows his stuff! Please keep up the great work!! ;-)Aaron W.
18:04 22 Jan 20
Great source of unbiased info.Glenn L.
14:17 05 Jan 20
Excellent non-biased recommendations.
Chris P.
17:27 22 Dec 19
Nice information to help you with making a choiceMartin L.
12:53 22 Dec 19
he is the go to guy for radar detector knowledge & makes informed videos.Kat S.
22:24 16 Dec 19
Very helpful with making a decision on which detector to buy. Explains the features very well!William F.
18:50 14 Dec 19
For up to date non biased information on radar and laser counter measures. He has very good information on dash cams... and storage too. I trust his reviews. Definitely pull good deals together and gives you options.read moreAndy B.
12:54 11 Dec 19
Very good and fair reviews and regular updates on a wide variety of productsAlc A.
23:13 06 Dec 19
There is no better hands on information source on countermeasure devices.Atwell H.
20:04 06 Dec 19
Comprehensive, unbiased reviews and setup guides.Ilan M.
08:32 30 Nov 19
very good information and short movies abaout the detecters.Dennis L.
17:16 08 Nov 19
Wish they all were this good!Tony L.
15:54 08 Nov 19
Vortex Radar provides a wealth of knowledge on all radar and lidar platforms. Anyone interested in learning more about... the speed countermeasure industry, Vortex is your guy!read moreJohn S.
14:10 31 Oct 19
Excellent information about "countermeasures" associated with safe driving. Everything is conveyed in simple form, and... to the point. Great production standards, too!read moreMathew J D.
13:53 29 Aug 19
was a huge help on picking my uniden r3, lots of info on styles of radars for comparisons, to find what radar is best... suited for you and your style if drivingread moreKatheleen C.
08:59 19 Jul 19
I recommend the products and people reading the information on your web site to learn what is out there and availableStan L.
13:01 13 Jul 19
I really like the idea of having the ability of recording my driving in case of a traffic incidentBruce T.
15:31 12 Jul 19
Great resource for information on radar detectors and dash cams. Vortex knows his stuff!Brian Douglas K.
02:34 08 Jul 19
great information and unbiased reviewsFred S.
23:55 18 Jun 19
The fantastic unbiased reporting of the latest radar capabilities and the ability to Express the technical information.... Thank you all for the great updates and videos.read moreSteve W.
22:27 14 Jun 19
informative.................................................................................................Todd Y.
15:10 04 Jun 19
Very informative, unbiased opinions.Andrew B.
14:12 30 May 19
Bought an R7 on your advice and its been a great purchase. Keep up the good work!Gern B.
07:15 18 May 19
Great advice, great tests, great videos, great attitude, great knowledge of his subject matter.Fred M.
17:02 14 May 19
Most knowledgeable guy about mobile devices!Lauren M.
17:42 11 May 19
high quality product, easy to follow instructionsDan M.
19:47 02 May 19
Great find when I was looking for a RD. Honest assessments.Jon V.
18:41 25 Apr 19
The most knowledgeable honest testing and recommendations on earth! Vortex you can trust!John T.
23:35 23 Apr 19
The most complete and thorough reviewer of radar detectors. Tons of information here.Hector M.
15:42 19 Apr 19
I like the share of information and ideas on the use and maintenance of radar detectors and related products.Lester H.
00:49 01 Apr 19
Great Information and review to help make the best chose for you.Jim L.
23:52 31 Mar 19
Great and knowledgeable site!Jonathan W.
16:01 03 Mar 19
I completely trust the information that I get from Vortex. They have been a huge help with equipment training,... installation recommendations & instructions, to helping me compare products to make the best purchase. I cannot say enough good stuff about them.read moreJonny S.
23:06 22 Jan 19
This guy is a radar guru! His reviews are fantastic!
Phillip K.
04:03 21 Jan 19
Very knowledgeable and wonderfully detailed videosMike L M.
03:17 05 Jan 19
from what I've seen so far, good, fair testing.David B.
15:56 26 Dec 18
The current GOLD Standard in detection news and reviews. I trust everything he posts!James M.
14:00 26 Dec 18
This is my go to for radar detector knowledge, I want answers and he has them,William Wendy Everhart I.
02:17 24 Dec 18
Performance warranted and best reviews onlineJohn Matthew W.
00:25 19 Dec 18
Information is spot on if there’s anyone that knows anything here about Detectors here’s your guy ! I got all my info... from Vortex an have a nice collection thanks so much #Vortexradarread moreRobert C.
20:46 12 Dec 18
an insane amount of info. best Ever!Plato Ioannis D.
18:23 09 Dec 18
Expert advice on Dashcams and radar detectorsChris B.
17:07 09 Dec 18
love checking in to see what this guy has in store for the different reviews. Only resource I know of right now that is... this thorough.read moreDavid Ket S.
01:22 09 Dec 18
Excellent information for newbies or Pro’s. Love there unbiased reviews of multiple detector types. Look forward to... learning more tips about my favorite detectors!!read moreRobert P.
16:09 08 Dec 18
Very informative channel for Radar Detectors and Dashcams!Albert D.
06:11 08 Dec 18
great content and honest reviewsCraig M.
01:12 08 Dec 18
Great advice and reviews!Gary G.
22:44 07 Dec 18
Great website and video content!John N.
17:42 07 Dec 18
Awesome videos. Love my R3. 😎Robert D.
15:36 07 Dec 18
Very knowledgeable about the productBrian St D.
15:13 07 Dec 18
Great informative videos on radar detectors (and related stuff).Derrick L.
15:00 07 Dec 18
Great information and knowledge or productsThomas W.
13:18 07 Dec 18
Very informative and unbiased reviews.Tim S.
07:51 06 Dec 18
It’s a great Radar detectorLes Y.
22:54 05 Dec 18
Great reviews and advice on youtube channel and the forumsAllen W.
22:24 05 Dec 18
I have been watching YouTube videos for a while and have learned a lot of useful information on radar detectors and how... to set them up properly. Thanksread moreBrian B.
22:07 05 Dec 18
Best and most informative website for all things radar detector on the internet! ...and dash cams!Ron S.
04:44 04 Dec 18
Very informative and knowledgeable about a variety of radar detector products... Product areas also include laser... jammers and dash cams.. As a technician I recognize good testing methods and appreciate the unbiased reviews of the products featured...read moreVD V.
07:15 28 Nov 18
Very professional reviews, tests in details, nice videos... he is awesome!!! 😍😎👍
Gene E.
15:37 01 Nov 18
Great infomation No bias in his reporting.Benedict De Leon A.
01:26 28 Sep 18
Great Content and Very Informative videosTed D.
23:33 23 Aug 18
real pro can learn a lotTroy N.
03:46 18 Aug 18
Vortex is one of the most knowledgeable guys in the countermeasure community. His non-biased approach makes it very... easy to trust what he says. If you are looking to buy a radar detector or laser jammer, check out his videos before going anywhere elseread moreAsa E.
23:19 17 Aug 18
Great content and very informative.Eric C.
16:00 09 Aug 18
simply the best place to get the best information and recommendations, thanks for all your great workKevin M.
09:19 07 Aug 18
Outstanding U Tube channel. Very informative and answered a ton of questions I had.Tim C.
00:22 06 Jul 18
Vortex is awesome. Best instructional and detailed videos ever. Sold me on the Uniden R3, and it was the best choice!... Thank you!read moreGabriel R.
18:09 29 Jun 18
Great Page I have a V1 and just bought a Uniden R3 & love it to your reviews helped Big time cant wait to post my... reviews on the R3.read moreΠαναγιωτης Ν.
15:40 29 Jun 18
Top!Rick M.
11:18 28 Jun 18
very informitiveRodz R.
08:05 28 Jun 18
clear explanation on products ,clear how to videosErwin Y.
11:34 22 Jun 18
Thanks a lot Mr. Radar expert, really helped out on my purchase of an R3, especially the upcoming support for MRCD... photo radar. Changed my mind from Escort based on your videos and saved a ton of $$$.read moreMarc M.
15:11 19 Jun 18
This guy is the king when it comes to detectors. Incredible knowledge and willing to share what he knows.Solano H.
16:54 08 Jun 18
The best radar detector expert in the world and a very nice person that I will be honor to meet in my next trip to USA.... Gretings from Brazil.read moreLucas C.
02:02 03 Jun 18
Sherry H.
21:14 26 May 18
ENTER TO WIN A HIGH TEC BACK , FRONT AND PARK VIEWING CAM!Ed A.
02:22 19 May 18
Jerry N.
02:10 16 May 18
Bryon V.
21:46 14 May 18
Questions answered promptly, great informative videos! Has taken over the helm left by Radar Roy!John W.
16:24 23 Apr 18
Everything you'll need to know about Top Detectors this man has you Covered reliable Information and that's Facts I... really Enjoy His Videos online an on Youtube , many Reviews I've learned alot an really enjoy the Collection I own thanks to Him.read moreBrian P.
01:01 12 Apr 18
David E.
04:50 01 Apr 18
The go to guy for anything about radar/laser detectorsBrian L.
06:41 18 Mar 18
Dwight G.
23:27 17 Mar 18
Dennis A.
21:25 12 Mar 18
Brian H.
03:47 12 Mar 18
Ryan B.
23:31 09 Mar 18
He's one of the most informed and definitely the most honest person you'll find when it comes to detectors and... countermeasures in generalread moreAlex B.
08:23 09 Mar 18
Anton F.
23:59 16 Feb 18
William R.
21:03 28 Jan 18
I appreciate the extensive time and effort Vortex has devoted to the subject of radar detector technology. His in depth... reviews and analyses of the products currently available has greatly helped me determine what is best for my needs.read moreSean Mashimarho R.
23:57 02 Jan 18
Awesome guy to work with. Very honest, personable, and has a passion for what he does.Tom A.
02:19 30 Dec 17
Excellent reviews of all the radar detectors. Great source of knowledgeChris M.
19:26 14 Dec 17
Best videos to learn about old and new radars. He's always keeping us updated on Radar news, updates, tests, and... reviews.read moreTy C.
12:57 12 Dec 17
Alway share valuable information. Im still undecided on which radar detector is right for me. Uniden R3 or the Radenso... proSo many choices...lol🤔read more
Bill B.
09:06 12 Dec 17
One should never buy a radar detector without first checking the reviews published by Vortex Radar for the various... products on the market. Absolutely a essential resource for decision making.read moreJc B.
08:57 12 Dec 17
your videos are very informative and has helped me select the best detector for my needs! thank you!!Kirk A.
22:16 11 Dec 17
Paul V.
04:47 07 Dec 17
It is always nice to watch Vortex videos. Simple-speak of complex gear, done by a guy who ENJOYS what he sharing. Sorry... to learn of your Miata getting smacked; glad you’re ok. I drive a new Miata and run a Uniden R3. I picked my car, but Vortex picked my R3 after following his research and testing. Best regards sir!read moreCristi M.
16:40 01 Dec 17
Clarence Glynn J.
18:38 24 Nov 17
Aissam B.
22:23 20 Nov 17
Jose Santana Y. Norma C.
00:13 15 Nov 17
Andrew G.
15:49 04 Nov 17
Love all the informative videos. Thank you for sharing!Matthew W.
19:55 07 Oct 17
Thank you so much for the reviews and videos of how to program and setup my R3. I purchased the R3 solely based on your... videos and recommendations. Best review and how to videos ive ever watched. I absolutely love this thing!read moreBrian S.
13:53 05 Sep 17
Great advise on the videos. This helped a lot on narrowing down so many choices.Steve C.
23:08 27 Aug 17
Terry A.
03:24 19 Aug 17
Brandon S.
19:25 31 Jul 17
Brandon B.
20:14 19 Jun 17
Curt C.
20:45 15 Jun 17
all is reviews are on target i do alot of reviews before i buy something an out of all the utube guys an gals this guy... is far better than anyone out there now with that said i think i deserve a 10% discount thats how it works i give you a good review i get mnie too lol just kidding keep up with the videos thanksread moreBobby B.
13:00 15 Jun 17
Brett W.
05:41 09 Jun 17
Tom Logan I.
04:57 22 May 17
Great unbiased reviews. I just put myself on the waiting list for the Uniden R3.Kent Riegl J.
01:17 16 May 17
I THINK...all the information they have on RADAR DETECTORS AND RADAR/LASER JAMMERS IS REALLY CLASSIC AND COOL....Lutu R.
03:39 11 May 17
Richard A.
20:42 09 May 17
Great unbiased reviews. Very thorough / excellent video quality. Full look at all the features and comparison points.Donny C.
22:35 14 Apr 17
Love the reviews, tips, and tricks! He has even taken the time to respond to questions concerning setups and... installations! Thanks to his advice I was able to hard-wire my Valentine1 in my MX-5. Awesome guy with awesome content.read moreAnthony F.
15:39 05 Mar 17
Glen B.
00:08 03 Mar 17
Wonderful tutorials and a wealth of knowledge! There is so much information here that will help one in finding answers... to the many questions that arise.read morePatrick P.
10:39 10 Feb 17
Awesome reviews glad to see some one honest and non bias keep up the good work mate :)Bart R. D.
03:34 25 Jan 17
Jonathan F.
22:40 28 Dec 16
Awesome information. Reviews are spot on with his competition. More importantly, he is not a salesman.Joshua S.
06:10 28 Dec 16
Tyler B.
20:10 09 Dec 16
He seems to be a great, honest guy. His reviews seem to be honest, straight forward, and correct.Natalie B.
13:36 02 Dec 16
D'Arcy R.
00:18 26 Oct 16
Incredible knowledge of radar detectors. Keep up the amazing work!