Let’s take a look at how to use your new Uniden R9, what all the buttons and menu options do, and how to configure your R9 for optimal performance and minimal false alerts. (Last updated February 2023.)
This guide is current as of firmware 1.19. You can download the latest firmware from Uniden’s website. (Copy the files to a USB drive and then plug the drive into the R9 to update it.) As Uniden continues to update and improve the R9 and as features are added or changed, this guide will be updated accordingly. You can also reference the Uniden R9 manual and install guide to learn more. This guide will explain things even further.
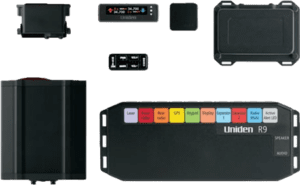
Uniden R9 Buttons & Functions
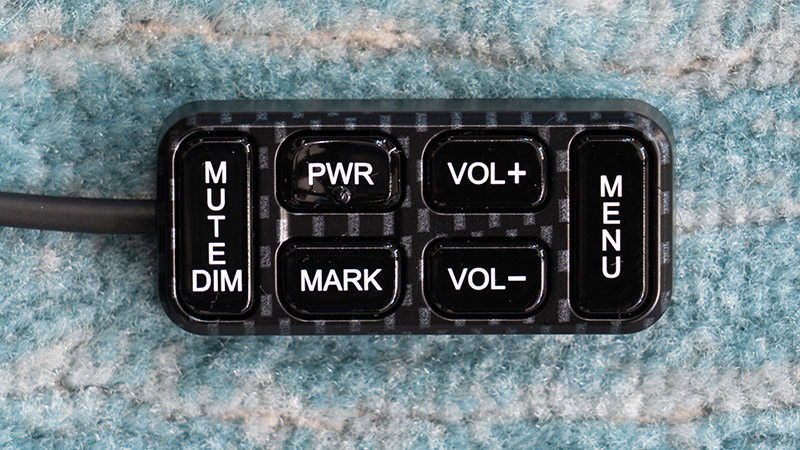
R9’s Buttons
- Mute / Dim
- Press during an Alert: Mute alert
- Double Press during an Alert: Create GPS lockout, remembering this false alert so it automatically mutes it in the future
- Double Press during GPS lockout: Remove GPS lockout
- Long Press at idle: Change display brightness
- Long Press during red light camera alert: Delete RLC location
- Power Button
- Long Press: Turn power on or off
- During Laser Alert: Switch laser jammers to receive mode
- Mark
- Short Press: Create GPS Mark so you get alerted every time you come by this area, useful for school zones, common speed trap locations, etc.
- Short Press during a Marked location alert: Delete GPS Mark
- Long Press at idle: Bring up option to clear all GPS Marks (press again to confirm)
- Long Press during K band alert: Create custom K Block filter around this signal
- Vol +
- Short Press: Raise volume
- Short Press in Menu: Next menu option
- Long Press in Menu: Scroll through next menu options
- Vol –
- Short Press: Lower volume
- Short Press in Menu: Previous menu option
- Long Press in Menu: Scroll through previous menu options
- Menu
- Short Press: Enter settings menu
- Short Press in Menu: Change / Activate setting
- Long Press in Menu: Exit menu
- Long Press at idle: Switch between Highway / City / Auto / Advanced mode
Uniden R9 Settings & Menu Options
Menu
Choose if you want the menu to only show a few basic options, or if you want to unlock every option available.
Basic: Simplified menu option list, shows only the following settings:
- Highway / City / Auto / Advanced
- Auto City speed (in Auto)
- X / K / Ka percentages (in Advanced)
- Speed Camera
- Speed Camera Distance
- Redlight Camera
- RLC Quiet Ride Speed
- POI Pass Chime
- Voice
- Ka Frequency Voice
- Front Radar
- Front X Band
- Front K Band
- Front Ka Band
- Rear Radar
- Rear X Band
- Rear K Band
- Rear Ka Band
- Laser
- MRCD/T
- Gatso RT3/4
- Display Mode
- Scan Icon
- Idle Display Mode
- Alert Display
- LED Initial
- Speed Unit
- Auto Mute
- Auto Mute Volume
- Quiet Ride
- Quiet Ride Beep Volume
- Limit Speed
- Factory Reset
- Delete All Mute?
- Delete All Auto?
- Delete All User?
- SW Version
- DB Version
Expert: (Default) Gives you access to every single menu option available. It adds the following options to the Basic menu:
- Front / Rear Balance (Advanced)
- GPS
- Laser Gun ID
- Laser Gun Voice
- Laser Jamming Modes
- Pulse On (AutoJTK) Timer
- Pulse Off (Warmup) Timer
- Laser TP Setting
- K POP
- Ka POP
- K Filter
- Ka Filter
- TSF
- K Block 1-3
- K User 1-5
- K Narrow / Wide / Extended
- Ka Narrow / Wide / Segmentation
- MRCD / Ka / Signal Priority
- Mute Memory X&K / X/K/Ka/MRCD
- Auto Mute Mem
- Auto Mem X&K / X/K/Ka/MRCD
- All Threat
- Display Color
- Arrow Color
- Band Color
- X Band Tone
- K Band Tone
- K Bogey Tone
- MRCD/T Tone
- Gatso Tone
- Ka Band Tone
- Ka Bogey Tone
- Laser Tone
- Dark Mode
- Auto Dim
- Backlight
- MRCD/T Quiet Ride
- Time Zone
- DST
- Battery Warning
- Battery Saver
- Self Test
- Memory Quota
Note: The Laser options only show up when Laser is enabled. The MRCD & Gatso options only show up when MRCD & Gatso are enabled. The Auto Dim options only show up with the display brightness set to Auto.
Highway / City / Auto / Advanced
Adjust the sensitivity of the radar detector.
- Highway: (Default) Full sensitivity on all radar bands.
- City: K Band sensitivity is dropped to 10% (I need to confirm this number, but it’s something like that), greatly reducing false alarms at the expense of maximum range.
- Auto: K band sensitivity varies based on speed. At high speeds, the detector runs in Highway mode. At lower speeds it runs in City mode.
- Advanced: Individually adjust the sensitivity of the three different radar bands. Choose between 30% – 100% sensitivity in 10% increments.
- X Band
- K Band: A popular choice here is to manually dial back the K band sensitivity to cut down on falses.
- Ka Band
Note: Switching to Advanced mode only activates the ability to individual adjust the sensitivity of the different radar bands. It does not enable any other advanced features.
Auto City
Set the speed threshold for Auto mode. Above this speed, the detector runs at full sensitivity on K band, effectively running in Highway mode. Below this speed, the detector runs at minimum sensitivity on K band, effectively running in City mode.
- 10 – 60 mph in 5 mph increments (Default 40 mph) or 10-100 km/h in 10 km/h increments
Front / Rear Strength
When the R9 is set to Advanced Mode, these settings appear and allow you to better balance the front and rear antenna’s sensitivity in case you get excessively long alerts in either direction and/or dial back the detector’s sensitivity to cut down on false alerts.
- Front X: 30% – 100% in 10% increments (Default 100%)
- Front K: 30% – 100% in 10% increments (Default 100%)
- Front Ka: 30% – 100% in 10% increments (Default 100%)
- Rear X: 30% – 100% in 10% increments (Default 100%)
- Rear K: 30% – 100% in 10% increments (Default 100%)
- Rear Ka: 30% – 100% in 10% increments (Default 100%)
GPS
Enable the different GPS related features and options like GPS lockouts, low speed muting, redlight camera alerts, etc.
The GPS features are incredibly useful so it’s recommended to definitely leave this on. If you turn this off, the GPS-related options will disappear out of the menu.
- On (Default)
- Off
Speed Camera
Notifies you when you approach speed cameras. It will also alert while you are above the speed threshold where the camera issues tickets.
![]()
- On (Default)
- Off
Note 1: These are GPS-based notifications that come from the downloadable database, separate from radar or laser alerts. The latest database generally comes packaged with the latest firmware.
Note 2: These alerts always occur even if the speed cameras only operate at certain times of the day such as in school zones.
SpeedCam Alert Distance
Choose the distance you’d like the detector to alert you to speed cameras (or redlight cameras).
- 1000 ft. / 300 m (Default)
- 2000 ft. / 600 m
- 2500 ft. / 760 m
- 3000 ft. / 900 m
- Auto
Auto mode applies just to speed cameras and varies your alert distance based on the speed limit threshold in the speed camera.
- Speed limit 50 or 60 km/h: Alert range 600m
- Speed limit 70 or 80 km/h: Alert range 700m
- Speed limit 100, 110, or 120 km/h: Alert range 800m
Redlight Cam
Notifies you when you approach redlight cameras.
![]()
- On (Default)
- Off
Note 1: Like speedcam alerts, these are GPS-based notifications, not radar or laser based alerts.
Note 2: The RLC alerts happen whenever you pass through an intersection with an RLC, even if the cameras only monitor one or two directions of travel.
RLC Q-Ride
Mute redlight camera alerts on nearby surface streets as you’re driving down the highway. This way you only get alerts when you’re driving on slower city streets. Think of it as high speed muting. Here you can select the maximum speed that you’ll still get RLC alerts.
- 50 – 85 MPH or 80 – 140 km/h
- Off (Default)
POI Passchime
Audibly play a chime when you pass a fixed point of interest like a speed cam or redlight camera. Some people find that alert annoying so you have the option to disable the chime if you like.
- On
- Off (Default)
Voice
Enable voice alerts for radar or laser signals (ie. “Ka Band”), direction (“Front,” “Side,” or “Rear”), as well as for the different menu options.
- On (Default)
- Off
Ka Frequency Voice
Verbally announce the exact frequency of the Ka band radar signal (ie. 34.759) to give you more information about the radar gun being used, without having to look up at the detector. Also handy for logging the exact frequencies on your dashcam footage. 🙂
- On
- Off (Default)
Front Radar
Enable or disable radar detection for the front radar detector antenna.
- On (Default)
- Off
Front X Band
Enable or disable front X band detection. X band is actively used in OH and southern NJ, but mostly phased out of the rest of the country.
- On
- Off (Default)
Front K Band
Enable or disable front K band detection. K band is actively used throughout most of the country.
- On (Default)
- Off
Front Ka Band
Enable or disable front Ka band detection. Ka is actively used all over the country and when your detector goes off to Ka, it’s almost always a legitimate alert.
- On (Default)
- Off
Rear Radar
Enable or disable radar detection for the rear radar detector antenna.
- On (Default)
- Off
Rear X Band
Enable or disable rear X band detection. X band is actively used in OH and southern NJ, but mostly phased out of the rest of the country.
- On
- Off (Default)
Rear K Band
Enable or disable rear K band detection. K band is actively used throughout most of the country.
- On (Default)
- Off
Rear Ka Band
Enable or disable rear Ka band detection. Ka is actively used all over the country and when your detector goes off to Ka, it’s almost always a legitimate alert.
- On (Default)
- Off
Laser
Enable or disable Laser detection and jamming capabilities. You can disable this if not using the R9’s included laser jammers, but generally you’ll want to leave it enabled. Disabling this will hide all of the laser-specific menu options.
- On (Default)
- Off
Laser Gun ID
This will visually identify the laser gun you’re shot with (brand or model) when the detector picks up an officer targeting you with laser.
- On
- Off (Default)
Laser Gun Voice
This will audibly announce the laser gun you’re shot with (brand or model) when the detector picks up an officer targeting you with laser.
- On
- Off (Default)
Constant / Pulse / Receive Mode
Control how the laser transponders / jammers behave when you get shot with laser.
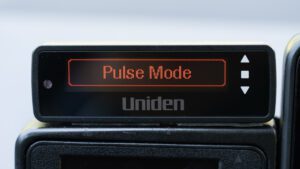
- Constant Mode: Unlimited jamming, used only for testing purposes. (Default)
- Pulse Mode: Automatically stop jamming after 3-10 seconds.
- Receive Mode: Detect laser only, but do not jam.
To manually disarm the jammers, hit the power button to switch into receive mode.
Pulse On
When the jammers are set to pulse mode, choose how long they jam before the automatically disarm (JTK).

- 3-10s (Default: 5s)
Pulse Off
After the jammers automatically disarm, how long to wait until they automatically rearm.
- 30-60s (Default: 30s) in 10s increments
Laser TP Setting
Tell the detector which transponders/heads are installed in the front or rear of your vehicle, as well as how the heads should behave when you get shot with a DragonEye.
TP1 – TP6 correspond to the 6 transponders.
- Front / Rx: Front transponder, Receive
- Front / Tx: Front transponder, Transmit
- Rear / Rx: Rear transponder, Receive
- Rear / Tx: Rear transponder, Transmit
While many head configurations are possible, the typical configuration is 3 heads in the front and 3 heads in the rear. The center heads will be configured as transmitters while the outer heads are set up as receivers. Here is the default and recommended transponder setup:
- TP1: Front/RX
- TP2: Front/TX
- TP3: Front/RX
- TP4: Rear/RX
- TP5: Rear/TX
- TP6: Rear/RX
K POP
Enable detection of K band POP detection. This is essentially unused in practice and it’s recommended to leave this off.
- On
- Off (Default)
MRCD/T
Detect the MultaRadar CD and CT which are low powered radar guns in use in a few state and provinces in North America. MultaRadar guns are in use in Alberta, Quebec, Chicago, NYC, and in Maryland near Washington D.C.

Enabling MRCD also helps to better filter out BSM falses from Mazda CX-5’s. However, turning this on will introduce additional MRCD falses so you may want to consider enabling MRCD GPS lockouts as well as MRCD Quiet Ride to help deal with the MRCD falses.
- On
- Off (Default)
Note 1: Not every MRCD alert is actually a legitimate MultaRadar source. False MRCD alerts from BSM’s or auto door openers can and will happen.
Note 2: The R9 will alert to both legit MRCD and MRCT sources as MRCD.
Gatso RT3/4
Enable detection of Gatso RT3 and RT4 photo radar systems.

Enabling this also leads to a bunch of Gatso falses so only enable it if you really do have Gatso systems in your area.
- On
- Off (Default)
Ka POP
Detect 67ms Ka band POP radar. This form of radar is essentially unused so it’s recommended to leave this off for improved performance and reduced false alerts.
- On
- Off (Default)
K Filter
Filter out many sources of K band false alerts such as many (but not all) cars with blind spot monitoring radar systems.
- On (Default)
- Off
Ka Filter
Filter out false alerts on Ka band. False Ka alerts are rare so people generally leave this off since you typically get better performance with it off, though I haven’t seen any Ka filter tests done yet to confirm.
- On
- Off (Default)
TSF
Traffic sensor filter designed to filter out traffic sensors on the sides of some highways that blast K band. If you get repeated K band alerts on your R9 on the highway that aren’t coming from nearby vehicles, turn on TSF.
- On
- Off (Default)
Note: I have also found TSF to be helpful at reducing BSM falses too. Testing does show a range drop on K band with TSF enabled, but it can be helpful for further BSM filtering.
K Block 1
This is essentially your Honda / Acura BSM filter. Those false alerts are extremely common and extremely difficult to filter out, so Uniden has given us several different notch filters to filter out false alerts between 24.194 – 24.204, effectively filtering out Honda / Acura falses. It also applies to some other vehicles like Chrysler Pacificas.
- On: Filter out all signals 24.199 +/- 5 MHz
- Weak: Filters out only weak signals 24.199 +/- 5 MHz (Default)
- Mute: Audibly mute all signals 24.199 +/- 5 MHz
- Off: Disable K Block 2
I personally prefer the Weak option since it seems to do a good job of completely filtering out weak BSM’s while still alerting to stronger signals in this frequency range like police radar guns at a distance.
K Block 2
This is similar to K Block 1, but it applies to 24.168 +/- 2 MHz which helps tackle BSM falses from Hondas, Acuras, GMCs, Jeeps, Chryslers, and Cadillacs.
- On: Filter out all signals 24.168 +/- 2 MHz
- Weak: Filters out only weak signals 24.168 +/- 2 MHz (Default)
- Mute: Audibly mute all signals 24.168 +/- 2 MHz
- Off: Disable K Block 2
K Block 3
This is similar to K Block 1, but it applies to 24.123 – 24.124 GHz which helps tackle BSM falses from Mazda CX-5 SUV’s.
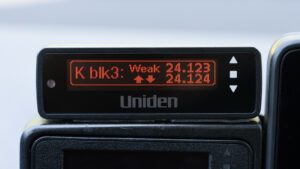
- On: Filter out all signals 24.123 – 24.124 GHz
- Weak: Filters out only weak signals 24.123 – 24.124 GHz (Default)
- Mute: Audibly mute all signals 24.123 – 24.124 GHz
- Off: Disable K Block 3
K Usr 1-5
Create 5 different custom K Blocks for any K band frequency range you like. This can be useful to knock out other common BSM frequency ranges such as 24.160’ish.
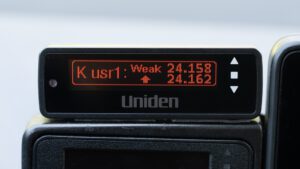
You can adjust many different parameters including:
- Signal Strength (filter out under this strength, alert over this strength) / Weak / Max / Mute / Off
- Direction
- Frequency Range
K Narrow / Wide / Extended
Adjust the range of frequencies that the R9 scans for on K band.
- Narrow: Scan for a smaller range of K band frequencies to help cut down alerts from radar signals that are usually false alerts and occasionally legitimate alerts. (24.080 – 24.200)
- Wide: (Default) Scan for the entire range of K band that police normally use in the US (24.050 – 24.250)
- Extended: Scan for the entire range of K band that police use in North America, including lower frequency MRCD and Redflex cameras (23.900 – 24.250)
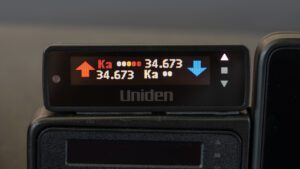
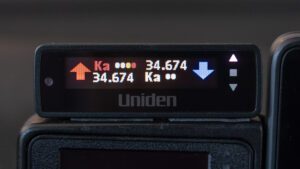
Ka Narrow / Wide / Segmentation
Adjust the range of frequencies that the R9 scans for on Ka band. All of Ka band is very wide so cutting down to a smaller range of frequencies improves the performance of the detector.
- Narrow: (Default) Scan for a reduced range of Ka frequencies to only the ranges where police radar guns generally operate (33.8 +/- 100 MHz, 34.7 -100 MHz / +150 MHz, 35.5 +/- 100 MHz)
- Wide: Scan all the possible Ka frequencies where the R9 is capable of scanning for (33.400 GHz – 35.700 GHz)
- Segmentation: Choose the individual Ka frequency ranges where you’d like the detector to scan for.
- Ka 1: 33.399 – 33.705 GHz
- Ka 2: 33.705 – 33.903 GHz (MPH 33.8 radar guns)
- Ka 3: 33.903 – 34.191 GHz
- Ka 4: 34.191 – 34.587 GHz (Stalker 34.7 radar guns that drift low)
- Ka 5: 34.587 – 34.803 GHz (Stalker 34.7 radar guns)
- Ka 6: 34.803 – 35.163 GHz (Stalker 34.7 radar guns that drift high)
- Ka 7: 35.163 – 35.379 GHz
- Ka 8: 35.379 – 35.613 GHz (Decatur & Kustom Signals 35.5 radar guns)
- Ka 9: 35.613 – 35.701 GHz
Note 1: If you’re wondering where segment Ka 10 is, it’s gone from the R9. To give the R9 the ability to scan down lower on K band, they’ve removed its ability to scan higher up on Ka band. Ka band above 35.600 is virtually non-existent so in general this is a good trade-off. This feature first came on the Net Radar DSP and you can read more about this discussion here.
Note 2: Read this post on RDF to learn which Ka segments to enable in your area.
Ka / MRCD Signal Priority
When detecting multiple signals, how should the R9 prioritize which signal is treated as the primary signal? The primary’s signal will take up most of the display and the audio rampup beeps will be for the primary signal.
- Ka / MRCD Priority: (Default) Alert priority is based on radar band. If you’re seeing multiple signals, alert priority will be given to Laser, Ka, MRCD, K, & X in that order.
- MRCD / Ka Priority: Alert priority is based on radar band. If you’re seeing multiple signals, alert priority will be given to Laser, MRCD, Ka, K, & X in that order.
- Signal Priority: Alert priority is given to the strongest (and likely closest) signal, no matter what frequency or band it’s on. MRCD is always prioritized in this mode, independent of strength.
Note: If you have MRCD turned off, it will only display Ka Priority and Signal Priority.
I prefer Ka / MRCD Priority since legit K band is rare and MRCD is non-existent around here. This way a detector alerts me to a weak Ka band at a distance if I’m next to a speed sign. If you have a lot of K band in use, Signal Priority may be preferred to alert you to stronger / closer K band sources. Legit MRCD is always super close range so if you have that in your area, choose an option that prioritizes MRCD.
Mute Memory Bands
By default, GPS lockouts only apply to X and K band. This makes sense since stationary false alerts coming from automatic door openers and speed signs typically transmit on these two bands. However, if you have fixed false alerts on Ka band (occasionally happens from certain speed signs or even some satellite dishes on homes that transmit on Ka), you can enable GPS lockouts for Ka band as well.
- X & K (Default)
- X, K, Ka
Note: Please be aware that locking out Ka band signals can be risky because Ka alerts are almost always legitimate. However, if you are 100% sure that a Ka band source that you keep passing is a false alert, you can enable lockouts for Ka band.
Bonus: If you enable Ka lockouts, you’ll also gain the ability to lock out MRCD/T alerts.
Auto Mute Mem
These are your automatic GPS lockouts. After you pass a stationary false alert multiple times over several days, the detector will automatically learn these false alerts and mute them for you in the future, automatically adding the signals to your mute memory.
![]()
- On (Default)
- Off
Auto Mem
By default your autolockouts will only apply to X & K band. This option allows you to enable autolockouts for Ka band (and MRCD at the same time) if you like.
- X & K (Default)
- X K Ka
All Threat Display
Display additional signals on the left hand side of the screen, replacing your speed/direction when more than 1 alert is present.
- On
- Off (Default)
Color
Choose the primary color of your display and control pad. This is helpful if you’d like to match the detector’s color to match your vehicle’s interior lights. It can also be fun to change on the holidays to make your detector’s display more festive, ie. running red or green during Christmas or amber/orange during Halloween. 🙂
- Red (Default)
- White
- Purple
- Blue
- Amber
- Green
- Pink
- Grey
Arrow Color
Choose unique colors for the arrows, depending on the direction or signal type. By default the arrows are always red ahead and blue behind, but you can make them different colors depending on if the primary signal is front or rear, Laser, X, K, MRCD, Gatso, or Ka Band.
- Red (Default)
- Blue
- Green
- Orange
- Yellow
- White
- Violet
Band Color
Choose the color for when the R9 displays the radar band (X, K, MRCD, Gatso, or Ka band) on screen.
- Signal: (Default) The color of the radar band changes as the signal gets stronger, from weak green signals, to medium yellow signals, or to strong red signals.
- Arrow: The arrow color matches the radar band.
- Red
- Blue
- Green
- Orange
- Yellow
- White
- Violet
Display
Choose what information is displayed on screen when no signal is present.
- Time
- Scan: Knight rider style animated scanning bar
- Mode: (Default) Highway, City, Auto, or Advanced mode
Scan Icon
Enable or disable the blinking heart icon on the main screen.
- Off (Default)
- On
Display (in Left Box)
Choose what information is displayed in the left box.
- Speed (Default)
- Speed + Compass
- Compass
- Voltage
- Altitude
Note: This information is temporarily overwritten when you have the All Threat Display option enabled and you’re detecting multiple signals.
Alert Display
Choose the signal strength meter style on the display.
- Alert Display #1: (Default) Shows the front and rear signal strength simultaneously
- Alert Display #2: Shows just the primary signal strength with additional signals in the All Threat Display
Alert Display #1
LED Initial
Choose if you want the external LED to be turned on and green at idle or turned off when no signal is present.
- Off (Default)
- On
Speed Unit
Choose if distances and speeds are displayed in imperial or metric units.
- mph (Default)
- km/h
X / K / MRCD/T / Gatso / Ka Band Tone
If you don’t like the default alert tones for the different radar bands, you can choose between 12 different alert tones.
K Bogey Tone
Choose which unique alert tone the R9 plays when it detects a new additional K signal while alerting to the first K signal.
Ka Bogey Tone
Choose which unique alert tone the R9 plays when it detects a new additional Ka signal while alerting to the first Ka signal.
Laser Tone
Choose between one of 12 different alert tones for laser alerts.
Auto Mute
Automatically reduce the volume of an alert after 3 seconds, once it has your attention.
- On (Default)
- Off
Auto Mute Volume
If the Auto Mute option is enabled, choose how loud or quiet the detector alerts once it drops down to the auto muted volume level.
- 0-8 (Default = 2)
Note: If your normal audio volume and auto mute volume are the same, it will “drop” to the same level and seem like the auto mute feature isn’t working. Be sure your auto mute volume level is set lower than your normal alert volume.
Dark Mode Brightness
When running the display in dark mode, the display will be off (with a blinking dot that slowly moves along the bottom of the screen to let you know the detector is on).

When the R9 picks up a signal, the R9 will light up and display all the normal information (as opposed to the “Off” display setting which keeps the display off no matter what.) This “Dark Mode Brightness” option lets you choose how bright the detector lights up when you pick up a signal.
- Bright
- Dim
- Dimmer (Default)
Auto Dim Setting
When you have the display brightness set to Auto, you’ll have the option in the menu to choose how bright or how dark the display is in the daytime or at night.
- Mode
- Sensor (Default)
- Time
- Bright Time (if mode is set to time)
- Bright Level
- Bright (Default)
- Dim
- Dimmer
- Dim Time (if mode is set to time)
- Dim Level
- Bright
- Dim (Default)
- Dimmer
- Dark
- Off
Note: If you don’t see these options in the menu, make sure your display brightness is set to “Auto.”
Backlight
Enable the colored backlight behind the keypad buttons, this way you can more easily see them at night.
- On (Default)
- Off
Quiet Ride
Low speed muting for X and K band alerts. This is super helpful around town to keep the detector calm and quiet. When signals are being muted, you’ll see them flash on screen with green text that says Q-Ride.
- 5 – 90 mph in 5 mph increments or 10 – 140 km/h in 10 km/h increments
- Off (Default)
Q-Ride MRCD/T
Choose whether or not MRCD/T alerts are affected by quiet ride. MRCD photo radar is often run on city roads so you may want the immediate alert for MRCD even if the detector is muting normal radar.
- Off (Default)
- On
Q-Ride Beep Vol
Adjusts the volume of the initial alert before the detector is muted with quiet ride.
1 is the quietest, 8 is the loudest. 0 will totally silence the detector altogether for any signals muted by quiet ride.
- 0-8
Limit Speed
Get an alert when you’re traveling above a preset speed. This can be a helpful reminder to let you know when you’re traveling too fast.
- Off (Default)
- 50 – 100 mph in 5 mph increments or 80 – 160 km/h in 10 km/h increments
GMT
Select what time zone you are in.
- GMT-05:00: Eastern Standard
- GMT-06:00: Central Standard
- GMT-07:00: Mountain Standard
- GMT-08:00: Pacific Standard (Default)
- GMT-09:00: Yukon Standard
- GMT-10:00: Alaska-Hawaii Standard
DST
Adjust the time for daylight savings time. If you set the time zone, but your clock is off by 1 hour, change this.
- On
- Off (Default)
BAT Warning
Alerts you when your battery voltage drops to a low level, below 11v.
- On
- Off (Default)
In certain vehicles that have a start/stop system that shuts off the engine at red lights, this warning may go off whenever that system kicks in and so you’ll want to disable it.
BAT Saver
If your R9 is plugged into a power source that is always on, turn this feature on. This way when you’re parked (stationary) or you’re in a parking garage (so you lose GPS), the detector will shut itself off after 1 hour so you don’t kill your car battery.
- On
- Off (Default)
Self Test
Plays a sample of the different radar and laser alerts on startup. It doesn’t actually do an internal self-check and it’s more of an audible and visual demo of the different alerts. I prefer turning this off for a quieter and faster startup.
- On (Default)
- Off
Factory Reset?
Reset all your settings back to factory default. There’s no options here. Pressing the menu button resets your detector.
Note: All of your GPS lockouts and GPS user marks will remain in place if you reset your detector’s default settings. Clearing your lockouts and marked locations are in the next menu options.
Delete All Mute?
Delete all of your manual GPS lockouts.
There’s no options here. Pressing the menu button clears all of your lockouts.
Delete All Auto?
Deletes all of your automatic GPS lockouts.
There’s no options here. Pressing the menu button clears all of your lockouts.
Delete All User?
Delete all of your manually marked GPS locations.
There’s no options here. Pressing the menu button clears all of your user marks.
Note: A shortcut to this option can be found by pressing and holding the Mark button on the front of your detector, then pressing Mark a second time to confirm. This is handy in case you don’t use this feature in the first place and you create a user mark by accident. You can clear your marks this way without waiting until you come back to this location, your detector goes off, and you press the Mark button on the front of your detector to delete that location.
Memory Quota
The R9 supports 2,000 memory locations, split between GPS lockouts and manual GPS user marks. By default the R9 is set up to give you 1,000 of each. Personally I use GPS lockouts all the time and rarely/never use the GPS marks, so I’d rather allocate the available space to GPS lockouts.
In the memory quota section, you can change how many of the 2,000 user points are being used for lockouts or for user marks. You can select up to 1,750 of one which gives 250 remaining for the other, adjustable in increments of 50.
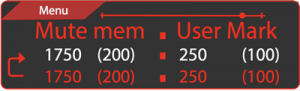
In this image, the detector is set to give us 1,750 manual GPS lockouts and 250 GPS user marks. You can also see the number in parenthesis telling you how many GPS lockouts (200) and how many User Marks (100) you’ve created so far.
Note: This applies to Manual GPS lockouts only. Auto lockouts have way more memory allocated separately and isn’t something you adjust.
You can change how many manual lockout and user mark locations are available with the – and + buttons on top of the R9 and this change will be shown in white text. The bottom text in red stays put as your current/previous settings. Press the Menu button up top twice to change to your new settings.
Version
Check which firmware version you’re running.
DB Ver
Displays the date of the redlight cam / speed camera database that you’re running.
Exit
Exit the menu. You can also exit the menu by long pressing the menu button or waiting for the detector to automatically time out.
General Recommended Uniden R9 Settings
Realistically speaking, there are no one set of settings that are appropriate for every person in every area. If there was, there would be no need to have adjustable settings in the first place. 🙂 Nevertheless, here’s a set of generic recommended settings that you can use as a starting point, think about what is appropriate for you, and then adjust as you see fit. As you drive, you’ll naturally get a better sense of how you can further tweak these settings.
- Menu: Expert
- Auto
- Auto City: 40 mph
- GPS: On
- Speed Camera: On
- Speed C Range: 1000ft
- Redlight Cam: On
- RLC Q-Ride: 60 mph
- POI Passchime: Off
- Voice: Off
- Ka Freq Voice: On
- Front Radar: On
- Front X Band: Off (On in OH and NJ)
- Front K Band: On
- Front Ka Band: On
- Rear Radar: On
- Rear X Band: Off (On in OH and NJ)
- Rear K Band: On
- Rear Ka Band: On
- Laser: On
- Laser Gun ID: On
- Laser Gun Vce: On
- Pulse Mode
- Pulse On: 4s
- Pulse Off: 30s
- Laser TP Setting
- TP1: Front / Rx
- TP2: Front / Tx
- TP3: Front / Rx
- TP4: Rear / Rx
- TP5: Rear / Tx
- TP6: Rear / Rx
- K POP: Off
- MRCD/T: Off
- Gatso RT3/4: Off
- Ka POP: Off
- K Filter: On
- Ka Filter: On
- TSF: On
- K Block 1: Weak, Default Settings
- K Block 2: Weak, Default Settings
- K Block 3: Weak, Default Settings
- K usr1: Weak, Both Directions, 24.158-24.162
- K usr2-5: Off
- K Narrow
- Ka Segmentation: 2/4/5/6/8
- Ka Priority
- Mute Mem: X & K
- Auto Mute Mem: On
- Auto Mem: X & K
- All Threat: On
- Color: Red
- Front Arrow Color
- Front X Band: Red
- Front K Band: Red
- Front MRCD/T: Red
- Front Gatso: Red
- Front Ka Band: Red
- Rear Arrow Color
- Rear X Band: Blue
- Rear K Band: Blue
- Rear Ka Band: Blue
- Band Color
- X Band: Signal
- K Band: Signal
- Ka Band: Signal
- Time Display
- Scan Icon: Off
- Display: Spd+Comp
- Alert Display: #1
- LED Initial: Off
- Speed Unit: mph
- X Band Tone: 1
- K Band Tone: 2
- K Bogey Tone: Off
- Ka Band Tone: 3
- Ka Bogey Tone: 1
- Laser Tone: 4
- Auto Mute: On
- Auto Mute Vol: 2
- Dark Mode: Dim
- Auto Dim Setting
- Mode: Sensor
- Bright level: Bright
- Dim level: Dim
- Backlight: On
- Quiet Ride: 40 mph
- Q-Ride Beep Vol: 0
- LimitSpeed: Off
- GMT: As appropriate
- DST: Off
- BAT Warning: Off
- Bat Saver: Off
- Self Test: Off
- Memory Quota
- Mute Mem: 1,750
- User Mark: 250
Vortex’s Uniden R9 Settings
Finally, here’s a look at the settings I use myself. I see almost all Ka band out here and K band is very rare, so I like to be pretty aggressive on the K band filtering. X band I disable. MRCD I don’t see in this area, but I occasionally turn it on to help with filtering Mazda CX-5 BSM’s. Then I turn on some additional MRCD filters to address the MRCD false alerts. These settings may or may not be appropriate for you and your driving area and personal preferences, but here’s a look at how I currently run my R9.
- Menu: Expert
- Auto
- Auto City: 40 mph
- GPS: On
- Speed Camera: On
- Speed C Range: 1000 ft
- Redlight Cam: On
- RLC Q-Ride: 60 mph
- POI Passchime: Off
- Voice: Off
- Ka Freq Voice: On
- Front Radar: On
- Front X Band: Off
- Front K Band: On
- Front Ka Band: On
- Rear Radar: On
- Rear X Band: Off
- Rear K Band: On
- Rear Ka Band: On
- Laser: On
- Laser Gun ID: On
- Laser Gun Vce: On
- Pulse Mode
- Pulse On: 4s
- Pulse Off: 30s
- Laser TP Setting
- TP1: Front / Rx
- TP2: Front / Tx
- TP3: Front / Rx
- TP4: Rear / Rx
- TP5: Rear / Tx
- TP6: Rear / Rx
- K POP: Off
- MRCD/T: Off
- Gatso RT3/4: Off
- Ka POP: Off
- K Filter: On
- Ka Filter: On
- TSF: On
- K Block 1: Weak, Default Settings
- K Block 2: Weak, Default Settings
- K Block 3: Weak, Default Settings
- K usr1: Weak, Both Directions, 24.158-24.162
- K usr2-5: Off
- K Narrow
- Ka Segmentation: 2/4/5/6/7/8
- Ka Priority
- Mute Mem: X & K
- Auto Mute Mem: On
- Auto Mem: X & K
- All Threat: On
- Color: Red
- Front Arrow Color
- Front X Band: Red
- Front K Band: Red
- Front Ka Band: Red
- Rear Arrow Color
- Rear X Band: Blue
- Rear K Band: Blue
- Rear Ka Band: Blue
- Band Color
- X Band: Signal
- K Band: Signal
- Ka Band: Signal
- Time Display
- Scan Icon: Off
- Display: Spd+Comp
- Alert Display: #1
- LED Initial: Off
- Speed Unit: mph
- X Band Tone: 1
- K Band Tone: 2
- K Bogey Tone: Off
- Ka Band Tone: 3
- Ka Bogey Tone: 1
- Laser Tone: 4
- Auto Mute: On
- Auto Mute Vol: 2
- Dark Mode: Dim
- Auto Dim Setting
- Mode: Sensor
- Bright level: Bright
- Dim level: Dim
- Backlight: On
- Quiet Ride: 40 mph
- Q-Ride Beep Vol: 0
- LimitSpeed: Off
- GMT: -8 Hour
- DST: Off
- BAT Warning: Off
- Bat Saver: Off
- Self Test: Off
- Memory Quota
- Mute Mem: 1,750
- User Mark: 250
@DC Fluid’s Canadian Uniden R9 Settings
If you’re in Canada, be sure to check out @DC Fluid’s Uniden R9 settings. There are some further customizations to the settings based on local threats, photo radar in use throughout the country, etc.
That’s it for now! Please let me know if you have any questions.
If you still need to pick up an R9, you can buy your R9 here.
Thank you for reading. 🙂
| This website contains affiliate links and I sometimes make commissions on purchases. All opinions are my own. I don’t do paid or sponsored reviews. Click here to read my affiliate disclosure. |


2 comments
I don’t have a Uniden 9, I have a Uniden 8
Author
In that case you can check out my Uniden R8 setup guide instead.