 The Radenso DS1 (purchase here) comes with a bunch of settings and options to let you customize the detector.
Let’s go over how to use the detector including what the buttons on the detector do and how to tweak your settings to optimize its performance and false alert filtering.
You can update the settings directly in the detector, or via the new Radenso Nexus Android app. (Radenso’s iOS app is still in development.)
When driving, you can pair several different apps with the detector including Radenso Nexus or Highway Radar for Android, or V1Driver or DS1 Companion on iOS.
Note 1: This guide is current as of firmware 1.16 and will be regularly updated as new updates are released. (This guide last updated December 2023.)
Note 2: You can also reference the DS1 manual which is an excellent resource and has a bunch of great info too.
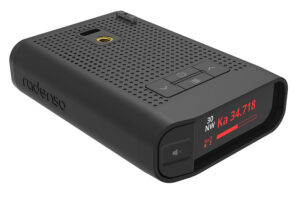
Radenso DS1 Interface & Operation
Starting off, let’s get familiar with the detector’s interface.
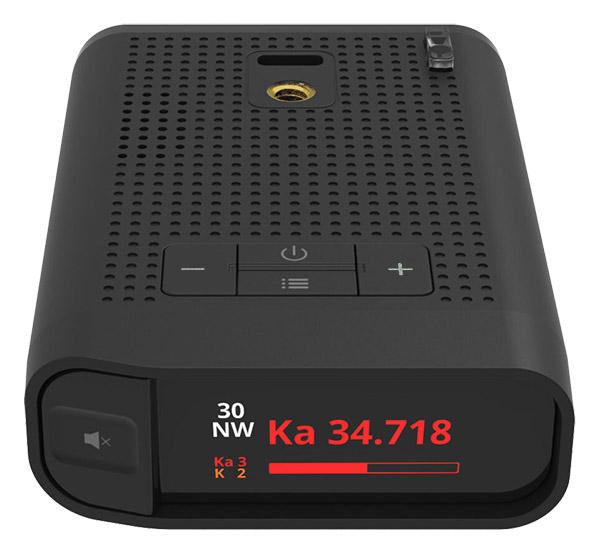
Buttons
Mute Button:
- Single press during an alert: Mute the signal
- Double press during an alert: Manually lock out the alert (use for stationary false radar sources like speed signs and shopping center door openers)
- 1 sec press during RLC/speed cam alert: Delete the RLC / speedcam alert
- Long press when no alert: Mark current location to get notified every time you pass
Menu Button:
- Single press: Enter the detector’s settings menu
- Short press in menu: Select this option
- Long press in a submenu: Go back up to the previous menu
– Button:
- Press: Volume Down
- Press in menu: Go back up the menu to the previous option
+ Button:
- Press: Volume Up
- Press in menu: Go down the menu to the next option
– & + Button Simultaneously:
- Hold Both: Put DS1 into Download mode while plugged into computer so you can update it
Power Button:
- Press: Turn detector on or off
User Pref.
These are some basic detector options. The default* option will be marked with an *.
Mode
- Auto*: Lets you automatically vary the detector’s sensitivity on K band based on speed. K Notch frequency ranges are all fully blocked regardless of K Notch settings.
- K Band runs at 65% at faster speeds
- K band runs at 50% at slower speeds
- Custom: Manual control over K band sensitivity, plus K Notch control.
Auto Speed Setting
Choose the speed threshold for when the DS1 automatically switches between K band running at 65% sensitivity (faster speeds) or 50% sensitivity (slower speeds)
- 15 – 60 mph in 5 mph increments (Default 50 mph)
Voice
Announces signal info when an alert pops up. Does not disable the voice in the menu.
- On*
- Off
Ka Frequency Voice
Audibly speak the frequency of a Ka signal when it alerts.
- On*
- Off
Frequency Display
Display the exact frequency of the radar signal on screen.
- On
- Off*
K X Low Speed Mute
Mutes X & K band signals when traveling below the preset speed.
- Off
- 5 – 65 mph in 5 mph increments (default 15 mph)
Ka Low Speed Mute
Mutes Ka band signals when traveling below the preset speed.
- Off (default)
- 5 – 65 mph in 5 mph increments
MRCD Low Speed Mute
Mutes MRCD signals when traveling below the preset speed.
- Off
- 5 – 65 mph in 5 mph increments (default 15 mph)
Over Speed Warning
Get notified if you travel above this preset speed.
- Off*
- 65 – 105 in 5 MPH increments
Bluetooth (BT)
Enable Bluetooth to use with apps like Radenso Nexus or Highway Radar.
- On
- Off*
BT Pairing
Activate when pairing your detector to your phone. (Option only shows up when Bluetooth is enabled)
- Pairing Set
Band On/Off
Choose which types of signals you’d like your detector to alert you to.
Laser
- On*
- Off
Ka
- On*
- Off
Note: Ka needs to be On to use Ka Segmentation.
MRCD/CT
- On
- Off*
K
- On*
- Off
X
- On
- Off*
POP Ka
This controls 67 ms Ka band POP detection.
- On
- Off*
POP K
This controls 67 ms K band POP detection.
- On
- Off*
K Gatso
Enable detection for Gatso RT3 and RT4 photo radar systems.
Note: Gatso falses are pretty common so leave this disabled unless needed.
- On
- Off*
Band Setting
K Notch
Additional filtering for many different cars with blind spot monitoring (BSM) radar systems. It’s designed to filter:
- 24.121 – 24.124
- 24.158 – 24.168
- 24.194 – 24.204
- 24.224 – 24.225
- Block all signals*
- Mute all signals
- Mute weak signals
- Off
I personally prefer Block Weak Signals because it does a good job of knocking out false alerts from nearby vehicles while still alerting to stronger police radar guns.
Note: This feature only works in Custom mode. When the DS1 is set to Auto mode, these settings are ignored and the detector essentially runs in “block all signals” mode instead.
Ka Sens
- 100 – 50 in 10% increments (default 100)
Note: These individual band settings only apply when running the detector in Custom Mode. They’re ignored in Auto mode.
K Sens
- 100 – 30 in 10% increments (default 100)
X Sens
- 100 – 50 in 10% increments (default 100)
Ka Wide/Narrow/Segment
- Wide*: 33.399 – 35.700 GHz
- Narrow: Scan predefined segments for 33.8, 34.7, & 35.5
- 33.8 GHz +/- 99 MHz
- 34.7 GHz -100/+150 MHz (34.6 GHz – 34.85 GHz)
- 35.5 GHz +/- 99 MHz
- Segment
K Narrow/Wide
- Wide*: 23.900 – 24.250 GHz
- Narrow: 24.080 – 24.200 GHz
- NZ K Narrow: 24.000 – 24.100 GHz (Only shows up when set to Aus & NZ in the Units section)
Ka Seg Setting
Controls which freq. ranges the detector scans for and alerts to on Ka band. You can turn each segment on or off.
- Ka Seg1: 33.399 – 33.705
- Ka Seg2: 33.705 – 33.903 GHz (33.8)
- Ka Seg3: 33.903 – 34.191 GHz
- Ka Seg4: 34.191 – 34.587 GHz
- Ka Seg5: 34.587 – 34.803 GHz (34.7)
- Ka Seg6: 34.803 – 35.163 GHz
- Ka Seg7: 35.163 – 35.379 GHz
- Ka Seg8: 35.379 – 35.613 GHz (35.5)
- Ka Seg9: 35.613 – 35.701 GHz
Note: Be sure to leave Ka on (not off like some other detectors) in order to choose which segments should be used.
Ka Filter
Helps filter out false alerts on Ka band.
- On*
- Off
K Filter
Filter out false alerts on K band including BSM falses.
- On*
- Off
TSR Filter
The traffic sensor rejection filter helps cut out false alerts from K band traffic sensors that run along some highways. If you encounter periodic blasts on K band on the highway (not from nearby cars with blind spot monitoring radar), you can turn this on.
- On
- Off*
Note: TSR does reduce K band range.
Display
Brightness
- Auto*: Gets brighter during the day and dimmer at night, relies on an ambient light sensor
- Bright
- Dim
- Dimmer
Display Color
- Red*
- Blue
- White
- Gray
- Pink
- Purple
- Green
- Amber
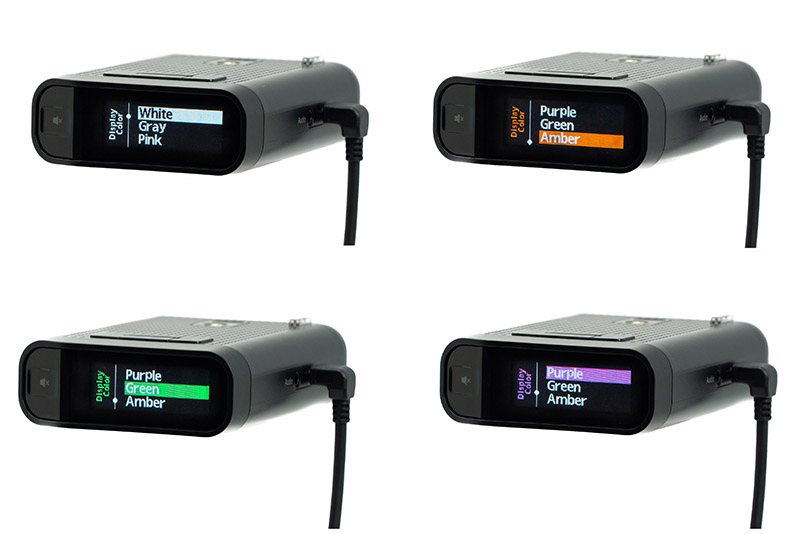
You can also control individual band colors below:
Laser Color
- Red, Blue*, White, Gray, Pink, Purple, Green, Amber
Ka Color
- Red*, Blue, White, Gray, Pink, Purple, Green, Amber
MRCD/CT Color
- Red, Blue, White, Gray, Pink, Purple*, Green, Amber
K Color
- Red, Blue, White, Gray, Pink, Purple, Green, Amber*
X Color
- Red, Blue, White, Gray, Pink, Purple, Green*, Amber
Idle Mode
Main display shown when detector is working but not detecting any signals.
- Scan: Scanning bar goes back and forth across the screen.
- Time*: Displays the current time.
- Speed: Display your current speed
- Smart Dark: Displays a blinking dot in the lower right corner to mitigate burn in and confirm that the detector is still powered on. Visually alerts normally when an alert pops up.
- Dark: Display remains dark both at idle and during an alert. You’ll see a blinking dot in the lower right corner to verify that the detector is still powered on.
Sub Mode
Additional info shown in the top left of the screen during idle.
- Speed
- Compass
- Speed & Compass*
- Altitude
- Off
Tone
Choose which audio tone plays for different types of alerts. Here’s a demo of the 10 different audio tones:
Laser
- 1 – 10 (default 1)
Ka
- 1 – 10 (default 3)
MRCD/CT
- 1 – 10 (default 5)
K
- 1 – 10 (default 4)
X
- 1 – 10 (default 2)
Bogey
- 1 – 4 (default 1)
- Off
GPS
GPS
- On*
- Off
GPS Signal announce
Announce when your detector acquires a GPS lock.
- On*
- Off
Auto lockout
Automatically learn and lock out stationary false alerts that you pass by regularly including shopping center door openers and speed signs on the side of the road.
- On*
- Off
Here are some technical notes:
- Auto lockouts apply to X band & K band.
- Signals will be locked out after 3 passes.
- The DS1 requires at least 8 hours between passes in order for each pass to count as a new sighting.
- Your lockout radius is approx. 450m when entering a lockout zone and approx. 500m when exiting a lockout zone.
Home auto lockout radius
Set a limit to how far away from home your auto lockouts will work.
- No limit
- 50MI – 200MI in 50 mile increments (default is 50 MI)
Note: I have no idea why you’d want to limit this. Personally I’d still want autolockouts to work if I travel to a new city or state and stay there for more than a few days.
Unlearn auto lockout
When locked out signals disappear, should the detector unlearn those lockouts after several passes of the signal being gone?
- On
- Off*
Pin Home
Mark your current location as your home location. Then use the “Auto lock area” above to choose how far away your auto lockouts will continue to work.
- Pin Home Set
Advanced Lockout
Customize the frequency range that each GPS lockout covers.
- +/- 10 MHz
- +/- 15 MHz (default)
- +/- 20 MHz
Lockout Bands
Have lockouts work for just the main sources of false alerts (X & K band) or add the ability to lockout Ka and photo radar alerts which can be risky.
- K&X bands*
- All radar bands
RL CAM
Get alerted to red light cameras.
- On*
- Off
SPD CAM
Get alerted to fixed speed cameras.
- On*
- Off
RL&SPD CAM
Get alerted to integrated red light and speed camera systems.
- On*
- Off
GPS Alert Distance
- Auto: Alert distance changes with speed, where faster speeds give you longer alert distances of 200 – 520m, varying between 25 – 65 MPH in 10 MPH increments.
- Short: 250m
- Medium: 350m
- Long: 450m
RLC Auto Mute
Mute redlight cameras when traveling above a preset speed, useful when you’re driving on the highway and you pass a redlight camera on a nearby surface street.
- Off*
- 55 – 70 in 5 MPH increments
RL&SPD Chime
Audible chime that plays when you pass a redlight camera or speed camera.
- On
- Off*
Delete All UserPTS?
Delete all manually created user points.
- Delete?
Delete All Lockouts?
Delete your manual GPS lockouts.
- Delete?
Delete All AutoLock?
Delete your automatic GPS lockouts.
- Delete?
Unit
Region
These are presets that automatically set your detector to MPH/KPH and adjust your default time zone. Choosing the Aus&NZ option also enables a new NZ-specific K band segmentation option. You can also control these settings below.
- US*
- CANADA
- AUS&NZ
GMT
- -12, -11, -10, -9, -8*, -7, -6, -5, -4, -3, -2, -1, 0, 1, 2, 3, 4, 5, 6, 7, 8, 9, 10, 11, 12
DST
- On*
- Off
Time
- 12Hr*
- 24Hr
Unit
- English*
- Metric
Auto Power
Automatically power off your detector after you’ve been parked for a period of time. Useful in case your power source is always on and doesn’t turn off with your vehicle’s ignition.
- Off*
- 15Min
- 30Min
Auto Mute
Automatically reduce the detector volume after an initial full volume alert.
- On
- Off*
Auto Mute Start
Choose with the auto mute kicks in.
- 1sec
- 2sec
- 3sec*
Auto Mute Vol
Adjust how quiet the detector gets once it reduces the volume. Lower = quieter.
- 50%*
- 40%
- 30%
- 20%
- 10%
- 0%
Factory Reset
Resets your detector’s settings back to factory default.
- Reset?
Note: This does not clear your user marks and GPS lockouts.
FW Ver
Display the current firmware version.
- 1.13
DB Ver
Display the date of the current GPS redlight/speedcam database.
- 22.07.04
General Recommended DS1 Settings
If you’re new to the DS1, here are some settings that would be good for most drivers. Different settings are best for different people so consider these settings to be a starting point to drive with and later customize further based on your personal needs and preferences.
(Settings with a * are changed from factory default.)
User Pref
- Mode: Custom*
- Auto Speed Setting: 50
- Voice: On
- KA Freq Voice: On
- Freq Display: On*
- K X Low Speed Mute: 35*
- Ka Low Speed Mute: Off
- MRCD Low Speed Mute: 35*
- OverSpd Warn: Off
- BT: On*
Band On/Off
- Laser: On
- Ka: On
- MRCD/CT: Off
- K: On
- X: Off
- POP Ka: Off
- POP K: Off
- K Gatso: Off
Band Setting
- K Notch: Block Weak Signals*
- Ka Sens: 100%
- K Sens: 60%*
- X Sens: 60%*
- Ka Segment*
- K Narrow
- Ka Seg SettingKa Seg1: Off*
- Ka Seg2: On
- Ka Seg3: Off*
- Ka Seg4: On
- Ka Seg5: On
- Ka Seg6: On
- Ka Seg7: Off*
- Ka Seg8: On
- Ka Seg9: Off*
- Ka Filter: Off*
- K Filter: On
- TSR Filter: On*
- Alert Priority: Band
Display
- Brightness: Auto
- Display Color: Red
- Laser Color: Blue
- Ka Color: Red
- MRCD/CT Color: Purple
- K Color: Amber
- X Color: Green
- Idle Mode: Speed*
- Sub Mode: Spd&Compass
Tone
- Laser: 5*
- Ka: 3
- MRCD/CT: 10*
- K: 4
- X: 2
- Bogey: Off*
GPS
- GPS: On
- GPS Signal Announce: Off
- Auto lockout: On
- Home auto lockout radius: No limit*
- Unlearn Auto Lockouts: On*
- Pin Home
- Advanced Lockout: +/- 15 MHz
- Lockout Bands: K & X bands
- RL Cam: On
- Spd Cam: On
- RL&Spd Cam: On
- GPS Alert Dist: Auto
- RLC Auto Mute: 55*
- RL&SPD Chime: Off
Unit
- Region: Select as appropriate
- GMT: Select as appropriate
- DST: On
- Time: 12Hr
- Unit: Select as appropriate
- Auto Power: 30Min*
- Auto Mute: On*
- Auto Mute Start: 3sec
- Auto Mute Vol: 50%
Vortex’s Personal DS1 Settings
Here are the settings I run on my DS1. I see mostly Ka band here. K band is rare, so I choose to filter it pretty aggressively. I have X Band, MRCD, and Gatso disabled since they’re not in use in my area.
User Pref
- Mode: Custom*
- Auto Speed Setting: 50
- Voice: Off*
- Ka Freq Display: On
- Freq Display: On*
- X K Low Speed Mute: 40*
- Ka Low Speed Mute: Off
- MRCD Low Speed Mute: 40*
- OverSpd Warn: Off
- BT: On*
Band On/Off
- Laser: On
- Ka: On
- MRCD/CT: Off
- K: On
- X: Off
- POP Ka: Off
- POP K: Off
- K Gatso: Off
Band Setting
- K Notch: Block weak signals*
- Ka Sens: 100%
- K Sens: 50%*
- X Sens: 60%*
- Ka: Segment*
- K: Narrow
- Ka Seg SettingKa Seg1: Off*
- Ka Seg2: On
- Ka Seg3: Off*
- Ka Seg4: On
- Ka Seg5: On
- Ka Seg6: On
- Ka Seg7: On
- Ka Seg8: On
- Ka Seg9: Off*
- Ka Filter: Off*
- K Filter: On
- TSR Filter: On*
- Alert Priority: Band
Display
- Brightness: Auto
- Display Color: Red
- Laser Color: Blue
- Ka Color: Red
- MRCD/CT Color: Purple
- K Color: Amber
- X Color: Green
- Idle Mode: Speed
- Sub Mode: Spd&Compass
Tone
- Laser: 5*
- Ka: 3
- MRCD/CT: 10*
- K: 4
- X: 2
- Bogey: Off*
GPS
- GPS: On
- GPS Signal Announce: Off*
- Auto lockout: On
- Home auto lockout radius: No limit*
- Unlearn Auto Lockouts: On*
- Pin Home
- Advanced Lockout: +/- 15 MHz
- Lockout bands: K&X Bands
- RL Cam: On
- Spd Cam: On
- RL&Spd Cam: On
- GPS Alert Dist: Auto
- RLC Auto Mute: 55 MPH*
- RL&SPD Chime: Off
Unit
- Region: US
- GMT: -8
- DST: On
- Time: 12Hr
- Unit: English
- Auto Power: Off
- Auto Mute: On*
- Auto Mute Start: 3sec
- Auto Mute Vol: 40%*
Recommended Canadian DS1 Settings
Are you driving in Canada? If so, take a look at @DC Fluid’s recommended DS1 settings. He has recommended settings for both B.C. and Alberta.
Finally, if you still need one, you can purchase your Radenso DS1 here.
| This website contains affiliate links and I sometimes make commissions on purchases. All opinions are my own. I don’t do paid or sponsored reviews. Click here to read my affiliate disclosure. |


9 comments
Skip to comment form
Any update on GPS Alert Dist?
Author
Yep, info now added on that
Noticed that on a number occasions the ka alert showed a much higher number of alerts even though there appeared to be only one source any thoughts on this??
Hi Vortex,
My question is about your recommended Ka Segs. Your general recommendation is to have segments 1,3,7,9 turned off. Yet, on your personal settings you have seg 7 turned on. Is there a reason for this? Are these segments false alarms? I am in Calgary, should I leave all segments on? Also, should I turn POP K/Ka band off and should I turn Gatso on or off?Thanks for your time.
Author
There are several officers in the Seattle(ish) area that have had segment 7 guns some years ago so I leave it on just in case. General recommended settings are just that. They are not intended to be the best settings in every situation for every person. They’re a starting point you can further tailor based on your specific needs.
If you have local-specific questions, your best bet is to ask others on the forum who also drive in Calgary. I’m not an expert in your city’s needs.
I live in Edmonton, Alberta, Canada. I would appreciate it very much if you could email me the best band segmentation I can set up on my DS1.
I have downloaded the Radenso Nexus.
Great job on the videos and guidance, do you plan to do a special for Alberta settings?
FYI, Radenso ds1 they sent version 1.23 fw 1.09 today 4/25/2022 they added unlearned autolock outs now.
will you be updating the new Firmware as of July 8th? Thank you!!