The Uniden R9 is Uniden’s first custom installed radar detector and laser jammer. The radar detector is based off the popular R8 and their laser jammer is all new. I and several others have been beta testing the R9 for the past 3 years while it was under development, and now that it’s available for order, here’s a hands-on look at the R9’s features, design, performance, and capabilities.
You can watch the full video review here:
Uniden R9 Overview
The Uniden R9 is a high performance all-in-one custom installed solution for both radar and laser protection. Unlike windshield mount radar detectors, the R9 is designed to offer a clean and stealthy looking install with nothing on your windshield visible to thieves or law enforcement.
The R9 requires installation. You can either do it yourself or hire a professional to install the system for you. Once it’s all done, the R9 provides a more hidden and aesthetically pleasing setup in your cabin.
As always, custom installed solutions cost more than windshield mounts. Here’s how the R9 compares to other comparably equipped front/rear systems.
- Net Radar DSP (ALP 4 RX + 2 TX, BT, HiFi): $3,820
- Uniden R9 (6 laser heads): $4,000
- Escort Redline Ci 360c (5 laser heads): $4,300
- Radenso RC M Ultimate 2.0 (ALP 4 RX + 1 TX): $4,700
- Stinger S8-50 (6 TX / RX fiber heads, View display): $8,280
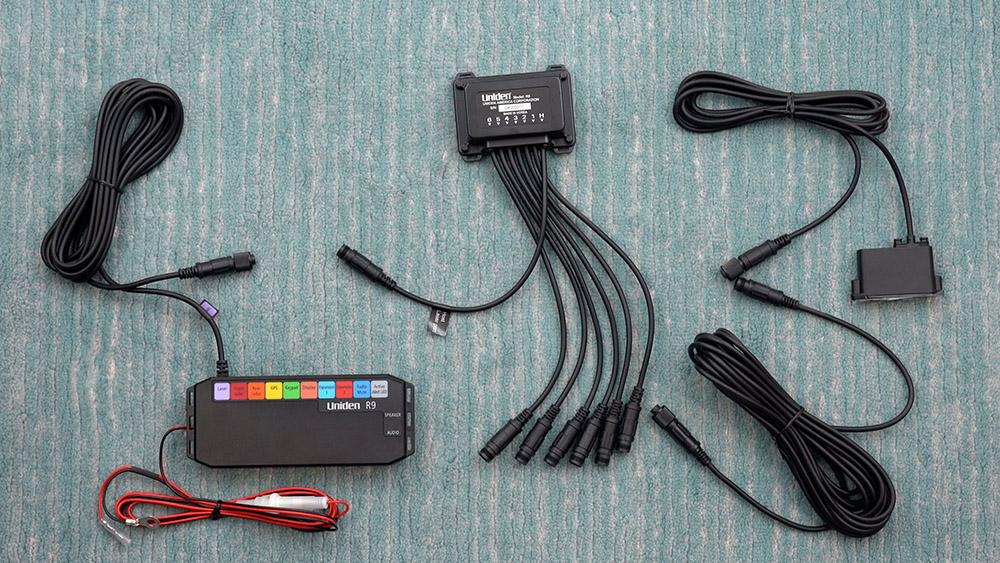
Uniden R9 Components
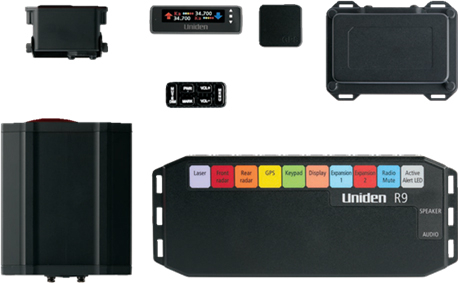
Starting off, here’s a hands-on look at all the parts of the R9 so you can get familiar with what is included and how everything connects.
The key parts and components include:
- Front & Rear Radar Detector Antennas
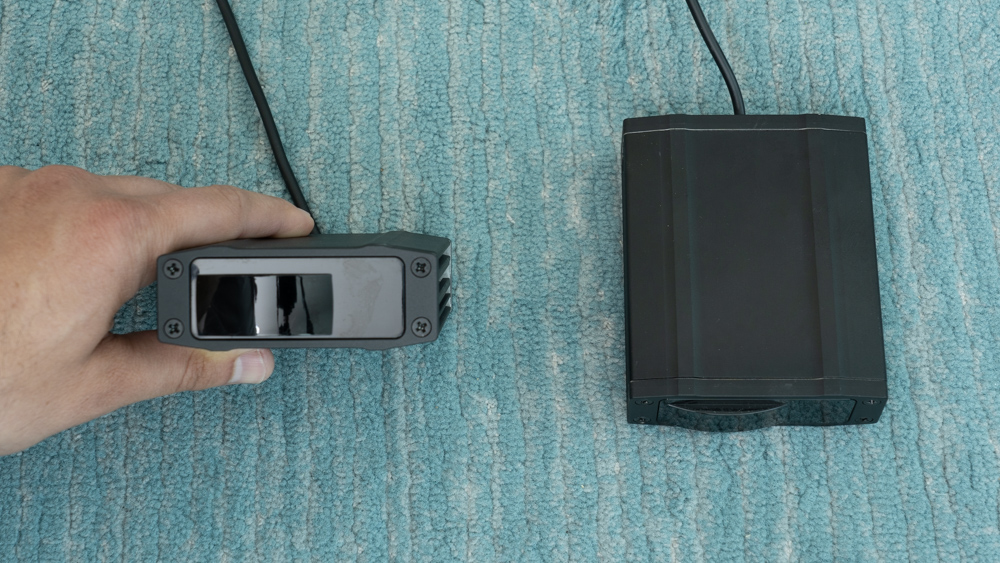
- Six Laser Jammer Heads
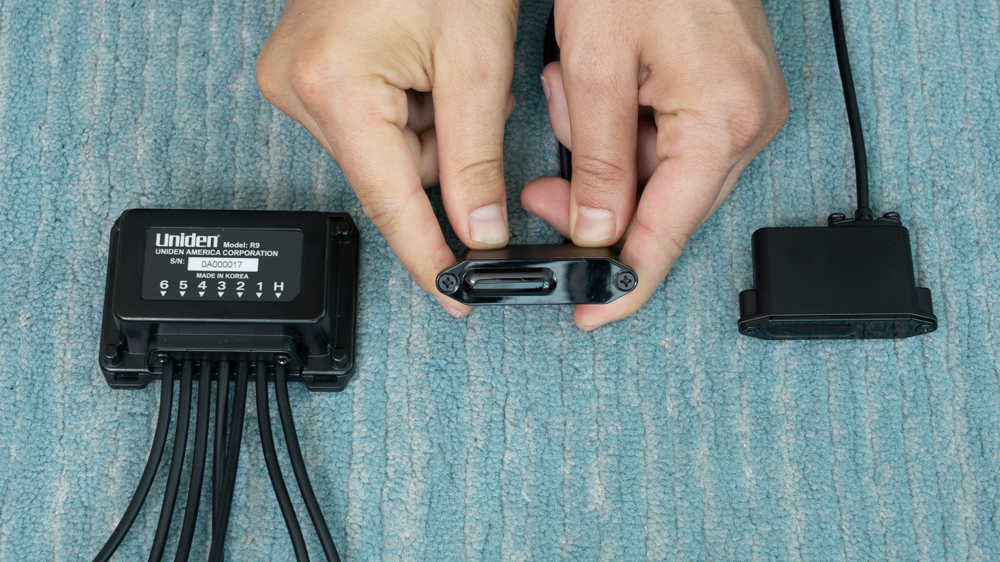
- Waterproof Laser Distribution Box
- OLED Display & Display Holder
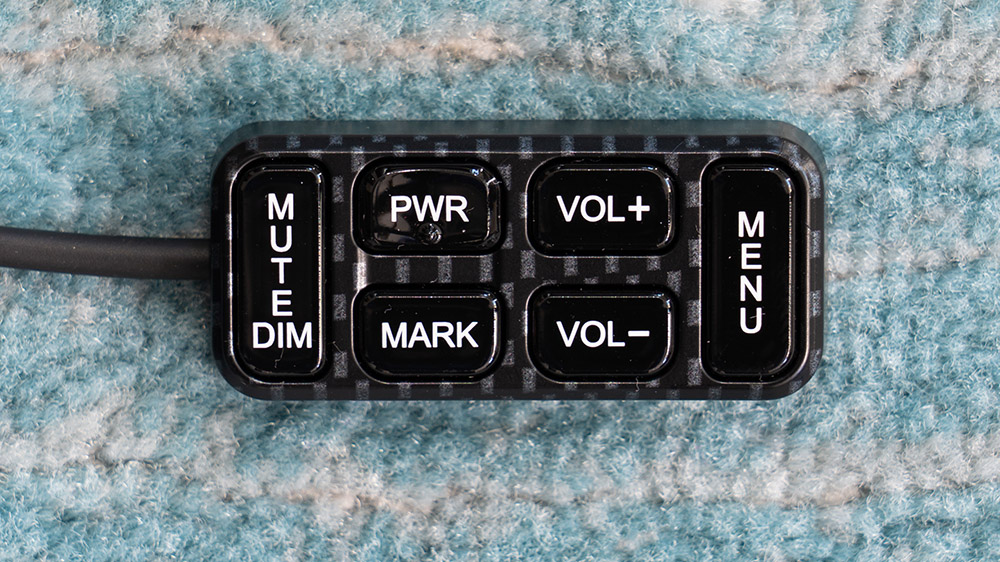
- Keypad
- Alert LED
- Main CPU
- GPS Antenna
- Speaker
- USB thumb drive for updates
- Radio mute wire
- Extension cables
- Mounting hardware
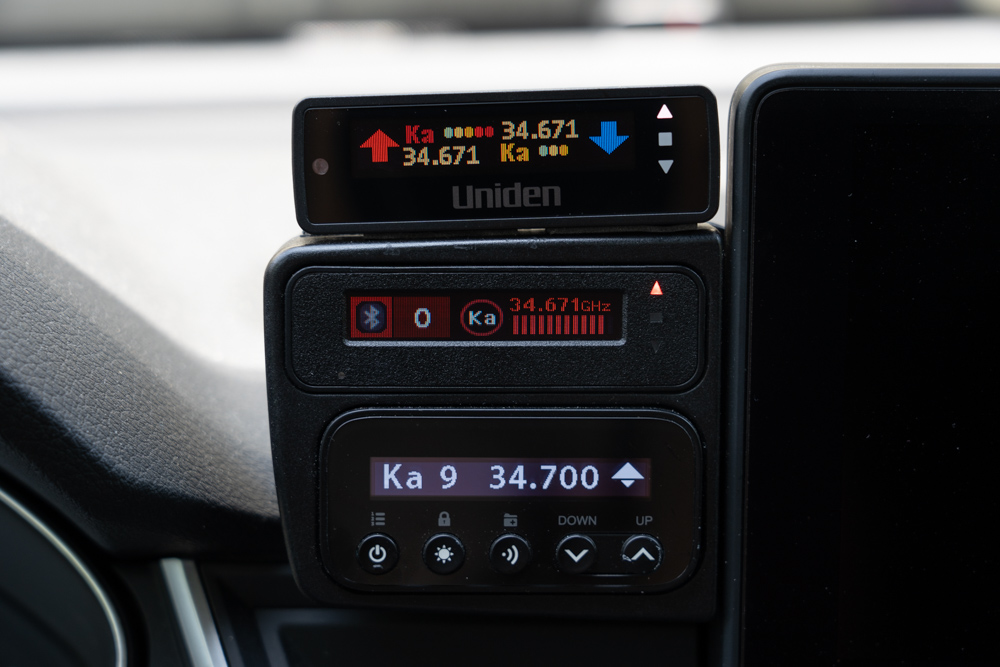
UI and Display
Once everything is installed, there will only be three things visible in the cabin including the display, controller, and optional alert LED.
The multicolor OLED display is same size as other custom installed radar detectors like the Max Ci 360, Redline Ci 360c, or Radenso RC M. It’s the same as the R4’s as well. The compact size is nice if your installer wants to take it apart and blend it into your vehicle, for example.
In practice I’ve found it can sometimes be confusing to quickly tell the signal direction, depending on the signal strength and how bright it is outside. The detector does an excellent job of locating different radar sources, but it’s not always easy to read that information. Luckily there are some workarounds you can take advantage of.
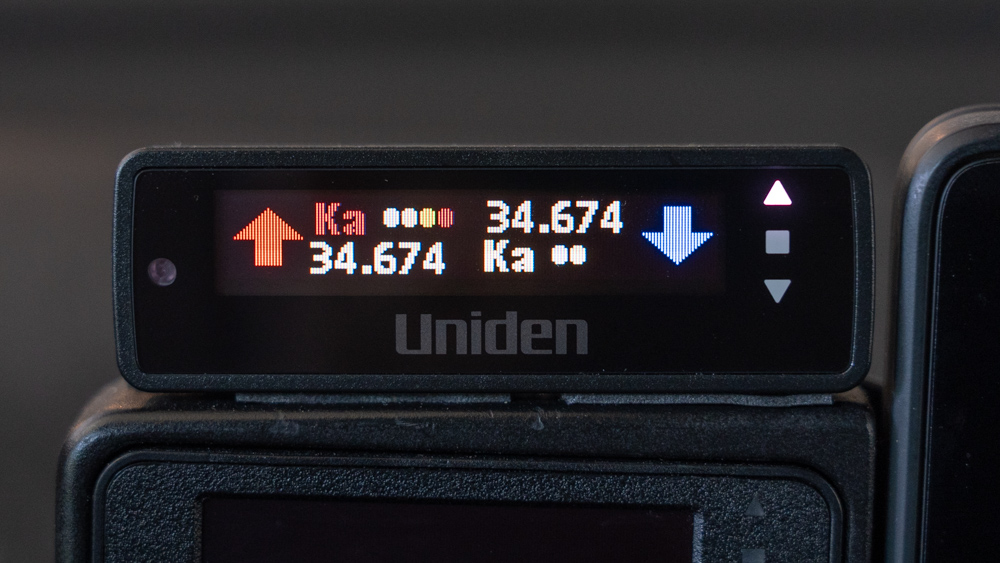
The arrows on the main display can be shown in two ways. The primary way is using the dedicated white arrows on the right side of the display. The second way is with one of the display modes where it displays the signal strength of both the front and rear antennas.
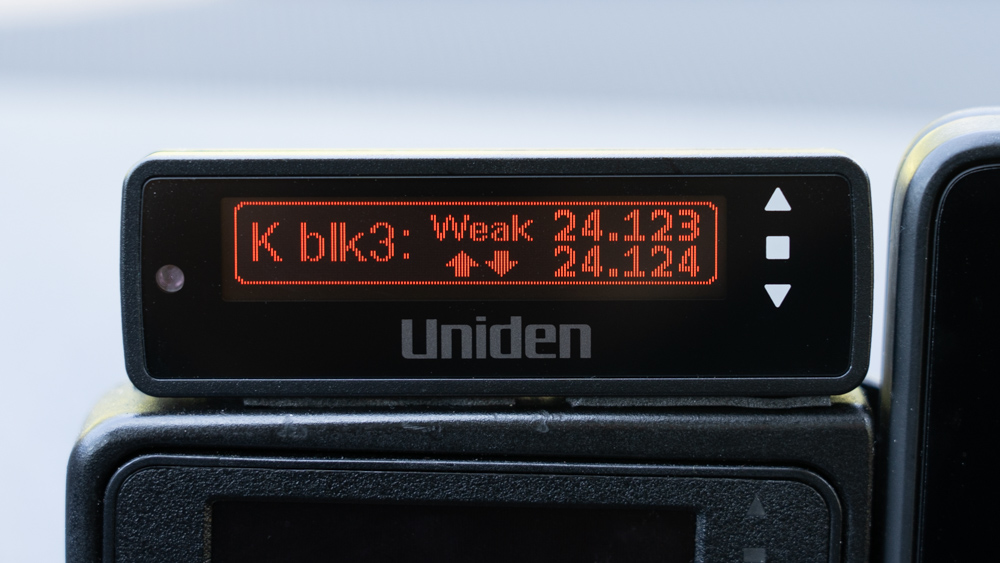
When you initially pick up a weak signal, only one of the antennas will pick it up. In the example below, there’s a weak Ka signal ahead which is easy to see on the display, but due to the bright sunlight, it’s hard to see the white arrow on the right lit up against the white background.
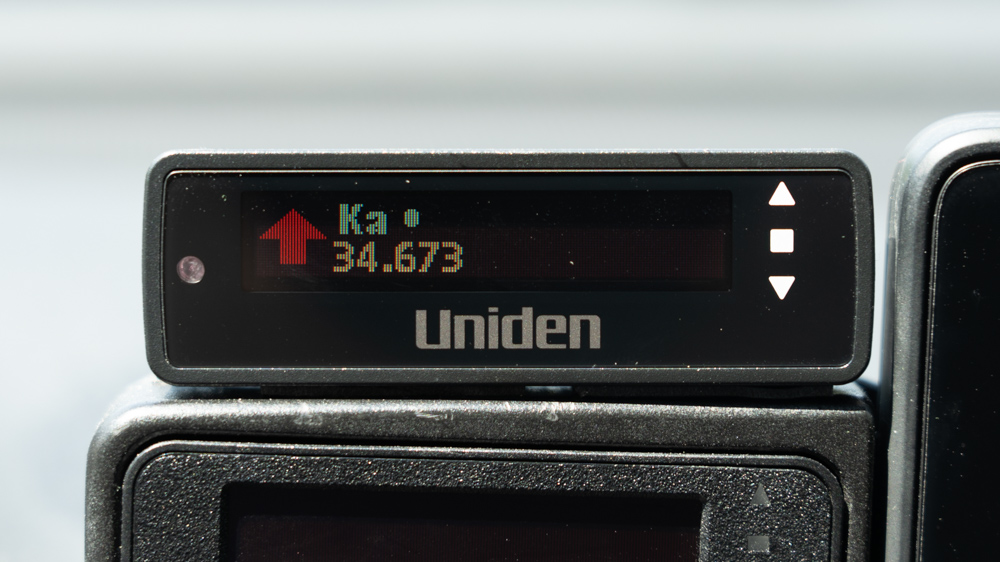
When it is darker, such as at night, it becomes easier to see that white arrow on the side.
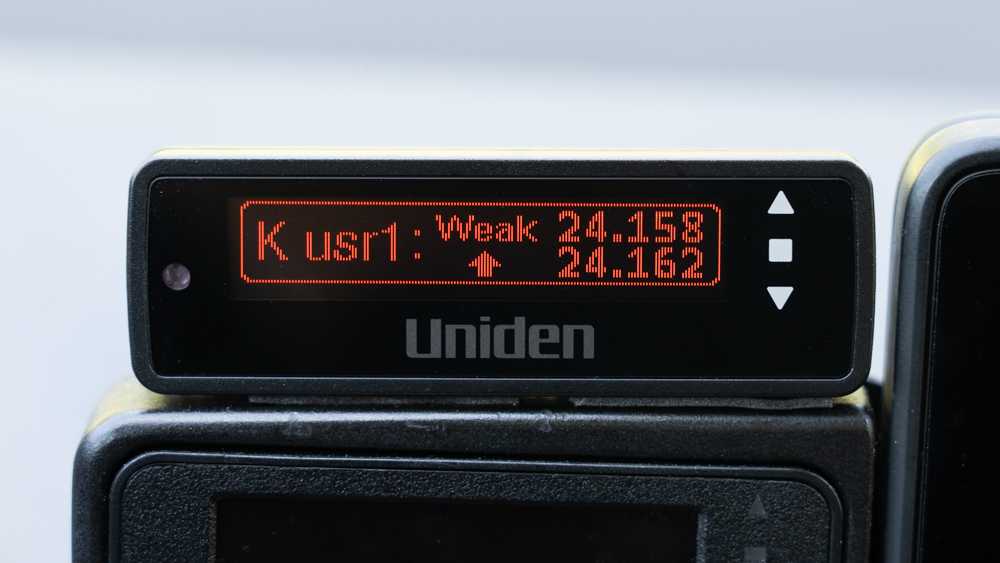
As you get closer to the source the signal gets stronger, the detector will display both the front and rear signals on screen simultaneously which can be a bit confusing.
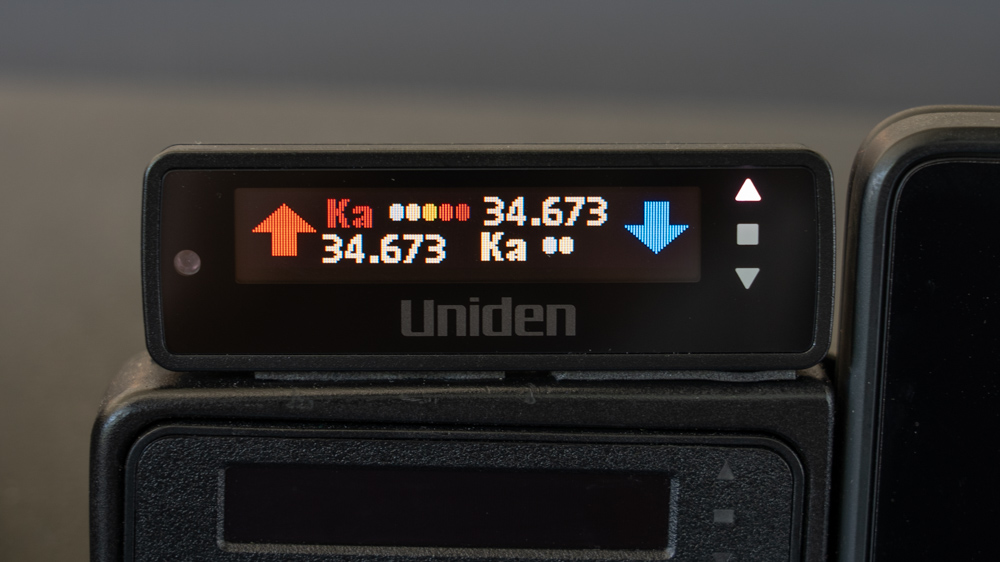
There is a menu option to display just one alert for one signal, but you lose those extra colored arrows which I do find helpful as a backup for when the small white arrow is hard to read.
Over time you get used to how the R9 displays signals, and when you initially pick up a signal it’s typically weak so it’s easy to tell if it’s ahead or behind. However, I don’t find it as easy to quickly read at a glance compared to other detectors, particularly when you’re close to the source and/or it’s sunny outside.
Here’s an example of the R9’s alerting and arrows in action:
There are several workarounds to make it easier to determine direction:
- Select “Alert Display #1” in the menu to get the added front and rear arrows on the display.
- Install the display in an area that’ll be shaded during the day.
- Install the wired alert LED. It flashes red during front/side alerts and blue when the signal flips behind.
- Enable the “Voice” menu option so that it says “Rear K band” or “Front Ka band” when you get an alert.
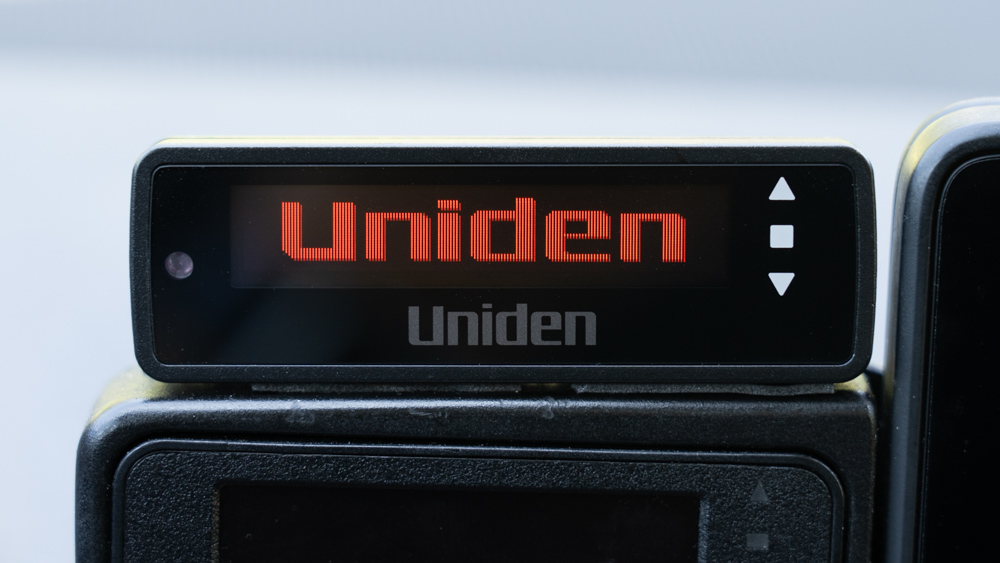
The display module says “Uniden” under the screen, but you don’t notice that in practice. It’s the same as the R7 or R8. When you get an alert, you glance at the display and the arrows and that’s all you notice.
The wired keypad works great and lets you control the detector, change settings, etc. It’s also backlit and the color matches the display color. This controller is the same one that’ll be available for R4 and R8, but there’s no ETA or price for that as a separate accessory yet.
The external LED lights up during alerts, red for front/side alerts and blue for rear. By default it is green at idle, but you can go into the menu and disable the idle color so it only flashes during an alert. I prefer that to keep the cabin darker and because it better grabs my attention when it goes off.
Finally there’s a speaker that you install somewhere in your dash. Several beta testers had issues with it blowing and so Uniden has since reduced the max speaker volume. Personally I have no issue with the alert volume, but others have reported it can be too quiet when installed under the dash in louder vehicles.
Radar Detector Performance
For radar detection, the R9 comes with a pair of extremely sensitive antennas to give you long distance alerts and directional arrows.
Under the hood they share the same platform as the Uniden R4/R8 with the added low noise amplifier (LNA) and so the R9 offers excellent long range performance.
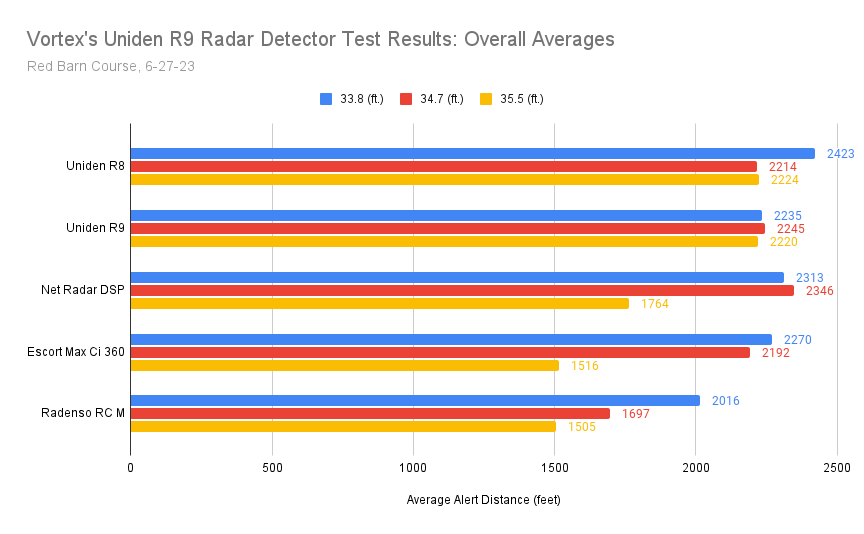
In my testing at the red barn test course, I found that it the R9, just like the R8, is a strong performer across the board, meeting or exceeding the range of other custom installed detectors I tested:
Here’s the full video of the R9 testing for all the information:
@DC Fluid has also done some testing with his R9. He tested against popular windshield mount detectors and he also tested the 3 different Ka frequency ranges as well as K band. As you can see, he’s also reporting long range detection range comparable to other high end detectors.
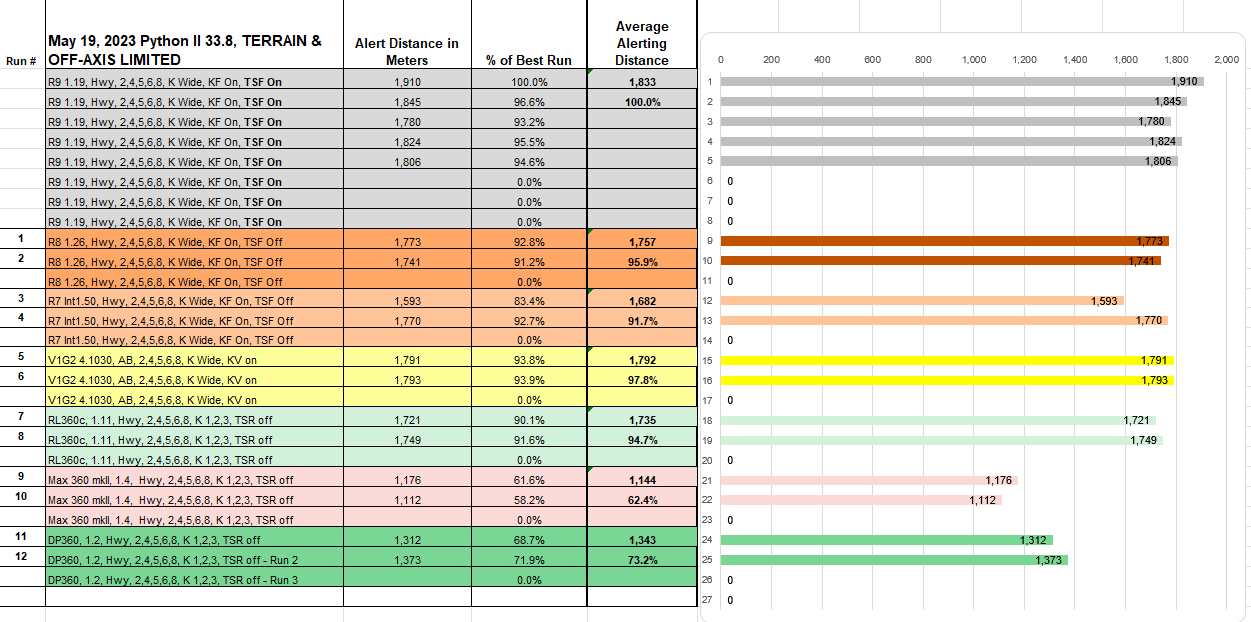
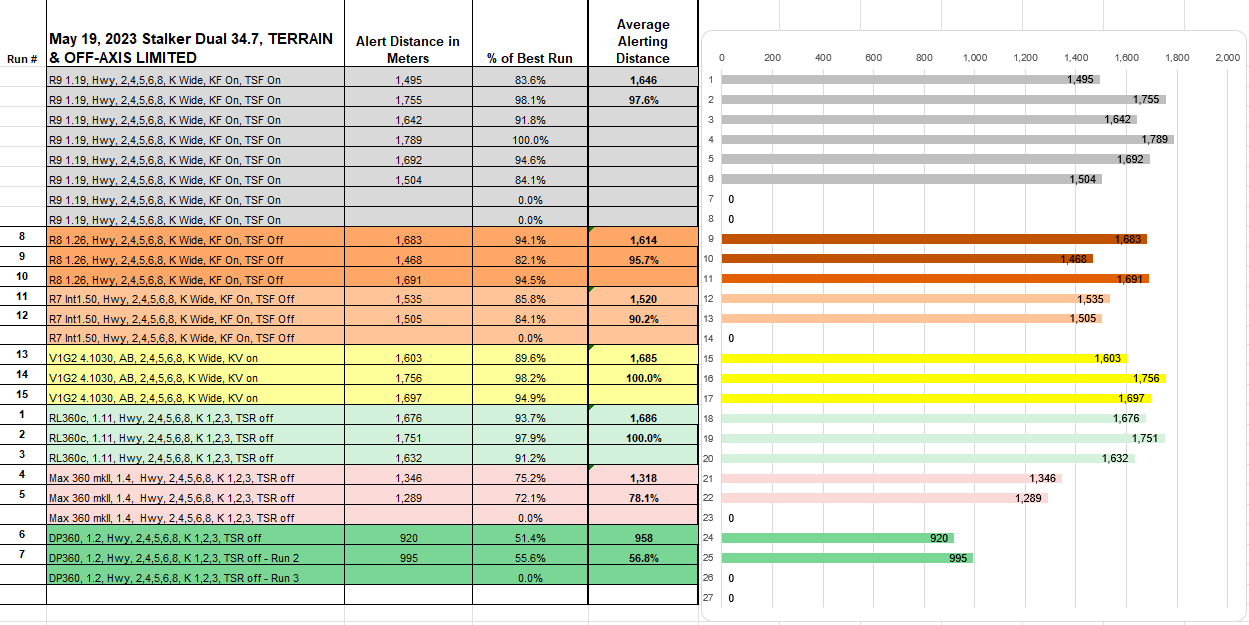
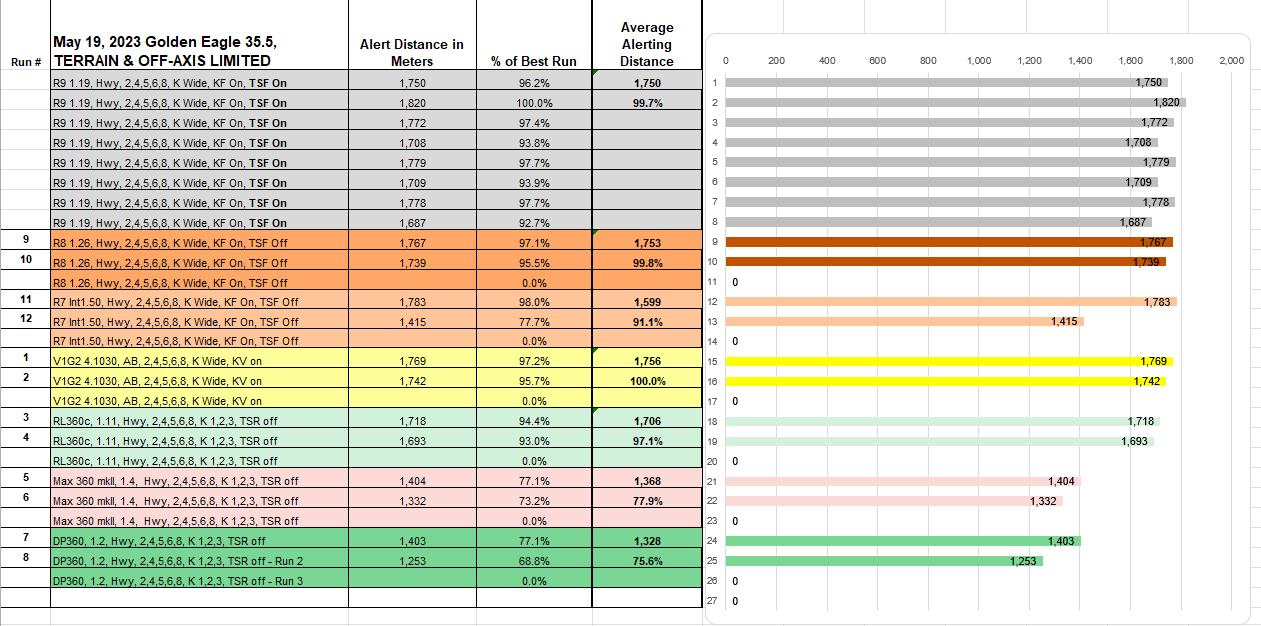
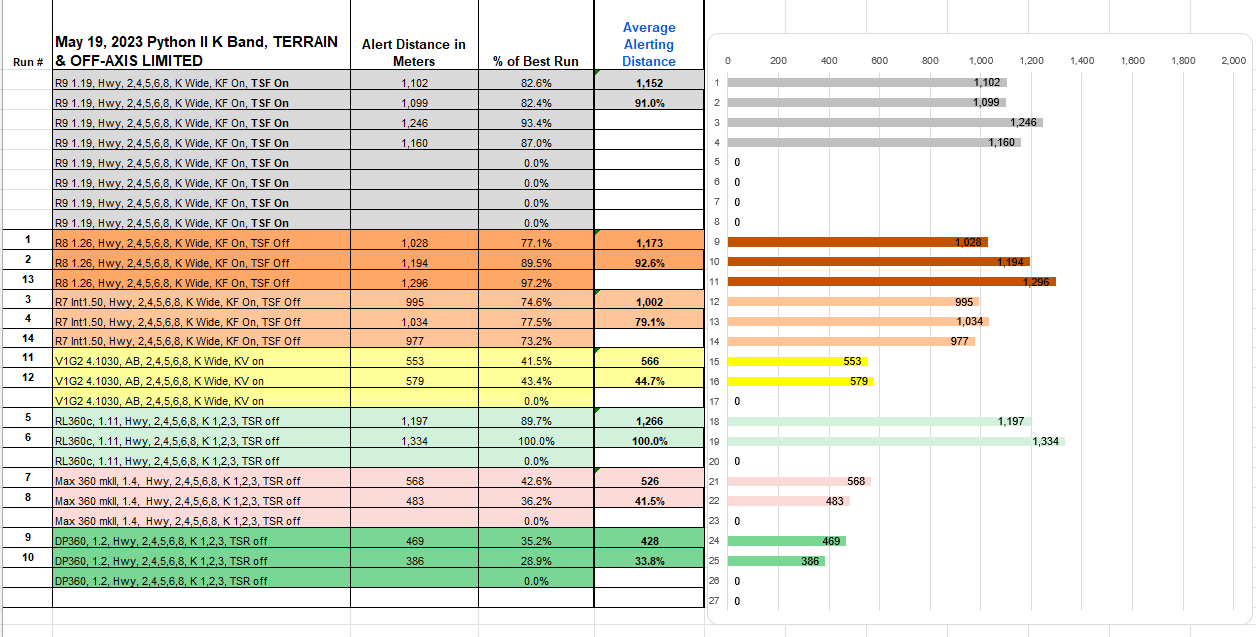
The overall trend here is that the R9 is a very sensitive detector and consistently turns in long range detections.
The R9’s ramp-up is excellent, progressively alerting more strongly as you continue getting closer to the threat.
The R9 is also extremely responsive on both K and Ka band which makes it a great choice against both instant on and quick trigger radar.
When it comes to photo radar detection though, specifically the MultaRadar CD, unfortunately the R9 is falling flat in initial testing. Even though it’s based on the R8, in testing it provides very limited advanced warning, sometimes none at all, only alerting to MRCD trucks once you’re near or already in the kill zone. @Dukes has done a bunch of testing and the results are all similar.
Here’s an example of a test pass against an MRCD truck in Edmonton running both the R8 and the R9 together for illustrative purposes so you can see the difference. (His results are the same when running the detectors solo.)
I don’t know why this is happening, especially since the R9 is essentially based on the R8. I also don’t know if that’s something that will be updated in a future firmware update, but obviously I hope so.
That said, there are many other types of photo radar systems though besides MRCD and more testing is needed to see how it fares against other variants.
Against traditional radar though including constant on, instant on, and quick trigger, the R9 performs like the R8 and so it is an excellent choice.
False Alert Filtering
False alert filtering is similar to other Uniden’s, but a bit better. It’s got all the usual stuff including Auto mode, TSF, GPS lockouts, low speed muting, K Block, etc.
The main improvement here is that the R9 adds more K blocks, plus they’re more configurable now. The R9 adds a third K block for 24.123’ish signals like Mazda CX-5’s (finally!) which makes it extremely effective at staying silent near those annoying SUV’s. The Radenso RC M falses to CX-5’s. Escorts can now filter them out like the Unidens can, but without being reliant on K blocks notch filters.
This feature alone makes the R9 noticeably quieter than the R8. If that’s not enough, the R9 also adds 5 user customizable K blocks (so 8 total), plus we now get fine tuned control over the frequency range covered, signal strength, and direction that the K Blocks apply to. In case you come across a car with blind spot radar that causes your R9 to false, such as an Acura transmitting at 24.160, you can press and hold the “Mark” button and the R9 will create a custom K block specifically for that type of signal. You can also later go in and further customize that K block filter’s settings.
To see how this works, watch this video starting at 1:35.
One improvement I’d like to see is the ability to dial back the sensitivity of the rear antenna, similar to what we have with Uniden’s windshield mount detectors. The detector is extremely sensitive and sometimes the rear detection ranges can be a bit excessive, holding onto the signal long after you’ve passed the threat. If you set it to Advanced mode, you can dial back the sensitivity of the rear antenna per band, ie. Rear K band 70%, but that won’t apply in other sensitivity modes like Auto mode. So solve this, the R9 needs a “Rear balance” option added the way the R8 offers.
GPS lockouts still have same issues as previous Unidens where the lockout radius only covers part of the signal and so signals may not automatically lock out even after weeks of passes. For that reason, you may need to manually lock certain signals out (by double pressing the mute button) in order to permanently silence them. Like with all of Uniden’s other detectors with autolockouts, the algorithm needs further refinement.
Spectre Immunity
How does the R9 fare against various radar detector detectors (RDD’s)? The Uniden R9 is one of Uniden’s stealthiest detectors, notably less detectable than the R8. It’s not fully undetectable, but just about.
Against the Spectre Elite, it can only be detected at extremely close range (when an officer passes you or pulls up directly behind you at a red light), and only if the Spectre is cranked up to maximum sensitivity (which isn’t recommended due to the increased false alerts). At the Spectre Elite’s standard/recommended sensitivity, it can’t detect the R9. So practically speaking, the main risk is an officer running a Spectre Elite at max sensitivity pulling up behind you at a red light.
Against the Spectre III, which is generally more sensitive than the newer Elite, surprisingly the R9 is completely stealthy and undetectable. It’s a noticeable improvement compared to Uniden’s other detectors and won’t be picked up by the officer’s RDD.
Laser Jammer Overview
The R9 offers not only protection against police radar, but also police laser, thanks to its included laser jammers. These jammers are a first for Uniden and they’re the same jammers that will eventually be available standalone to pair with the R4 and R8.
Uniden has been working hard on these jammers and I’ve been impressed with how far they’ve come.
The system ships with 6 heads to give you any combination of front and rear coverage you want. You can do the standard 3 front / 3 rear, or something different like 4 / 2 or even 6 / 0 if you like.
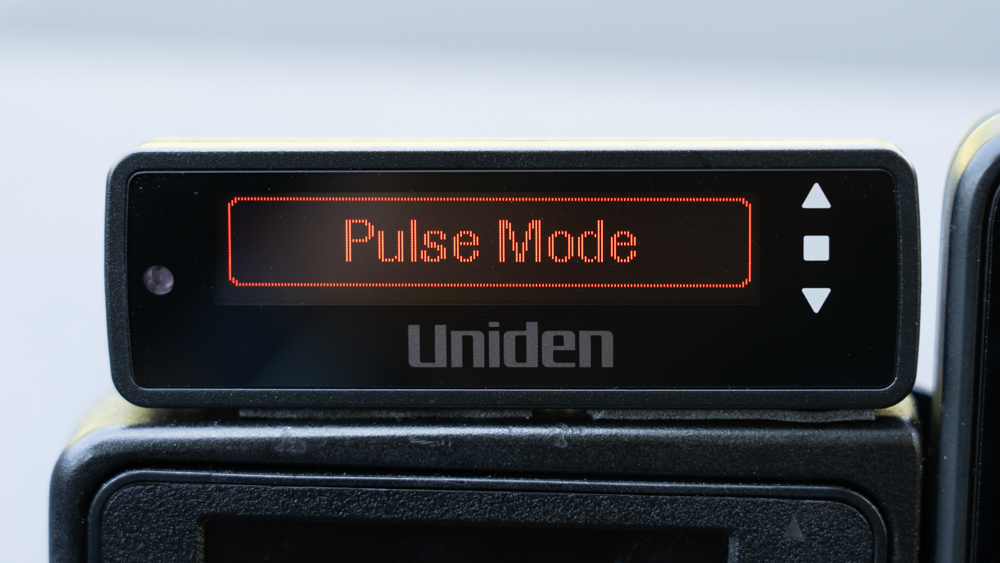
The heads themselves have the traditional form factor of other laser jammers, but they are a bit wider with screws visible on the face. Unlike other systems that have unique VPR/TX heads specifically to counter the tougher DragonEye (DE) guns, all of the Uniden heads are physically identical, but in the menu you can set which heads transmit or receive when encountering the DE.
All the heads run into one single laser distribution box and then back to CPU which reduces how many cables need to be run through your firewall.
Laser Jammer Performance
How well does the R9 jam? Based on our latest testing, it’s looking very capable, even able to jam many DragonEye guns.
Here’s some testing with an R9 triple setup vs. an ALP quad with dual older gen Tx heads.
Pretty solid performance out of both setups, but the R9 (surprisingly) did a bit better at limiting the close range punchthrough’s against the DragonEye’s. Check out the full testing thread for more info, detail, and discussion.
Here’s a look at one the test passes with the R9 going jam-to-gun (JTG) against a DragonEye.
Laser Jammer Features & Interface
There’s also a couple different features and issues that are worth mentioning.
The R9 features a laser gun ID to visually and audibly tell you what gun the officer is targeting you with, plus it tells you what direction the officer is targeting you from. Here’s a quick alert demo showing both front and rear shots against the DragonEye.
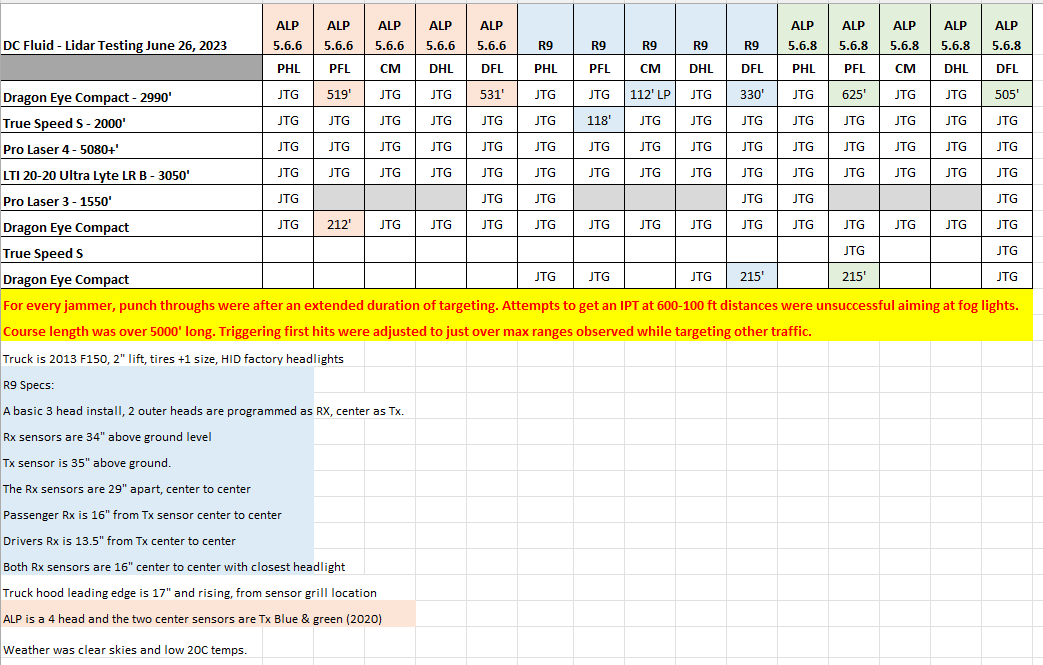
The laser jammer has three different modes:
- Constant Mode: Jams continuously (for testing purposes only)
- Pulse Mode: Jams for up to 10 seconds, then automatically disarms (user adjustable timer configurable between 3-10 sec)
- Receive Mode: Detection only, jamming disabled (for prohibited areas)
I recommend driving with the R9 in Pulse Mode to get an automatic disarm in 3-4 sec or so.
Unfortunately the manual disarm is very poorly implemented though. To kill the jammers when shot, you press the power button and they’ll stop jamming. However, doing this also changes which mode the laser jammer is set to for some reason. There is also no audible or verbal confirmation that the system has been disarmed and so if you’re not sure you’ve disabled your jammers and so you hit the power button again, laser jamming silently resumes. None of the other buttons kill the jammer. Just the power button.
For this reason, I propose the following improvements:
- Add visual and audible confirmations that laser jamming has been disarmed
- Pressing the power button mid-jamming shouldn’t change jamming modes
- Pressing power a second time shouldn’t reactivate the jammers
- All buttons should be able to instantly kill the jammers, letting you mash the controller without looking while you’re hard on the brakes
Additional Laser Jammer Notes
If the laser distribution box (that all the individual heads plug into) gets unplugged from the CPU, you’ll get a warning in the cabin. However, if an individual head gets damaged, a cable gets pinched or unplugged, or the head is otherwise unresponsive, there isn’t any notification to the driver. Fortunately though, the other heads will continue to operate.
The R9 is only available packaged as a radar and laser combo. I wish Uniden would offer the R9 as a radar only option so we could run the AntiLaser Priority instead for laser. Escort initially sold the Max Ci 360 as a bundle too, but given the demand, they eventually made it available a la carte so people could pair the radar detector with any laser jammer they chose. Hopefully Uniden does the same thing.
If you run an R4 or R8 on your windshield, these are the same laser jammers that will eventually be available to pair with your detector. Price and release date have not yet been announced.
Bluetooth
Bluetooth is built into the R9, but for some odd reason it’s not activated at launch. Once bluetooth is activated, that would give us the ability to use our phone to change settings, add additional filtering capabilities, improve the GPS lockouts, etc. However, app support is currently an issue.
Uniden is choosing not to produce their own apps for any of their detectors. Instead they’ve given some third party developers the ability to build apps for their detectors. Currently the only option available is an Android app, Highway Radar, which supports detectors like the R4 and the R8, but Uniden hasn’t sent an R9 to the developer so HR currently doesn’t support the R9 in the first place.
On iOS, the developer of V1Driver has been experimenting with supporting Uniden detectors. It currently works in beta with windshield mount detectors, but Uniden’s bluetooth implementation creates issues for apps to connect. To improve this, again Uniden would have to create and release a firmware update. Either way, I’m hopeful that down the line the app will work with the R9 as well.
Update
To update your R9 when Uniden releases new firmware or an updated GPS database, you can download the update files from Uniden’s website, copy them from your computer to the provided USB thumb drive, and then plug it into the R9.
Here’s a video showing you the process:
This is the only method to update. There is no option for updating over the air using your phone. You also don’t update the R9 by plugging it into your computer like you do with Uniden’s windshield mount detectors. (This is probably for the best given how many people have issues with running Uniden’s update software.) This USB thumb drive solution is simple, effective, and does the job.
Overall Thoughts
Overall I like the Uniden R9 and think it’s off to a great start.
The radar detector offers excellent performance. It offers long range performance and excellent responsiveness. It’s the type of detector I’d rely on for challenging situations. Photo radar detection is somewhat lacking so far, but against traditional radar is solid. False alert filtering is better than other Uniden’s, but still has room for improvement. Uniden, please fix your lockouts already!
Laser jamming performance is excellent so far and any needed UI improvements can be made via a firmware update. I’d love to see the R9 available as a radar-only version so you could pair it with any laser jammer, but the included one is proving to be pretty effective too, not to mention having one display and controller for both is great for simplicity and integration.
The multicolor display itself is pretty good, similar to competing detectors. I do wish the dedicated white arrows on the side were easier to read and the display itself was more clear regarding when you pass a source, though the dedicated arrows themselves do transition very nicely as you pass a threat.
If you’re looking for a high end custom installed radar detector and laser jammer, the R9 is an excellent choice. In my opinion, it should definitely be on your short list of detectors to consider if you’re wanting radar and laser protection.
Where to Purchase the Uniden R9
When you’re ready to purchase, you can buy the Uniden R9 here.
It’s important to mention that Uniden has made it clear that the R9 is not returnable once opened. You can return an unopened system, but it is subject to a 15% restocking fee. If any parts are defective, Uniden does have replacement parts available. See here for more info.
For the installation, you can either DIY it or bring it to a local installer and have them professionally install it for you. Uniden is new to the custom installed space and since they don’t have local dealers yet, you can take a look at the list of installers from Escort, AntiLaser, and Radenso and choose an installer from that list. The installation process for an R9 is very similar to other countermeasures so if they’re comfortable installing other systems, they should be able to take care of your R9 install for you too. If you’re wanting to have a professional install the system for you, it would be wise to speak with them first, go over all the details, make sure everything sounds good first, and then order your R9.
If you have any questions, feel free to ask in the comments or head to the Uniden discussion area of RDF.
Thank you for reading!
| This website contains affiliate links and I sometimes make commissions on purchases. All opinions are my own. I don’t do paid or sponsored reviews. Click here to read my affiliate disclosure. |


7 comments
Skip to comment form
Hello Vortex. Where did you get your r9 custom installed at.
Author
I haven’t had it permanently installed yet. For now I’ve just got it temporarily installed with doublestick tape. The majority of it is stuffed under my passenger seat, lol.
Once I’m ready though, I plan on heading back to Systems Unlimited in Bellevue, WA to have the system professionally installed.
Thank you for posting this. It looks like you worked all through the 4th, so I hope your family forgive you. The email notification hit just as I am about to go into a 2-hour meeting, sigh. I’ll pore through this tonight for sure.
Author
lol nah, I only worked for a tiny bit while my son napped. Otherwise we were out at the park, spending time with friends, and I flew my drone to capture the fireworks. Was a good day! I hope you had a fun 4th as well and your meeting isn’t too bad. 🙂
They need to develop a standalone laser jammer like a radar detector for those with leased vehicles
Fantastic review. Very thorough. The R9 seems like it’s very good in its inaugural edition. I don’t think you can fix those white LEDs with a firmware update, though (weird that Uniden would screw that up). The laser performance looks great. I might be weird, but I’d still consider an ALP with a Uniden R8 or Escort Redline on the windshield as a solid competing solution. As always, it’s the hassle and cost of installation that holds me back, but thanks for those links.
Great write up and as always, thanks to you and DC Fluid for all the hard work and time invested for our group of enthusiasts. Keep it goin boys!