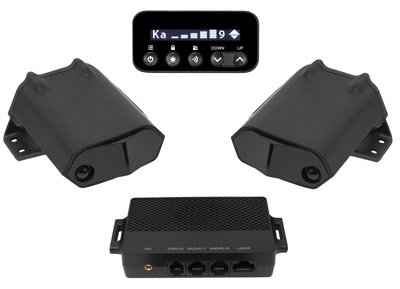
 The Radenso RC M is an excellent custom installed radar detector with great performance, false alert filtering, low powered radar detection, and ALP integration.
The Radenso RC M manual does a great job going over the radar detector and so in this tutorial, we’ll go over things in a bit more detail and help you get the RC M set up for where you drive.
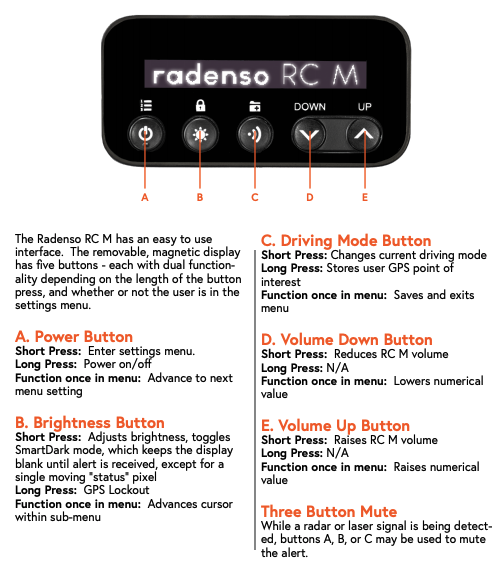
Radenso RC M Interface & Buttons
Radenso RC M’s Settings & Menu Options
The RC M is highly customizable, even more-so than most other detectors, and there’s a lot of options available here.
If you’re running front and rear radar antennas for arrows, the RC M gives you independent controls for both antennas. Usually you’ll want to configure the two antennas identically, but it can be nice to operate them independently. For example, in Edmonton you can enable MRCD for the front antenna and disable it for the rear. This way you’ll get sufficient warning as you approach, but limit the excessively long rear alerts you’ll get as they continue shooting you from behind despite you being long past the kill zone.
Now that said, Radenso’s default settings (marked with a *star) do a great job of giving you a quiet detector out of the box. There’s very few settings that I even bother changing. Let’s run through all of them.
Front Radar
Enable detection of your front radar detector antenna.
- *On
- Off
Rear Radar
If you have a second rear antenna to give you arrows, enable this option.
- *On
- Off
Driving Mode
This allows you to adjust the sensitivity of the RC M’s radar detection. You can adjust X, K, and Ka band sensitivity individually (in an upcoming menu option). The driving modes allow you to choose if and when the detector drops to reduced sensitivity (ie. at lower speeds around town to help cut down on false alerts).
- Highway: Full sensitivity at all times
- City: Reduced sensitivity at all times
- *Auto City: Automatically switches between full sensitivity at higher speeds and reduced sensitivity at lower speeds
Auto City Speed Limit
The first number is for low speed muting. X and K band signals below this speed will be automatically muted.
The second number is the speed threshold for when the sensitivity changes. Below this speed, Auto City mode reduces the detector sensitivity. Above this speed, it runs at full sensitivity. (Default: 30 / 60)
- 0-55 mph / 35-130 mph
City Level (Front Antenna)
Individually adjust the sensitivity of X, K, and Ka band for the front antenna.
This number adjusts signal attenuation. You can think of it as how strong the signal needs to get (1-9) before you get an alert.
Lower numbers mean less filtering and more sensitivity/range. Higher numbers mean more filtering and less range. Set it to “0” for maximum performance.
- X 4, K 2, Ka 0
City Level (Rear Antenna)
Same as above, just for the rear antenna.
- X 4, K 2, Ka 0
F-X Band (Front Antenna – X Band)
Enable X band detection for the front antenna.
X band has been phased out of most of the US. It is actively in use in OH, NJ, and a few rural places here and there. Most people are safe disabling this to avoid X band false alerts.
- *On
- Off
F-K Band (Front Antenna – K Band)
This allows you to both enable/disable K band detection and to adjust how wide the detector scans across K band. You can scan all of K band or cut off the lower and upper ends to help cut back false alerts if there’s not a ton of low/high frequency K band in your area.
Low is a good option if you have a fair amount of K band in your area and want a good balance of filtering and range. High is the best option if you don’t face a ton of K band and you want the quietest detector possible.
- Wide: 23.950 – 24.250 GHz (24.100 GHz ± 150 MHz)
- *Narrow: 24.010 – 24.190 GHz (24.100 GHz ± 90 MHz)
- Off: Disable K band detection
F-TS Rej
Traffic sensor rejection allows you to filter out many false alerts on K band at the expense of ultimate range. High gives you the most filtering, Low in the middle, and Off the least.
If you’re running it on Low and are seeing fixed traffic sensors along the highway causing K band falses on your RC M, switch this to High.
- Off
- Low
- *High
F-Ka Band
This allows you to enable/disable Ka band detection on the front antenna as well as adjust how band segmentation works.
Ka Narrow gives you the best performance and control over which frequencies are scanned while Ka Wide scans everything and helps cover potentially out of tune guns.
- Off: Ka band detection disabled
- Wide: 33.4 GHz – 36.0 GHz
- *Narrow: Enables individual Ka segment options. Each segment is ± 120 MHz.
- F-Ka 33.8
- F-Ka 34.3
- F-Ka 34.7
- F-Ka 35.5
F-Ka Filter
Filters out false alerts on Ka band.
You can try running Normal and then if you see a bunch of false alerts on Ka band, you can crank it up to High.
- Off
- Normal
- *High
F-Ka POP
Enables Ka band POP radar detection. POP is an infrequently used form of radar available in certain MPH brand radar guns. It is designed to allow an officer to preview a vehicle’s speed without alerting radar detectors by using a super quick burst of radar that’s too quick for radar detectors to pick up on. This setting enables POP radar detection.
It’s recommended to leave this feature off though since POP isn’t used much at all, it’s not legal to issue tickets without using traditional radar too, and it generally causes both reduced performance and false POP alerts.
- *On
- Off
F-Laser
Enables laser detection using the laser sensor built-in to the radar detector head. This is separate and completely independent from the laser jammer controls if you’re running it paired with an optional laser jammer.
- *On
- Off
F-MRCT
Enable detection for MultaRadar CT.
This is a low powered photo radar unit that’s used in places like Chicago and NYC. If you enable MRCT detection, you will see quite a few false MRCT alerts from nearby vehicles with blind spot monitoring (BSM) systems. Since MRCT is generally only in fixed redlight that you can get alerted to via the GPS database anyway, it’s generally recommended to leave this off and rely on GPS alerts if you have these in your area.
- *Off
- Wide
- Narrow
F-MRCD
Enable detection for MultaRadar CD.
The MRCD is also a low powered photo radar gun. It’s in use in places like Alberta, Quebec, NYC, Maryland, & Washington D.C. MRCD systems can be fixed or mobile so you can’t rely on GPS for these. MRCD falses are also less common than MRCT, but they still do happen from certain Ford, Nissan, Subaru, Toyota, and Lexus vehicles so you should only enable this option if you have MRCD in your area. If you need MRCD detection, the Radenso RC M is an excellent choice. It’s the go-to solution for people who face MRCD regularly.
Narrow is generally what people run for the MRCD to help cut down on false alerts.
- *Off
- Wide
- Narrow
F-Gatso
This is a low powered mobile photo radar system used in Iowa.
- On
- *Off
F-MR Filter
MultaRadar and Gatso false alert filter.
- Off
- Low
- *High
R-X Band (Rear Antenna – X Band)
Moving on we have all the same radar detection options, but for the rear antenna. This option allows you to disable X band detection behind.
- *On
- Off
R-K Band (Rear Antenna – K Band)
Configure K band detection for the rear radar antenna.
- Wide: 23.950 – 24.250 GHz (24.100 GHz ± 150 MHz)
- *Narrow: 24.010 – 24.190 GHz (24.100 GHz ± 90 MHz)
- Off: Disable K band detection
R-TS Reject
Traffic Sensor Rejection / K band false alert filtering behind.
- Off
- Low
- *High
R-Ka Band
Rear Ka band detection.
- Off: Ka band detection disabled
- Wide: 33.4 GHz – 36.0 GHz
- *Narrow: Enables individual Ka segment options. Each segment is ± 120 MHz.
- F-Ka 33.8
- F-Ka 34.3
- F-Ka 34.7
- F-Ka 35.5
R-Ka POP
Rear Ka band POP detection.
- *On
- Off
R-Laser
Laser detection behind using the rear radar detector antenna.
- *On
- Off
R-MRCT
Rear MRCT photo radar detection.
- *Off
- Wide
- Narrow
R-MRCD
Rear MRCD detection. This is often recommended to be run disabled. In Edmonton, Canada where the MRCD is used commonly, they shoot cars from behind as they pass the photo radar truck. Because of this, you’ll get pretty short distance alerts as you approach, but you’ll get unnecessarily long alerts from behind, long after you’ve exited the kill zone. For this reason, you can choose to turn off MRCD detection from behind.
- *Off
- Wide
- Narrow
R-Gatso
Rear Gatso photo radar detection.
- On
- *Off
R-MR Filter
Rear MultaRadar and Gatso false alert filter.
- Off
- Low
- *High
Jammer
Enables laser jammer integration. Turn on if you’re running the RC M connected to an AntiLaser Priority.
- On
- *Off
Parking Assistance
Controls the parking sensor capabilities of the ALP. I find the parking sensors don’t work all that well so I disable this feature myself.
- *On
- Off
Laser Jamming Timer
How long do you want your ALP to jam for before it automatically disarms?
Note: This is critically important when using laser jammers. When shot, you quickly slow down and disable your laser jammers so the officer can get a reading. The RC M defaults to a 6 sec AutoJTK, but I’d recommend dropping this down to 4 sec. If you want to disable even more quickly like a rock star, manually press any button on the RC M’s display once you’re down to speed.
- *Jamming 1-9 sec
- Unlimited (only to be used for testing)
- Jamming Off
- Detection Only
Laser Name
Provides a laser gun ID so you know what gun you’ve been shot with.
- *Voice: Audible and visual announcement of laser gun
- No Voice: Visual indication of laser gun on display only
- Off: Simply says “Laser” on screen
Jammer Default?
Resets ALP back to factory default options. Press the middle button to reset.
Display Mode
Choose what info is displayed on screen when no alert is present.
- Speed / Time
- Speed
- *Speed / Compass
- Speed / Voltage
- Voltage
- Time
Units
Display units in feet & mph or meters & km/h.
- *English: feet & mph
- Metric: meters & km/h
Alerts
Choose what information is presented with your radar alerts.
- *Bar: Signal strength represented with increasing bars
- Frequency: Display alert frequency
Voice
Announce radar band info during an alert as well as the menu options when you scroll through.
- *On
- Off
Beep First
When you get an alert, do you want the radar detector to beep first or speak first?
- Beep First
- Voice First
- No Voice
Auto Mute
Automatically reduce the alert volume after 8 seconds once the radar detector has your attention.
- *On
- Off
X Tone
There are now 15 different alert tones available for the different radar and laser alerts. This first option is to choose your X band alert tone. (Default: 1)
- 1-15
K Tone
Choose your K band alert tone. (Default: 1)
- 1-15
Ka Tone
Choose your Ka band alert tone. (Default: 2)
- 1-15
MD Tone
Choose your MultaRadar CD alert tone. (Default: 3)
- 1-15
MT Tone
Choose your MultaRadar CT alert tone. (Default: 3)
- 1-15
G3 Tone
Choose your Gatso RT3 alert tone. (Default: 3)
- 1-15
G4 Tone
Choose your Gatso RT4 alert tone. (Default: 3)
- 1-15
Laser Tone
Choose your Laser alert tone. (Default: 4)
- 1-15
1-Beep
When you detect a signal that’s previously been locked out, do you want to get one initial beep before the detector goes silent? If you want to know there’s a signal present that’s being muted, turn this on. If you’d prefer a quieter experience, turn this off.
- On
- *Off
Speed
Low speed muting. This mutes all signals below this threshold. (Default: 15 mph)
- 5-130 mph in 5 mph increments
Startup Sound
Choose if you want to hear the startup sound.
- *On
- Off
Power Off If Display Removed
Do you want the radar detector to instantly turn off when you remove your display? This can be useful for quickly disabling your detector in banned areas. You can also have the detector stay on and continue alerting in case you need to remove your display temporarily because it’s reflecting sunlight in your eyes or something, but keep in mind you won’t be able to manually mute alerts since the control buttons are part of the display too.
- *On
- Off
GPS Connect Announce
Audibly indicate when your RC M gets a GPS lock once you start driving.
- On
- *Off
GPS Detection
Choose which types of GPS-based points you’d like to be alerted to. (Default: All On)
- Speed Cam
- RedLight Cam
- Section Speed Cameras
- User Area (I like turning this off because I don’t use the feature, but I sometimes wind up hitting the wrong button and creating a marked GPS location by accident. Disabling this prevents me from being alerted next time I come by.)
GPS Warning Distance
How far away would you like to be alerted to a GPS-based location?
- *Normal (800 feet)
- Farther (1200 feet)
- Farthest (1650 feet)
Time
Allows you to set the correct timezone for your clock that is sync’ed via GPS.
Factory Reset?
Reset the RC M back to factory defaults. Press the middle button to reset.
Note: These settings are best suited for US drivers.
Delete All User Locations?
Delete all marked user locations that you manually created by pressing the middle button while driving. Press the second button to delete all user locations.
Delete All False Alert Areas?
Delete all manually created GPS lockouts. Press the second button to delete all false alert areas.
Serial Number: XXXXXX
Displays the serial number of your RC M.
Hub XX Display XX
Displays the current firmware and display version loaded in to your RC M.
Radenso’s Recommended / Default US Settings
- Front Radar: On
- Rear Radar: On
- Driving Mode: Auto City
- Auto City Speed Limit: 30 mph / 60 mph
- City Level (Front Antenna): X 4, K 2, Ka 0
- City Level (Rear Antenna): X 4, K 2, Ka 0
- F-X Band: On
- F-K Band: Narrow
- F-TS Rej: High
- F-Ka Band: Narrow
- F-Ka 33.8: On (only available if F-Ka set to Narrow)
- F-Ka 34.3: Off (only available if F-Ka set to Narrow)
- F-Ka 34.7: On (only available if F-Ka set to Narrow)
- F-Ka 35.5: On (only available if F-Ka set to Narrow)
- F-Ka Filter: High
- F-Ka POP: On
- F-Laser: On
- F-MRCT: Off
- F-MRCD: Off in US, Narrow in Canada
- F-Gatso: Off
- F-MR Filter: High
- R-X Band: On
- R-K Band: Narrow
- R-TS Reject: High
- R-Ka Band: Narrow
- R-Ka 33.8: On (only available if R-Ka set to Narrow)
- R-Ka 34.3: Off (only available if R-Ka set to Narrow)
- R-Ka 34.7: On (only available if R-Ka set to Narrow)
- R-Ka 35.5: On (only available if R-Ka set to Narrow)
- R-Ka Filter: High
- R-Ka POP: On
- R-Laser: On
- R-MRCT: Off
- R-MRCD: Off in US, Narrow in Canada
- R-Gatso: Off
- R-MR Filter: High (only available if F-MRCD/MRCT is enabled)
- Jammer: Enable if Jammer is present
- Parking Assistance: User Preference (Default: On)
- Laser Jamming Timer: 6s
- Laser Name: Voice
- Jammer Default?
- Display Mode: User Preference (Default: Speed/Compass)
- Units: User Preference (Default: English)
- Alerts: User Preference (Default: Bar)
- Voice: On
- Beep First: Beep First
- Auto Mute: On
- X Tone: 1
- K Tone: 8
- Ka Tone: 2
- MD Tone: 3
- MT Tone: 3
- G3 Tone: 3
- G4 Tone: 3
- Laser Tone: 4
- 1-Beep: User Preference (Default: Off)
- Speed: 15 mph
- Startup Sound: User Preference (Default: On)
- Power Off If Display Removed: User Preference (Default: On)
- GPS Connect Announce: User Preference (Default: Off)
- GPS Detection:
- Speed Cam: On
- RedLight Cam: On
- Section Speed Cameras: On
- User Area: On
- GPS Warning Distance: Normal
- Time
- Factory Reset?
- Delete All User Locations?
- Delete All False Alert Areas?
- Serial Number: XXXXXX
- Hub XX Display XX (Firmware & Display version)
Vortex’s Radenso RC M Settings
Here’s the settings that I run on my RC M. I basically have it set up with fairly aggressive K band filtering since we don’t have a ton of K band in use around here, no low powered radar detection, and X band off. I’m also experimenting with different alert tones and I have it set to laser jammers off since I run my ALP’s standalone so I can use them with any RD.
- Front Radar: On
- Rear Radar: On
- Driving Mode: Auto City
- Auto City Speed Limit: 30 mph / 60 mph
- City Level (Front Antenna): X 4, K 2, Ka 0
- City Level (Rear Antenna): X 4, K 2, Ka 0
- F-X Band: *Off
- F-K Band: Narrow
- F-TS Rej: High
- F-Ka Band: Narrow
- F-Ka 33.8: On
- F-Ka 34.3: Off
- F-Ka 34.7: On
- F-Ka 35.5: On
- F-Ka Filter: High
- F-Ka POP: *Off
- F-Laser: On
- F-MRCT: Off
- F-MRCD: Off
- F-Gatso: Off
- F-MR Filter: High
- R-X Band: *Off
- R-K Band: Narrow
- R-TS Reject: High
- R-Ka Band: Narrow
- R-Ka 33.8: On
- R-Ka 34.3: Off
- R-Ka 34.7: On
- R-Ka 35.5: On
- R-Ka Filter: High
- R-Ka POP: *Off
- R-Laser: *Off
- R-MRCT: Off
- R-MRCD: Off
- R-Gatso: Off
- R-MR Filter: High
- Jammer: Off
- Parking Assistance: *Off
- Laser Jamming Timer: *4s
- Laser Name: Voice
- Jammer Default?
- Display Mode: *Speed/Time
- Units: English
- Alerts: *Freq.
- Voice: On
- Beep First: Beep First
- Auto Mute: On
- X Tone: 1
- K Tone: *8
- Ka Tone: *14
- MD Tone: *6
- MT Tone: *6
- G3 Tone: 3
- G4 Tone: 3
- Laser Tone: 4
- 1-Beep: Off
- Speed: 15 mph
- Startup Sound: *Off
- Power Off If Display Removed: *Off
- GPS Connect Announce: Off
- GPS Detection:
- Speed Cam: On
- RedLight Cam: On
- Section Speed Cameras: On
- User Area: *Off
- GPS Warning Distance: Normal
You can purchase your Radenso RC M here.
| This website contains affiliate links and I sometimes make commissions on purchases. All opinions are my own. I don’t do paid or sponsored reviews. Click here to read my affiliate disclosure. |


1 comments
Thanks for all the info…got a great deal on a 2014 Tesla Model S P85+ wired up my Escort Max 360…..and well didn’t work due to RF blocking windsheild…..so I purchased the Radenso RC M…..night and day results front and rear bumper install DIY…..works and happy with results so far….