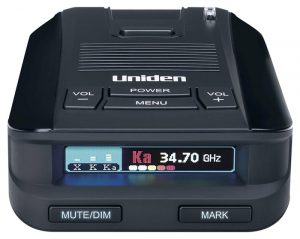
The Uniden DFR9 is a solid mid-tier radar detector with good performance, false alert filtering, and features. If you’re just getting started with the DFR9, here’s what all the buttons do and how to program your detector.
Purchase the Uniden DFR9 here.
Note: You can download the Uniden DFR9 owner’s manual. This tutorial will provide additional information and detail.
If you’d like to watch the video walkthrough going over the different settings and options, here ya go! 🙂
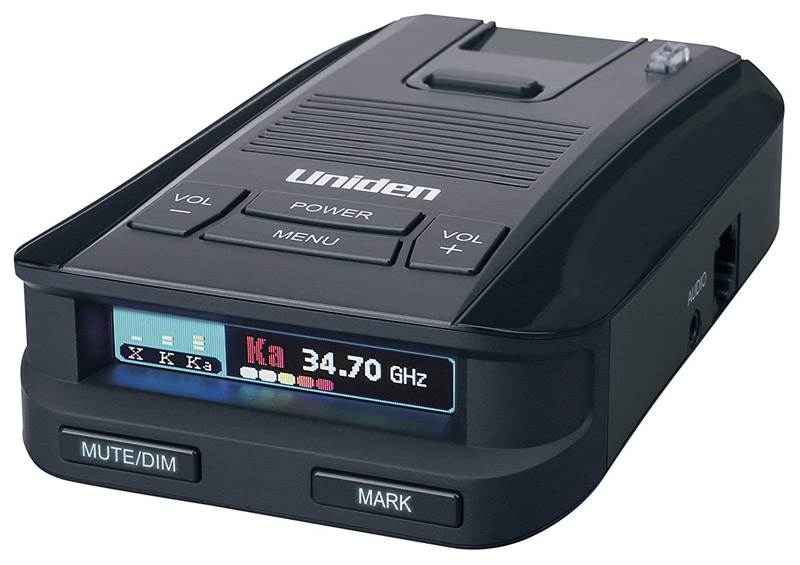
DFR9 Top Buttons:
- Power: Turn detector on and off
- Menu: Enter menu, change menu settings
- Long press: Switch between Highway, City, and Advanced sensitivity options
- Long press in menu: Exit menu
- Volume – / +: Adjust volume, previous / next menu option
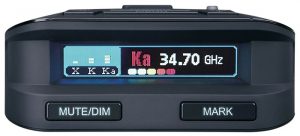
DFR9 Front Buttons
- Mute / Dim: Mute signals and adjust brightness controls
- Single press during an alert: Mute current alert.
- Double press during an alert: Lock out the signal (ie. speed sign, automatic door opener) so the detector learns this false alert and doesn’t alert you again in the future. (The DFR9 stores up to 500 lockouts.)
- Double press during a locked out alert: Unlock the signal
- Long press: Change display brightness
- Mark: Mark this location so you get alerted every time you come by
- Double press during marked alert: Delete marked alert
- Long press: Delete all marked locations (single press to confirm)
DFR9 Menu Options
Highway / City / Advanced
Adjust the sensitivity of the different radar bands as desired. For maximum performance, run in full sensitivity. To help cut down on false alerts (at the expense of all out range), you can dial back the sensitivity.
Note: Changing these settings do not change anything else or activate any other advanced options besides adjusting the sensitivity of the detector itself.
- Highway: (default) Full sensitivity on all bands.
- City: Reduced sensitivity (about 10% sensitivity) for both X and K band. Ka band remains at 100% sensitivity.
- Advanced: Allows you to individually adjust the sensitivity of X, K, and Ka bands from 40-100% in 20% increments.
GPS
Enable or disable the different GPS related feature and false alert filters. A great way to turn your DFR9 into a DFR8. 😀
- On (default)
- Off
Speed Camera
Enable or disable speed camera alerts.
- On (default)
- Off
Redlight Cam
Enable or disable red light camera alerts around town.
- On (default)
- Off
RLC Q-Ride
Low speed muting for redlight cameras. Helpful when you’re on the highway and want to filter out RLC’s on nearby surface streets.
- Off (default)
- 50 – 85 mph (80 – 140 km/h) in 5 mph (or km/h) increments
Voice
Announces the radar band during an alert. Also announces the menu options as you scroll through.
- On (default): Announce the band and play an alert tone when detecting a signal.
- Off: Play only alert tones when detecting a signal.
Ka Freq Voice
Announces the Ka band frequency when you pick up a Ka band alert. ie. 34.72 GHz.
- On
- Off (default)
X Band
Enable X band if you wish.
X band is mostly phased out across the US and is only in active use in Ohio and southern NJ, as well as in a few rural areas around the country. In most places you can shut it off.
- On
- Off (default)
K Band
Enable detection of K band radar.
K band is actively used by law enforcement across the country. It’s also used by automatic door openers, speed signs, and some blind spot radar.
- On (default)
- Off
Ka Band
Enable detection of Ka band radar.
Ka band is almost always a cop running radar, with very rare exceptions, so you’ll definitely want this on.
- On (default)
- Off
Laser
Enable detection of laser.
Laser jammers are the proper tool to protect you against laser. However, you can enable laser detection in your DFR9 as well if you like.
- On (default)
- Off
Ka POP
Detect 67 ms Ka band POP radar.
POP is a super fast form of radar designed to defeat radar detectors. However, it’s not verified to be actively used anywhere, partly because of the fact that it’s not legal to issue tickets with in the first place. It’s generally recommended to turn off POP detection for better performance and fewer false alerts.
- On
- Off (default)
K Filter
Filter out some false alerts from sources like certain vehicles with radar-based collision avoidance systems. It doesn’t filter out all of them, but it does address many of them. You’ll definitely want this filter on.
- On (default)
- Off
Ka Filter
Filter out false alerts from poorly designed radar detectors nearby that “leak” radar and cause false alerts on your detector.
False Ka alerts are rare so most people turn this off for better performance.
- On
- Off (default)
TSF
Traffic sensor filter. This filters out traffic sensors that line the sides of certain highways. If you get repeated blasts of K band on the highway (not from nearby cars with blind spot monitoring radar), turn this on.
- On
- Off (default)
K Wide / Narrow
Adjust the frequency range that the detector scans for on K band.
- K Wide: (default) (24.050 – 24-250) Scans for the entire range of K band frequencies used by police in the US.
- K Narrow: (24.080 – 24.200) Scans for a reduced range of K band frequencies, narrowing down to the more common frequencies you’ll see while trimming off frequencies that are more likely to be false alerts.
Ka Wide / Narrow
- Ka Wide: (33.4 – 36 GHz) Scans for the entire possible range of Ka frequencies where police are allowed to transmit, including frequencies that are not used by any actual radar guns. However, this will help you catch any out of tune guns.
- Ka Narrow: (default) (33.8 +/- 100 MHz, 34.7 +/- 120 MHz, 35.5 +/- 100 MHz) Scans a narrower range of Ka band frequencies to focus in on the typical range of frequencies that you’ll see police using.
Ka / Signal Priority
When you’re picking up multiple signals, choose which signal is given audible and visual priority.
- Signal Priority: Gives alert priority to the strongest (usually closest) signal.
- Ka Priority: (default) Gives you band priority alerts where if you’re seeing multiple signals, alert priority will be given to Laser, Ka, K, & X in that order.
So for example, if you’re getting a strong K band signal and a weak Ka band signal, Signal Priority will alert you to the K band signal while Ka Priority will focus on the Ka band signal. If you have the all threat display option enabled, the secondary signal will show up on screen next to the primary signal, but the audio will always be focused on the primary signal.
Mute Mem
Choose which radar bands are allowed to be locked out. Useful for teaching the detector about stationary false alerts from speed signs and automatic door openers.
- X & K: (default) Recommended option of only being able to lock out X and K band signals.
- X, K, Ka: Add the ability to also lock out Ka band signals. This is useful if you have Ka band speed signs or satellite dishes that always trigger the same false alert in the same area. It’s risky because you can accidentally lock out a police officer, especially since a Ka signal is almost always a cop.
All Threat
When the detector is picking up more than one signal, it can show the band and signal strength of any additional signals (up to 3 more) on the left side of the screen where the speedometer/voltmeter would normally go. When only one signal is present, that left side of the screen stays as a speedometer/voltmeter.
- On
- Off (default)
Color
Choose which color display you want. This is helpful if you want the detector to match the colors of your vehicle’s dash lights, for example.
Color options: Red (default), White, Purple, Blue, Amber, Green, Pink, Gray
Time / Scan / Mode Display
Choose what information is displayed on screen when no signal is present.
- Time: Display the current time.
- Scan: Shows an animated scanning heartbeat display.
- Mode: (default) Displays the current sensitivity mode such as Highway, City, or Advanced.
Display
Choose what information is displayed on the left side of the screen.
- Speed (default)
- Speed + Compass
- Compass
- Voltage
- Altitude
Speed Unit
Select imperial or metric speeds and distances.
- mph (default)
- km/h
X / K / Ka Band / Laser Tone
Customize the different alert tones for both radar and laser alerts. There are 12 unique alert tones available.
- X Band: (default = 1)
- K Band: (default = 2)
- Ka Band: (default = 3)
- Laser: (default = 4)
Auto Mute
This will drop the alert volume to a lower level after the detector goes off at full volume initially to get your attention.
- On (default)
- Off
Auto Mute Vol
Choose how quiet the detector gets once it drops down to the auto muted volume level (if enabled.)
Auto Mute Vol: 0 – 5 (default = 2)
Note: If you set this to the same level as the normal alert volume, the detector won’t actually get quieter. Be sure to double-check this setting if that happens.
Dark mode
When the display is set to dark mode (display off when no alert, display turns on when a signal is detected), choose how bright the display turns on to.
- Bright
- Dim
- Dimmer (default)
Auto Dim Setting (only if brightness set to Auto)
The DFR9 has an ambient light sensor to tell the difference between daytime and nighttime. Here you can select the display brightness you want for day vs. night.
- Bright Level: Bright (default), Dim, Dimmer
- Dim Level: Bright, Dim (default), Dimmer
Backlight On/Off
Light up the Mute/Dim and Mark buttons so you can see them more easily at night.
- On (default)
- Off
Quiet Ride
Low speed muting. When traveling below this speed (like in traffic around town or sitting at a stop light), the detector will stay quiet when detecting a signal. I’d recommend turning this on.
- Off (default)
- 5 – 90 mph (10 – 140 km/h) in 5 mph (10 km/h) increments
LimitSpeed
Get an audible warning when traveling over a pre-set speed. Useful as a reminder for when you go above the speed limit in your area.
- Off
- 50-100 mph (80 – 160 km/h) in 5mph (10 km/h) increments
GMT
Choose what time zone you’re in so that the time (determined by GPS) is displayed properly for your area.
- GMT-05:00: Eastern
- GMT-06:00: Central
- GMT-07:00: Mountain
- GMT-08:00: Pacific
DST
Adjust the time for daylight savings time. If you’ve set the proper time zone, but your clock is off by 1 hour, try turning this on or off.
- On
- Off (default)
BAT Warning
Lets you know if your vehicle’s battery voltage drops below 11v. This can be a helpful reminder if you’re temporarily running your vehicle with the engine off that you’re putting strain on your battery and shouldn’t keep doing that for too long to ensure you can still start your vehicle next time.
- On
- Off (default)
BAT Saver
If your DFR9 is plugged into a power source that is always on and doesn’t turn off when you turn off your vehicle, your detector will drain your vehicle’s battery. The battery saver option will detect (using GPS) when you’ve been parked (0 mph) for one hour or you’ve lost GPS for an hour (such as when you’re parked in a parking garage) and then turn off your detector.
- On
- Off (default)
Self Test
The self-test plays the different radar and laser alerts on startup. It doesn’t actually do any testing on startup and is mostly there to verify that the speaker and display are working properly, so I normally just turn this off for a silent startup.
- On (default)
- Off
Factory Reset
Reset your settings back to factory defaults. Press “Menu” to reset your settings. There is no confirmation to reset.
This does NOT also delete your GPS lockouts or manually marked locations. Those are cleared in the next menu options.
Delete All Mute?
Delete all of the GPS lockouts you’ve created. Press “Menu” to clear all your lockouts. There is no confirmation to clear.
GPS lockouts are individually created by double pressing the mute button during a false alert. You can also delete single alerts individually by double pressing the mute button while detecting a previously locked out signal.
Delete All User?
Delete all of the manually marked user locations. Press “Menu” to delete all of your user points.
You can also delete single user points individually by double pressing the mark button while detecting a previously created user location.
Ver: 1.02 / 1.01
Tells you the firmware version currently loaded onto your detector.
DB Ver: 18/04/03
Current RLC/speedcam database loaded into the detector.
Exit
Exit out of the menu.
Uniden DFR9 Recommended Settings
While there are no one settings that are perfect for every person in every area, here are some generally recommended settings that you can start with and customize further as you get more familiar with the detector. These settings basically do things like enable some of the additional filters to help quiet down the detector. If you need to make changes such as enabling X band or TSF because they’re used in your area, for example, you should definitely make appropriate location-specific adjustments.
Note: I’ve added a (*) at the start of every setting that I’m changing from the default option.
- *Advanced
- X Band: 100%
- *K Band: 80%
- Ka Band: 100%
- GPS: On
- Speed Camera: On
- Redlight Cam: On
- *RLC Q-Ride: 50mph
- Voice: On
- Ka Freq Voice: Off
- X Band: Off
- K Band: On
- Ka Band: On
- Laser: On
- Ka POP: Off
- K Filter: On
- Ka Filter: Off
- TSF: Off
- K Wide
- Ka Narrow
- Ka Priority
- Mute Mem: X & K
- *All Threat: On
- Color: Red
- Time Display
- Display: Speed
- Speed Unit: mph
- X Band Tone: 1
- K Band Tone: 2
- Ka Band Tone: 3
- Laser Tone: 4
- Auto Mute: On
- Auto Mute Vol: 2
- Dark mode: Dimmer
- Auto Dim Setting
- Bright Level: Bright
- Dim Setting: Dim
- Backlight: On
- *Quiet Ride: 30 mph
- *Limit Speed: Off
- *GMT: As appropriate
- *DST: On/Off as needed
- BAT Warning: Off
- *BAT Saver: On
- *Self Test: Off
Vortex’s DFR9 Settings
These are the settings that I personally run on my DFR9. They may or may not be appropriate for you, of course, but they are what I use. Since I see mostly Ka band here, I run more aggressive filters on K band to help cut down on false alerts on K band.
Note: I’ve added a (*) at the start of every setting that I’m changing from the default option.
- *Advanced
- X Band: 100%
- *K Band: 60%
- Ka Band: 100%
- GPS: On
- Speed Camera: On
- Redlight Cam: On
- *RLC Q-Ride: 50mph
- *Voice: Off
- *Ka Freq Voice: On
- X Band: Off
- K Band: On
- Ka Band: On
- Laser: On
- Ka POP: Off
- K Filter: On
- Ka Filter: Off
- TSF: Off
- *K Narrow
- Ka Narrow
- Ka Priority
- Mute Mem: X & K
- *All Threat: On
- *Color: Blue
- Time Display
- *Display: Spd+Comp
- Speed Unit: mph
- X Band Tone: 1
- K Band Tone: 2
- Ka Band Tone: 3
- Laser Tone: 4
- Auto Mute: On
- Auto Mute Vol: 2
- Dark mode: Dimmer
- Auto Dim Setting
- Bright Level: Bright
- Dim Setting: Dim
- Backlight: On
- *Quiet Ride: 30 mph
- *Limit Speed: Off
- GMT – 8 Hour
- *DST: On/Off as needed
- BAT Warning: Off
- BAT Saver: Off
- *Self Test: Off
Purchase the Uniden DFR9 here.
| This website contains affiliate links and I sometimes make commissions on purchases. All opinions are my own. I don’t do paid or sponsored reviews. Click here to read my affiliate disclosure. |


20 comments
Skip to comment form
Thanks
Thanks for this!
Good morning Vortex,
Question for you. I have a Uniden R3, to get the latest update they are charging $50! Is it worth $50 to update? Thank you so much, you do a terrific job on your web site. Have a Happy New Year.
Richard
Uniden doesn’t charge for there updates on there site. I just checked and downloaded the new update again for free.
Thank you so much for your quick response. Like I said before you do it great job.
HI I have problems installing the new updates from Uniden support site. The downloaded the update tool was successfully installed but it would not update my dfr9. I get the message update fail plug in your detector, I do but still get the same message. Is there a way to solve this problem?
Author
If you need tech support, contact Uniden or hop on the forums. https://www.rdforum.org/index.php?forums/169/
A thought on this issue, the cable may not be a data cable I had similar issues till I used a cable for my phone then it updated flawlessly. 🙂
Fantastic guide, this really helped me setting up my DFR9.
Where is the best place to mount this? I had it hard wired into my convertible Camaro. The installer at Ziebart placed it on the dash by the corner on the driver’s side. It is sounding alerts but thought lower center was the typical mounting choice.
Anybody else’s dfr9 seem to max out at a low sound volume? My dfr7 and friend’s r3 have a much louder speaker.
I love your site.
Question: does the detector detect laser scatter (Ie. if a laser is being used on a car ahead of me will the detector go off)?
Author
Technically it can, but realistically your chances of having it do that are near 0. It’s like asking if you can win the lottery. :p
Thank you! This was a life saver for me on several occasions. I have a question. I’ve driven right pass police/sheriffs over the speed limit and my detector didn’t sound. Is it because they don’t have their radar on or what? Please advise. Thanks again for your help. Or can someone else respond if you know?
Author
Insanely common and you nailed it. Their radar guns were not turned on.
Hi, i just got the DFR9, whats the best setup for southern california that you would recommend. I really dont understand much of detectors. and your videos are a little outdated. Just asking sir.
My DRF9 auto-mutes for K and X, but not Ka. Suggestions??
Do you have the vortex settings for the dfr8
I have auto quiet set to on and volume at 2. K and X band auto quiet but Ka does not.
Thoughts??
How to do a firmware update for the DRF9? Do you have any video step by step sir @Vortex? And thank you for making all these videos for us .